PUBLISHER: Amy Marson CREATIVE DIRECTOR: Gailen Runge EDITOR: Karla Menaugh TECHNICAL EDITOR: Helen Frost COVER DESIGNER: Christina Jarumay Fox BOOK DESIGNER: April Mostek PRODUCTION COORDINATOR: Tim Manibusan PRODUCTION EDITOR: Alice Mace Nakanishi ILLUSTRATOR: Mary E. Flynn PHOTO ASSISTANTS: Carly Jean Marin and Mai Yong Vang HAND MODEL: Kristi Visser COVER AND STYLE PHOTOGRAPHY by Lucy Glover and
INSTRUCTIONAL PHOTOGRAPHY by Diane Pedersen of C&T Publishing, Inc., unless otherwise noted Published by C&T Publishing, Inc., P.O. Box 1456, Lafayette, CA 94549 DEDICATIONFor Eli and Tess,
my favorite people to sew things forACKNOWLEDGMENTS Thank you to my agent, HILARY MCMAHON . Thank you to KARLA MENAUGH for her fabulous job as my editor. To TIMELESS TREASURES FABRICS AND RILEY BLAKE DESIGNS , thank you for providing me with fabric to use for some of the projects in this book. I am so pleased with the wonderful modern Halloween and basic fabrics I was sent by both companies, and I think they add so much style to the completed pieces.
Thank you to the WRITING AND ARTS COMMUNITIES for being supportive and encouraging of what I do. Thank you to EVERYONE WHO LET ME KNOW THEY ENJOYED MY FIRST QUILT BOOK , Modern Selvage Quilting (from C&T Publishing), and suggested that I write another. Thanks to SHANE, ELI, AND TESS for tolerating the sound of my sewing machine running in the background of their lives. introduction Im pretty sure some of the most difficult decisions of my childhood involved what to wear for Halloween. Successful costume choices included the Queen of Hearts, an elephant, a mummyand once, even a superhero! Or kind of. My mother made my shorts, shirt, cape, and hat from a gold patterned upholstery fabric.
Blue felt trim was added, and red tights finished the outfit. I looked fabulous (or thought I did, anyway). But oh, how hard it was every year to narrow all the possibilities down to just one. I had seemingly endless ideas. What figured into my decision-making process was not only what would be fun to wear, but what would be fun to maketo create. When I was young, my crafty mother brought my ideas to fruition and never disappointed me.
As I got older, it was I who, even though I didnt sew much, continued to gather, construct, draw, paint, glue, and otherwise assemble my costumes. Now that I have children of my own, the innovation and improvisation havent stopped. They come up with the ideas, and I, often with their help, make the costumes. For example, when my son was four, he sure made a cute lighthouse. Creativity will always be a huge part of Halloween, and that is one of the main reasons I love it. No matter how many decorations manufacturers continue to mass produce and sell in stores, the one very best Halloween display item is something that you use your own creativity for.
Know what Im talking about? A jack-o-lantern. How do you turn a plain old pumpkin into something magical? You carve it yourself. You decide how it will look. You cut out the design. You perform the makeover, and complete the transformation. It is the original seasonal DIY project.
But Halloween projects youve made yourself dont have to stop at the porch. Or they dont have to be costumes you wear. We quilters can do much more than that. If youre reading this book, Id bet you want to do much more than that. Its time to express your Halloween creativity in fabric. Its time to make pillows and quilts and table runners to place throughout your home.
Like the projects on these pages. So lets get started.  modern halloween sewing Making It Spooky, Yet Stylish Halloween isnt meant to be cute. Leave that for the Easter Bunny. Or at least Halloween for adults doesnt have to be cute. There will be no smiling bats wearing pink hair bows here.
Halloween is the one time of year to embrace the spookier, scarier side of things. The designs in this book are for the modern and mature Halloween enthusiast (doesnt that sound official?). Really, these are projects that can add a unique seasonal touch to your home without making it seem like you have decorated the place for a preschool party. The designs are purposefully modern. They use simple angular shapes and feature areas of negative space (or space filled with a single fabulous, carefully chosen Halloween fabric). Some designs are quite subtle, with minimal details.
Sometimes solid fabrics are used along with Halloween prints and modern basics. The projects here aim to be slightly scary but chic. Choosing Colors and Fabrics 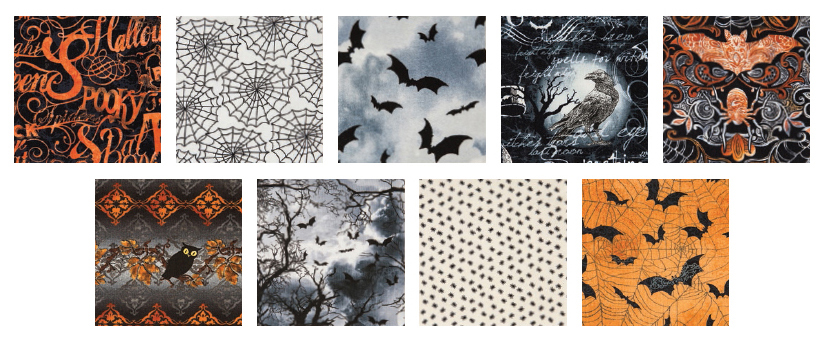 Modern Halloween fabrics (Many of these fabrics are from the Wicked/Wicked Eve collection, by Timeless Treasures Fabrics.)
 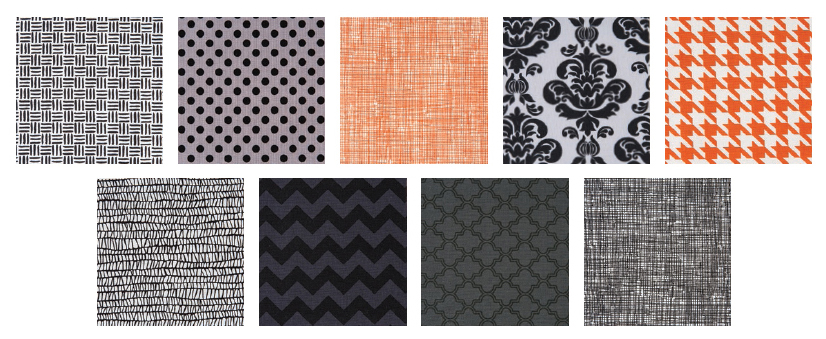 Modern basic fabrics (Several of these fabrics are from Riley Blake Designs and Timeless Treasures Fabrics.) Fabrics that have a mature, subtly spooky appearance complete the look of the modern designs. The color scheme is essential as well. Orange and black are go-to colors for Halloween, but these colors are then complemented by shades of cream, ivory, gray, and charcoal. Purple and lime green, which often show up in Halloween fabrics targeted to a younger audience, are left out completely.
Not every fabric in your project needs to have black cats or ghosts on it. Less is often more. Combining Halloween-themed fabrics with modern basics will make the overall look more stylish and contemporary. So what are possibilities for basics? Be bold. Dont reach only for safe tone-on-tone blenders. Try for geometricsdots, herringbones, or hexagons.
Use crosshatches, chevrons, tossed triangles or rectangles, tiny lines, or stripes. Consider large-scale patterns that look as though they could be wallpaper in a haunted house. Think about designs that arent necessarily sold as Halloween fabrics but would work. Some possibilities are wood grain (haunted house), twigs and branches and leaves (spooky woods), dark clouds, a night sky, or bugs. Check your stash. You may already have some fabrics you can use.
Even if you are purchasing new fabric, resist the urge to buy 100 percent Halloween designs. Your projects will have a more distinctive look if you mix in some basics and unique choices. Also, try to buy fabrics from several different Halloween lines and manufacturers. Challenge yourself to mix and match. About the Designs and Projects Everyone crafts at a different pace, but none of these projects should involve a huge investment of time. I can understand not wanting to spend months creating an heirloom-quality Halloween piece that will be displayed for only a few weeks a year.
Some projects can be made in a couple of hours or in an afternoon; some can easily be made in a weekend. In any event, you certainly dont have to start working on these Halloween projects in July to be sure they are done in time (that is, unless you want to). Each section opener includes a basic technique or block pattern and then specific projects with complete, detailed instructions. The designs involve straight-ahead basic piecing and no paper piecing, as well as several chances for improvisational cutting and sewing. You will have many opportunities to truly express your own creativity in what you make. Beyond the Designs and Projects Because these projects include instructions for a basic design or block as a starting point, if youre so inclined or inspired, you can then do your own thing completely from there.
Next page

 modern halloween sewing Making It Spooky, Yet Stylish Halloween isnt meant to be cute. Leave that for the Easter Bunny. Or at least Halloween for adults doesnt have to be cute. There will be no smiling bats wearing pink hair bows here.
 Modern Halloween fabrics (Many of these fabrics are from the Wicked/Wicked Eve collection, by Timeless Treasures Fabrics.)
  Modern basic fabrics (Several of these fabrics are from Riley Blake Designs and Timeless Treasures Fabrics.) Fabrics that have a mature, subtly spooky appearance complete the look of the modern designs. The color scheme is essential as well. Orange and black are go-to colors for Halloween, but these colors are then complemented by shades of cream, ivory, gray, and charcoal. Purple and lime green, which often show up in Halloween fabrics targeted to a younger audience, are left out completely.