Publisher: Amy Marson Creative Director: Gailen Runge Art Director: Kristy Zacharias Editor: Monica Gyulai Technical Editor: Helen Frost Cover/Book Designer: Kerry Graham Production Coordinator: Jenny Davis Production Editor: Alice Mace Nakanishi Illustrators: Jessica Jenkins and Cherry Guidry Photo Assistant: Mary Peyton Peppo Instructional photography by Diane Pedersen, unless otherwise noted Published by C&T Publishing, Inc., P.O. Box 1456, Lafayette, CA 94549 General Instructions All four Celebrate the Seasons holiday quilts share the same pieced background layout and borders. Refer to this section for all directions. FABRIC I recommend that you prewash and press all your fabrics before sewingthis way you wont be caught by surprise with fabrics that shrink at different rates or colors that bleed. Fabric requirements and cutting instructions are based on fabric that is at least 40 wide and allow for both shrinkage from prewashing and some errors when cutting. The fabric amounts for the pieced blocks include some extra that can be used for the appliqus. WOF is an abbreviation for width of fabric.
Specific yardage and color requirements are included with each project. SEWING All seam allowances are . Be as accurate as possible when piecing. The sashing is part of the construction of each block, and accuracy will determine how well your pieced borders will fit. To keep the batting from migrating through, use a shorter-than-usual stitch length for seams that are pressed open. APPLIQUS These instructions are for appliqus attached using paper-backed fusible web and machine stitching.
Use the layout diagrams in the pattern sheets (P1P12) when preparing the appliqu pieces. The patterns are reversed and numbered in appliqu sequence. Choose your favorite fusible web and follow the manufacturers directions. TIP I recommend using Silicone Release Paper (by C&T Publishing) or a translucent nonstick pressing sheet to preassemble the appliqus before fusing them onto the background fabric. Trace, fuse, and cut out the appliqu shapes. Pin the release paper or pressing sheet on top of the pattern page.
Assemble and fuse the appliqu pieces right onto the nonstick sheet, remove the assembly from the sheet, and fuse it onto the background fabric. Prepare the Appliqus Trace the patterns onto the paper side of the fusible web and write the number on each shape. The numbers indicate the appliqu sequence. Trace 1 of each pattern piece unless otherwise noted. Cut out the traced patterns, leaving about a margin around each piece, and fuse them to the wrong side of the corresponding fabric. Cut out the appliqu pieces on the traced lines.
FUSE AND STITCH THE APPLIQUD BLOCKS Follow the layout diagrams for Blocks A, B, C, and D, and fuse the appliqu pieces onto the background fabric following the manufacturers instructions. TIP Its a good idea to stabilize your background fabric before adding appliqus. Cut the background fabric about 1 larger than indicated and spray with starch, saturating the fabric so that when pressed dry, it is as stiff as paper. Fuse and stitch around the appliqu pieces; then cut the background block to the size in the project directions. Stitch around the fused appliqus using a blanket, satin, or zigzag stitch. Use the needle-down feature on your machine if available.
TIP Test different stitch lengths and widths to get the look you want on the edges of your appliqus. I love to use machine embroidery thread because of its light weight and sheen. HAND EMBROIDERY Some of the quilts require a bit of hand embroidery. Tape the layout diagram to a lightbox or window and place the corresponding appliqud block on top. Trace the embroidery designs onto the right side of the fabric with a fine-tip pen, such as Micron, in the same color as the floss. Use two strands of embroidery floss and either a stem stitch or backstitch.
Take small, even stitches without pulling too tightly. Your stitching will cover up the fine marker lines. 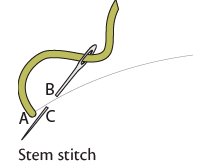
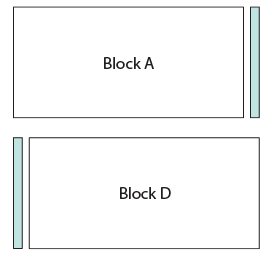
 PIECE THE BACKGROUND BLOCKS Cut the fabric as directed in the charts with each project. Blocks A and D Materials Blocks A and D with appliqu: 2 blocks 12 25 Fabric #2: 2 strips 1 12 for sashing Instructions Sew a sashing strip to the 12 edges: the right edge of Block A and the left edge of Block D. Press the seams toward the sashing.
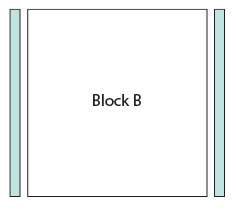
  Block B Materials Block B with appliqu: 20 22 Fabric #2: 2 strips 1 22 for sashing Instructions Sew the sashing strips to the 22 edges of Block B.
  Block C Materials Block C with appliqu: 2 blocks 8 13 Fabric #2: 2 strips 1 8 for sashing Instructions Sew a sashing strip to the 8 edges: the top edge of one Block C and the bottom edge of the other Block C.
  Block C Materials Block C with appliqu: 2 blocks 8 13 Fabric #2: 2 strips 1 8 for sashing Instructions Sew a sashing strip to the 8 edges: the top edge of one Block C and the bottom edge of the other Block C.
Press the seams toward the sashing. 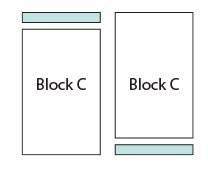
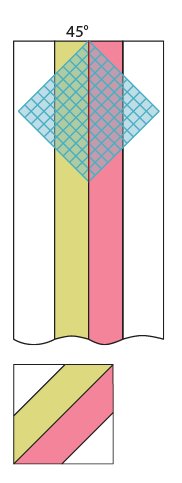
 MAKING THE PIECED BLOCKS Note: Use a shorter-than-usual stitch length for better seams and no batting migration. Block EPieced Border Materials Background fabric: 8 strips 2 WOF Fabric #1: 4 strips 2 WOF Fabric #3: 4 strips 2 WOF Arrange 2 background strips and 1 strip each of Fabrics #1 and #3, with Fabrics #1 and #3 in the middle and the background strips on either side. Sew together to make a strip set. Press all seams open. Repeat for a total of 4 strip sets. Align the 45 line of a 5 square ruler on the center seam of the pieced strips and cut a 5 square block to make Block E.
Repeat to make a total of 20 E blocks. Join 10 E blocks, alternating the direction of the seams, for each of the 2 pieced borders. 
 Block F Materials Background fabric: 6 strips 2 WOF Fabric #1: 2 strips 2 WOF Fabric #3: 2 strips 2 WOF Arrange 3 background strips and 1 strip each of Fabrics #1 and #3. Sew together, offsetting the top of each strip 2 as shown. Press all seams open.
  With Fabric #1 toward the top, align the 45 line of a 6 24 ruler on the top edge of the first strip set.
  With Fabric #1 toward the top, align the 45 line of a 6 24 ruler on the top edge of the first strip set.
Next page



 PIECE THE BACKGROUND BLOCKS Cut the fabric as directed in the charts with each project. Blocks A and D Materials Blocks A and D with appliqu: 2 blocks 12 25 Fabric #2: 2 strips 1 12 for sashing Instructions Sew a sashing strip to the 12 edges: the right edge of Block A and the left edge of Block D. Press the seams toward the sashing.
  Block B Materials Block B with appliqu: 20 22 Fabric #2: 2 strips 1 22 for sashing Instructions Sew the sashing strips to the 22 edges of Block B.
  Block C Materials Block C with appliqu: 2 blocks 8 13 Fabric #2: 2 strips 1 8 for sashing Instructions Sew a sashing strip to the 8 edges: the top edge of one Block C and the bottom edge of the other Block C.
 MAKING THE PIECED BLOCKS Note: Use a shorter-than-usual stitch length for better seams and no batting migration. Block EPieced Border Materials Background fabric: 8 strips 2 WOF Fabric #1: 4 strips 2 WOF Fabric #3: 4 strips 2 WOF Arrange 2 background strips and 1 strip each of Fabrics #1 and #3, with Fabrics #1 and #3 in the middle and the background strips on either side. Sew together to make a strip set. Press all seams open. Repeat for a total of 4 strip sets. Align the 45 line of a 5 square ruler on the center seam of the pieced strips and cut a 5 square block to make Block E.
 Block F Materials Background fabric: 6 strips 2 WOF Fabric #1: 2 strips 2 WOF Fabric #3: 2 strips 2 WOF Arrange 3 background strips and 1 strip each of Fabrics #1 and #3. Sew together, offsetting the top of each strip 2 as shown. Press all seams open.
  With Fabric #1 toward the top, align the 45 line of a 6 24 ruler on the top edge of the first strip set.