Easy Tatting Rozella F. Linden  DOVER PUBLICATIONS, INC.
Mineola, New York Copyright
Copyright 1999 by Rozella F. Linden
All rights reserved. Bibliographical Note
Easy Tatting is a new work, first published by Dover Publications, Inc., in 1999. International Standard Book Number ISBN-13: 978-0-486-29986-0
ISBN-10: 0-486-29986-4 Manufactured in the United States by Courier Corporation
29986410
www.doverpublications.com Introduction The origin of tatting is somewhat of a mystery. However, it was all the rage in the 18th and 19th century among well-to-do and fashionable ladiesfine work for fine ladies.
The term picot is French and many credit French aristocrats with inventing tatting. Perhaps it was borrowed from the working class, who used a similar technique to mend their fishing nets. After fine lace became available in stores, the art of making homemade lace declined for several decades. Today the interest in tatting is growing and many people want to revive the lost art of making tatted lace. The first 90% of learning to tat is learning to make the knot or double stitch. The other 90% is figuring out the instructions.
This is reality, not math. Tatting instructions can be very cryptic. Often those who know how to tat still have trouble with the instructions in most tatting pattern books. I often have to try two or three times before I get some patterns to come out right! The purpose of this book is to provide tatting instructions and patterns for beginners and anyone else who would benefit from seeing how to do it. The illustrations were done using a CAD program and are not always exactly to scale. I have, however, attempted to draw them as close as possible to the correct proportions.
Numbers are used to indicate how many double stitches there are in a ring or chain, or between picots. Letters in the illustrations refer to the written instructions and are used to show where to begin, where to join, etc. Equipment Needed for Tatting Tatting shuttle: A metal one with a removable bobbin and a hook on one end for joining is recommended. Keep extra bobbins on hand for use with different colors of thread. All the projects in this book use one tatting shuttle. Thread: Beginners should use a thick crochet threadsize 5, 8, or 10 will do.
It is easier to learn to tat using a variegated color thread, because the double stitch is easier to see on contrasting colors. Pearl cotton feels, and looks, great and is pleasant to work with. Some crochet thread is not suitable for tatting because it does not have a tight enough twist. Tatting thread (size 70) is very fine. A proficient tatter can quickly make beautiful delicate lace with this kind of thread. The Snowflake Ornament ( page 20 ) is made with fine tatting thread.
Crochet hook, or large sewing needle: This is used to work in the ends. Scissors or other cutting instrument: A pair of nail clippers fit easily in a tatting bag with the other equipment. Small scissors or a seam ripper will also work well. Quilters T-pins: These are used for positioning and blocking the finished piece. Stiffening medium: My grandmother always used sugar water to stiffen her fine things. Corn starch, laundry starch, or commercial stiffening products made especially for crocheted and tatted items also work.
Spray starch tends to flake off and look nasty, and is not recommended. Small zippered bag: All the essentials fit easily in a to go tatting bag. The time spent waiting for an appointment can be profitably spent working on a tatting project. This is a good way to meet people, as I am often interrupted by someone inquiring about what Im making. Abbreviations
| + | picot used for joining |
| = | join to picot already made |
| small picot |
| medium picot |
| large picot |
| very large picot |
| ds | double stitch |
Ring (3 = 3 3 2 1 1 2 3 3 + 3) Work a ring with 3 double stitches, join to previous ring, work 3 double stitches, small picot, 3 double stitches, medium picot, 2 double stitches, large picot, 1 double stitch, very large picot, 1 double stitch, large picot, 2 double stitches, medium picot, 3 double stitches, small picot, 3 double stitches, small picot to be used for joining another ring later, 3 double stitches. Close ring.
Chain (6 6) A chain of 6 double stitches, small picot, 6 double stitches. Turn This means to turn the work over. Sometimes called reverse work (RW) in tatting instructions. Basic Tatting Instructions First half of double stitch Hold thread as shown ( Fig. 1 ). 1 Work the double stitch between the first finger and the middle finger. 1 Work the double stitch between the first finger and the middle finger.
The thread around the right hand forms a loop. Pass the shuttle under the thread in the left hand, then back over ( Fig. 2 ).  Fig. 2 At this point the knot is around the thread in the left hand. Relax the left hand so that the thread is limp.
Transfer the knot to the shuttle thread by pulling the shuttle thread tight, then spreading the fingers of the left hand to pull the knot into place ( Fig. 3 ).  Fig. 3 Second half of double stitch The thread between the shuttle and the left hand hangs in a loop. Pass the shuttle over the thread in the left hand, then back under it ( Fig.
  Fig. 4 Transfer the knot as before ( Fig. 5 ). 5 ).
A correct double stitch will easily slide back and forth on the shuttle thread. To close a ring, slide all the double stitches together by pulling the shuttle thread while holding the double stitches with the left hand. A space left between two double stitches makes a picot (pronounced peek-oh ), when the knots slide together by closing a ring or pulling a chain together ( Fig. 6 ).  Fig. 6
 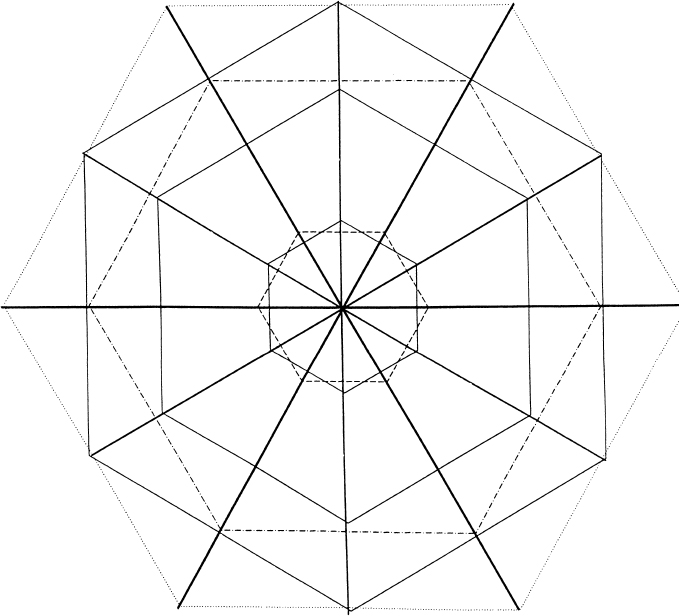 This hexagon template can be used to position six-sided pieces correctly. 6
  This hexagon template can be used to position six-sided pieces correctly.
Part OneJust Rings One tatting shuttle filled with any size and color thread will make all these items. Size 8 white crochet cotton was used for the examples in this book. Many of these items are used as part of the more involved projects later. Center Ring 1A Ring (4 4 4 4 4 4) Close ring and tie ends to make sixth picot. This is used when a row of chains is worked around the center ring. 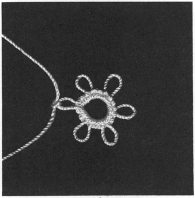 Center Ring 1B Ring (2 4 4 4 4 4 2) Close ring and work in ends.
  Center Ring 1B Ring (2 4 4 4 4 4 2) Close ring and work in ends.
Next page





 DOVER PUBLICATIONS, INC.
 Fig. 2 At this point the knot is around the thread in the left hand. Relax the left hand so that the thread is limp.
 Fig. 3 Second half of double stitch The thread between the shuttle and the left hand hangs in a loop. Pass the shuttle over the thread in the left hand, then back under it ( Fig.
  Fig. 4 Transfer the knot as before ( Fig. 5 ). 5 ).
 Fig. 6
  This hexagon template can be used to position six-sided pieces correctly. 6
  Center Ring 1B Ring (2 4 4 4 4 4 2) Close ring and work in ends.