Table of Contents
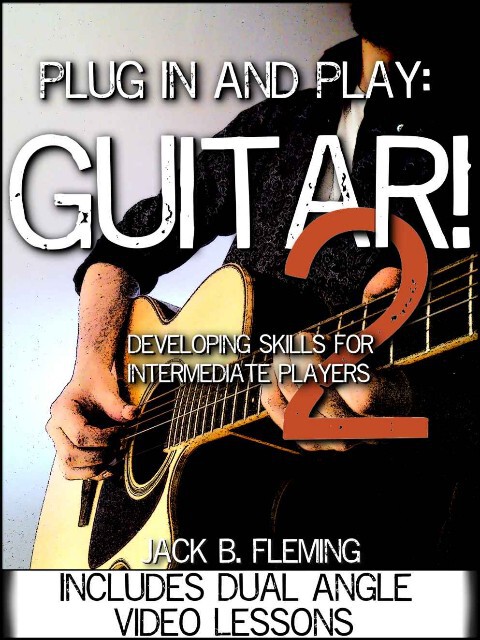
Plug In And Play: Guitar II
How To Expand And Improve Your Guitar Playing Skills
By
Jack B. Fleming
www.jbfmusic.com
Copyright 2016 by Jack B. Fleming
About The Author
I've played guitar for around fifteen years and have been a gigging musician for over a decade. Aside from this, I work as a composer, author, producer and session musician. I also teach guitar, bass, song writing and ukulele in person and via Skype. I achieved a First Class BA(Hons) in Professional Musicianship. During the course of my studies I was lucky enough to attend master classes from great players such as Guthrie Govan, Adrian Legg, Carl Verheyen, Steve Smyth, Chris Eaton, Aynsley Lister, Paul Bielatowicz, Scott Mcgill and Billy Sheehan. I've also worked for bassist Herbie Flowers (Lou Reed, David Bowie) teaching song writing, performance/stage skills and guitar. So I'm filled up with otherwise useless and often rather nerdy guitar information!
More advanced players may want to check out my Youtube channel (Jbf Music & Guitar Lessons) which hosts tutorials, tabs, honest gear reviews, lessons, riffs, loads of original jam tracks and regularly features new weekly uploaded content. At the time of writing I lend my guitar playing skills to the UK's only Sousxie And The Banshees Tribute Band Lizzie And The Banshees and assume the role of bassist for the Edinburgh based function band The Heebie Jeebies
Among other projects, I also teach in person and via Skype, feel free to drop me a line:
Happy Playing!
You Can Find Me On:
Youtube
Instagram
Facebook
Twitter
Sound Cloud
And Of Course, My Website
Introduction
Hello and welcome to the second instalment of my Plug In And Play Guitar series. This eBook follows on from where the last one left off, as well as going into greater detail on previously covered topics.
This time we will be looking at: tuning, harmonics, time signatures, strumming, picking, chords, melodies, arrangement, reading guitar tab and even a little bit of lead playing. Each example has been taken from a well known song to make sure that you're not just doing technical exercises with no musical merit. As before, each song has a free comprehensive video lesson - all available in this YouTube playlist . So tune up, strap on, dig in, rock stance at the ready, time to Plug In And Play! Sorry, I'm really not American, or cool enough to pull that last sentence off...
If you don't have the first Plug In And Play eBook it can be downloaded for free in all major formats:
Amazon (UK)
Amazon (US)
Itunes
Sony Kobo
Barnes & Noble (Nook)
ePub, Mobi & PDF
Tuning
If you're just starting out, I would highly recommend investing in a tuner. For a few years now companies have sold clip on guitar tuners- they clip on your head stock and find the pitch through vibrations rather than a built-in microphone. This is really handy, because if you're in a noisy environment the tuner won't get as easily confused by the background ruckus. They're great for beginners to pros, provided you buy a decent brand. There are some quite frankly awful ones out there, so just make sure you do a little bit of research. If you don't want to splash the cash why not have a look at a free tuning App?
If this has piqued your curiosity you can find a video demo and quick overview here . Aside from using a tuner there are a few ways you can tune a guitar. Although to be in standard 440 Hz tuning you'll generally need a reference pitch. On a side note, there have been some mumbles around the Internet that music should actually be 432 Hz. It's quite interesting (while largely debunked from a scientific perspective), but some of the conspiracy theories associated with it are just far to grandiose to cover in this humble eBook.
Method 1
A is tuned from Es 5th fret
D is tuned from As 5th fret
G is tuned from Ds 5th fret
B is tuned from Gs 4th fret
e is tuned from Bs 5th fret
Method 2
Natural harmonics occur due to string tension and length, you could think of them as sort of subdivisions, ratios or fractions. To play a natural harmonic, lightly rest your finger on the string directly above the fret wire. Unlike usual fretting, you don't actually push the string down. This technique is really much easier to understand via demonstration, so click here for the video . Like before, each string is tuned from the previous one, but using natural harmonics:
As 7th fret is tuned from Es 5th fret.
Ds 7th fret is tuned from As 5th fret.
Gs 7th fret is tuned from Es 5th fret.
Bs 5th fret is tuned from Gs 9th fret.
es 7th fret is tuned from Bs 5th fret.
es 7th, Bs 5th and Gs 9th are actually all the same note. This method is maybe a bit trickier; due to using the harmonics it can also be slightly less accurate than the first method depending on your guitar's intonation (if it stays in tune all the way up the neck). The benefit is that you hear a sort of vibration between the two notes, which syncs up when the two are in tune.
If you don't have a tuner to hand, but have a decent ear, you could also try using my YouTuners:
Acoustic Guitar
Electric Guitar, Clean
Electric Guitar, Dirty
Digital/Synth Tone
These are just audio clips of each string being played. Check out the description in the video for each string.
On a slight tangent, there are a lot of free resources for guitarist now, some of which I've listed in the back of this eBook in a section called
Reading Guitar Tab
Guitar Tab is pretty intuitive and relatively easy to read. Unlike standard notation, Tab often doesn't have note values. So, ideally you need to know the song, or have a recording to accompany the Tab. To circumvent this issue, sometimes standard notation is shown directly above the tab. In this eBook the note stems are integrated into the tab. If that sounds like total nonsense don't worry about it, just read on! Actually, I'd say that's quite good advice for this eBook in general, because the more you learn, the more things often unfold and can start to make more sense. Anyway, guitar Tab in a nutshell; the horizontal lines represent the strings and any number represents the fret.
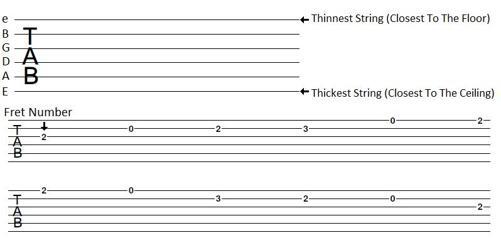
In the above example, you would play: the G string 2nd fret, B string open (un-fretted), B string 2nd fret, B string 3rd fret, e string open, e string 2nd fret. Then that in reverse: e string 2nd fret, e string open, B string 3rd fret, B string 2nd fret, B string open (un-fretted), the G string 2nd fret. It's a bit wordy explaining it like that, so this video might be more helpful.


