Luis Gonzalez - DIY Photo Equipment, Studio Lighting & Camera Support Systems
Here you can read online Luis Gonzalez - DIY Photo Equipment, Studio Lighting & Camera Support Systems full text of the book (entire story) in english for free. Download pdf and epub, get meaning, cover and reviews about this ebook. year: 2012, publisher: Luis Gonzalez, genre: Children. Description of the work, (preface) as well as reviews are available. Best literature library LitArk.com created for fans of good reading and offers a wide selection of genres:
Romance novel
Science fiction
Adventure
Detective
Science
History
Home and family
Prose
Art
Politics
Computer
Non-fiction
Religion
Business
Children
Humor
Choose a favorite category and find really read worthwhile books. Enjoy immersion in the world of imagination, feel the emotions of the characters or learn something new for yourself, make an fascinating discovery.

- Book:DIY Photo Equipment, Studio Lighting & Camera Support Systems
- Author:
- Publisher:Luis Gonzalez
- Genre:
- Year:2012
- Rating:4 / 5
- Favourites:Add to favourites
- Your mark:
DIY Photo Equipment, Studio Lighting & Camera Support Systems: summary, description and annotation
We offer to read an annotation, description, summary or preface (depends on what the author of the book "DIY Photo Equipment, Studio Lighting & Camera Support Systems" wrote himself). If you haven't found the necessary information about the book — write in the comments, we will try to find it.
Luis Gonzalez: author's other books
Who wrote DIY Photo Equipment, Studio Lighting & Camera Support Systems? Find out the surname, the name of the author of the book and a list of all author's works by series.

DIY Photo Equipment, Studio Lighting & Camera Support Systems — read online for free the complete book (whole text) full work
Below is the text of the book, divided by pages. System saving the place of the last page read, allows you to conveniently read the book "DIY Photo Equipment, Studio Lighting & Camera Support Systems" online for free, without having to search again every time where you left off. Put a bookmark, and you can go to the page where you finished reading at any time.
Font size:
Interval:
Bookmark:
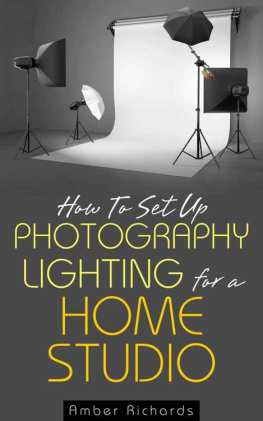
DIY Photographic Equipment,Support Systems & Studio Lighting
Luis E Gonzalez
Copyright Luis E Gonzalez2012
SmashwordsEdition
Table of Contents
Chapter 1 DYI PhotoUmbrella
Chapter 2 Studio Lights SetUp
Chapter 3 Camera SupportSystems
DIY photo
I like to take photos ofalmost everything, but I also like D.I.Y photo equipment projectswhenever possible.
An easy project which shouldtake no more than an hour is making your own reflectivephotographic umbrella. Learning how to make your own photographyequipment can be fulfilling, and save you some hard earned cash inthe process.
You need: an umbrella, spraypaint, cutting pliers, lightsource , electrical type clamps (lookslike a "?" and it's used to attach electrical tubing to walls).They are also known as Adel-style or "P" clamps, anyway see photo,and a tripod orstand.
Cloth spray paint works wellbut with care any spray paint will do. Chrome for a strongerreflection, white for a softer reflection and gold for a warmingeffect. The outside color is up to you.
Prepare the working surfaceusing newspapers or tarp, open your umbrella and spray paint theinside first (several thin coats), let it dry. Now paint theoutside and again, let it dry.
Next cut the handle of theumbrella with cuttingpliers at the point where thehandle meets the metal/rod. This will make it easier to attach toyour tripod.
Attaching the umbrella toyour tripod: Use the "?" clamp by inserting a screw through thepre-made hole and through the upper base of the tripod. Ensure thatthe screw is long enough. Make sure that the "?" clamp bend isabout the same diameter as that of the metal tube/rod of theumbrella to eliminate movement. If you need to, you can insertrubber tubing into the metal tube/rod and the "?" clamp will holdbetter. Insert the metal portion of your umbrella through the bendof the clamp. You're done.
The umbrella works well byitself by reflecting available light back to your subject or youcan attach a light source to it. There are several grill clamplights at many hardware stores and they range from about $8 to $12each. Use daylight bulbs or adjust your camera's color balance toaccept other tungsten type bulbs .
You should also considerattaching any weighted material to the base of your tripod forwindy conditions. Sand bags are good for this.

Lights for the photographystudio are different from portable flashunits . They are much more powerful, areheavier, recycle faster, and off course are more expensive. Onemain studio unit and some accessories are really all you need,unless you have a large studio, in which casetwo units wouldserve you better.
A photo studio canbe set up almost anywhere, a spare room, the garage, a loft, acorner of your house, or the patio. My studio is nothing more thanfour heavy canvas walls under a porch. I chose the location becausethe porch has a high ceiling and a ceramic tilefloor.
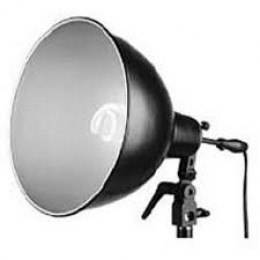
Main studiolight . Usually a photo-flood or flashwhich provides the main source of illumination. Most are selfcontained with all of the controls in the rear of the unit. Theycan run on batteries or preferably connected to an electricalsource. They are heavy and expensive but much more efficient andreliable than a camera mounted flash unit.
Most studios will also needto have at least one modelinglight . This light is a simple photo floodlight or even a halogen light which provides continuousillumination and give the photographer an idea of the lightingconditions that will be created when the flash is fired. They aremostly set up next to the main studio light just for this reason ifthey are not already part of the main light unit.
Slave flashunits. Theyare units that react to the burst of light from the main flash unitvia a sensor and add extra light or act as fill-in when needed.They are usually placed at a 90 degree angle from the mainunit.
Studio lights can have severalaccessories attached to them to help guide the light to where thephotographer wants it.
Barndoors aresquare plates that corral the light from the main unit or otherlight sources and direct the burst towards the subject. They can bewidened to enlarge the lighted area or closed to shortenit.
Snoots. These are cone lookingattachments that direct an ever decreasing beam of light to aspecific part of the subject. Mostly used to highlight hair orbackgrounds.
Softbox. They are box/square like covers,whose front element is cloth or other translucent material and areattached over the light source and have the effect of producing asofter light which in turn creates a more natural lookingillumination that mimics indirect sunlight. With their use, theflash can be aimed directly towards the subject without the need ofhaving to bounce the light.
Reflectiveumbrellas . Made specifically forphotographic use, and you can easily make your own, are used toreflect light to the subject thus having a diffusing effect. Theycan be used alone as a reflector would be or with an attached flashunit aimed at the umbrella's interior to bouncelight .
Focusingspot. Verysimilar to a snoot, their use is specialized for the creation of anarrow beam of light and mostly applied for specialeffects.
All your studio lights need a standand when choosing one try to go for the sturdier ones with mostjust being sturdy tripods.
Studio kits are sold by severalmanufactures and range in price from a couple of hundred dollars toa couple of thousand. Choose only what you need and add as the needincreases. The most basic of kits go for about $149.00.
Paint your studio in non glossycolors; white to semi white is best, as most colors can produce atint/cast on your photos. The same goes for the ceiling and floor.Have several electrical extension cords, power outlets,backgrounds, some props, backdrops, storage space and seating. Ifpossible choose a location that has at least one window to allowsunlight. Regular lights should be dimmed or turned off beforetaking the photo, unless they are photo lights to reduce the riskof producing color cast. Studio lights produce heat, especiallyhalogen, so provide some sort of ventilation.
Camera Support Systems
Most photographers willneed tripodsfor photography, however, a tripod is not the only means to supporta camera and lens combination.
Thephotographic tripod isone of the most useful accessories that you can have if yourintention is to be serious about photography. There are severaltypes and several materials from which they areconstructed.
Most tripods have three legs, hencethe name tripod (three legs). Most are made from aluminum, althoughrecently several have been made out of carbon fibers due to thismaterial's light weight and sturdiness.
When buying your tripod, choose amodel that will allow you flexibility. The best models allow you tomove the legs independently, remove the center column to lower itto the ground, have a movable or rotating head to allow for quickmovement, and have options for the legs or base for grippingsurfaces.
For photography the model tochoose is one designed specifically to be used in photography,mostly referred to as SLRTripods . There are three maintypes. Table top, which are small models meant to be used on top oftables and to be used to photograph small items, and usually inthe studio .Ebay sellers swear by them.
Standard models arewhat their name suggest the average. They are meant to support mostSLR or DSLR and the lens. They are light weight yet sturdy, thelegs expand independently and are coated in water/rust resistantpaint. The base offers rubber feet for use on slippery surfaces,and spikes for ground use.
Next pageFont size:
Interval:
Bookmark:
Similar books «DIY Photo Equipment, Studio Lighting & Camera Support Systems»
Look at similar books to DIY Photo Equipment, Studio Lighting & Camera Support Systems. We have selected literature similar in name and meaning in the hope of providing readers with more options to find new, interesting, not yet read works.
Discussion, reviews of the book DIY Photo Equipment, Studio Lighting & Camera Support Systems and just readers' own opinions. Leave your comments, write what you think about the work, its meaning or the main characters. Specify what exactly you liked and what you didn't like, and why you think so.