Two Cycle Carburetor
And the Back Alley Mechanic
by Alex R Casey
Smashwords Edition
Copyright 2014 Alex R Casey
Two Cycle Carburetor
And the Back Alley Mechanic
Content
: Two CycleCarburetor
: Back AlleyMechanic
: WalbroCarburetor
: ToolsNeeded
: AirPressure
: DigitalCamera and Marker
: Working onCarburetor
: Testingfor leaks
: FuelAdjustment Screws
: RemovingNeedle Assembly
:Rejuvenating Gaskets
:Re-Assembling
Chapter 1
Two Cycle Engine Carburetor
The two cycle engine carburetor is designedto function under all operating angles. This carburetor is found onchainsaw engines, weed eaters, and other power tools thatoperate
at all angles.
The carburetor needs to deliver the exactamount of fuel at all operating speeds and angles of the powertool.
This type of engine and the operating anglesinvolved make the simple gravity flow fuel system impossible. Thetwo cycle carburetor uses the internal pressures of the engine tooperate a diaphragm within the carburetor to pump fuel.
The carburetor has a needle valve much thesame as in the four cycle carburetor. This needle allows thecorrect amount of fuel to pass through the unit.
The fuel chamber in a two cycle carburetor ismuch smaller than a four cycle carburetor. Because the fueldelivery is pressurized this design of the fuel chamber works verywell. At some time or other the workings of the carburetor willstart to fail and eventually fail
completely. The first sign is poor startingand stalling. As the carburetor internal diaphragm hardens overtime, the pumping action is reduced and the engine starves forfuel. The diaphragm may crack, and when this happens only acarburetor rebuild kit will help. This is the time for the backalley mechanic to come to the rescue.
Chapter 2
Back Alley Mechanic
The definition I give for the term back alleymechanic is as follows. One who is not a professional mechanic anddoes not work in the field of small engine repair. Also a backalley mechanic does not have all the tools available such as theprofessional has. This person would be someone who attempts the oddrepair with what he has at his disposal.
This book is written for this type of person.You the back alley mechanic doesn't want to put a whole lot ofmoney into a repair and then find out the engine still does notwork. If you can rejuvenate the carburetor diaphragm, and provesthat the diaphragm is the only trouble keeping your engine fromoperating properly; then a carburetor rebuild kit is in order.These kits run around thirty dollars. If you go and purchase acarburetor kit, write down the model and serial number found on theside of the carburetor.
Chapter 3
Walbro Carburetor
I have chosen the Walbro two cycle carburetorfor this book, as many small engines use
this carburetor.
You have a two cycle engine that just quitsor you have a lot of trouble starting it and keeping it running.This book will show you how to do simple trouble shooting andrepairs with just a few tools.
Chapter 4
Tools Needed
Basically all you will need is a short pieceof fuel line, about 12 inches long, the same size in thickness thatthe engine uses, a Philips screwdriver, a flat blade screwdriver,and tweezers. An old towel to work on, black marker pen, WD40, anda container to hold screws and small parts. A small container tosoak the carburetor gaskets in WD40.
Chapter 5
Air Pressure
Mark one end of the 12 inch fuel line withthe black marker pen, you will be using this tubing to blow throughand you don't want to get the ends mixed up. A person can produceabout two pounds of pressure when they blow hard. You will producethe air pressure to test the carburetor and blow out the fuelpassages.
Chapter 6
Digital Camera and Marker
You have removed the carburetor from theengine. As you removed it you have taken notice of how all theparts have connected together. You have used your black marker penon parts so you will know how they go back together. Use a digitalcamera as you proceed, this way you can always go back and look atthe pictures. Before you start working on the carburetor,thoroughly clean off the outside of the carburetor. Kerosene workswell to remove oil and grime. Rags and An old tooth brush worksgood for cleaning. Commercial spray can carburetor cleaner is alsogood to have when cleaning the carburetor. Use safety glasses toprotect your eyes when working on your engine and carburetor.
Chapter 7
Working on the Carburetor
Place the carburetor on an old towel and workin good light where you will not be
disturbed.
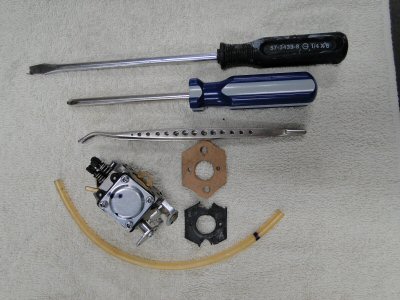
This picture shows the carburetor and toolsneeded to do the job.
Notice the gaskets in the picture, the newgasket was copied from the old one.
If you decide to make new gaskets, placeslike Canadian Tire or Auto part stores sell gasket material inrolls. A leather punch which dollar stores sell, works good forpunching the holes. A sharp knife or hobby utility knife will dofor cutting out any large circular holes. The upper and lower smallpunched holes in the gasket between the carburetor and engine mustmatch exactly, these ports are where the pressure comes from theengine to operate the fuel pump diaphragm in the carburetor to pumpfuel. If you make your own carburetor to engine gasket, the gasketmust stand up to high heat. Auto supply stores may sell gasketmaterial for engines. The gasket material must stand up to highheat as the carburetor is connected to the combustion chamber.
Picture ofTools
Chapter 8
Testing for Leaks
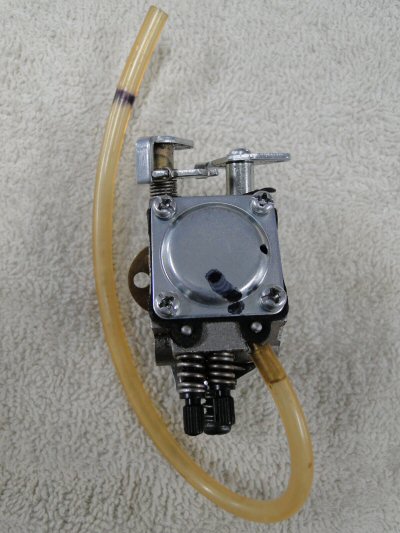
This picture shows you where to connect theplastic tubing to, when testing for leaks. Any gasket that does notseal properly will leak air. If there is an air leak in thegaskets, the fuel pump diaphragm, and metering diaphragm will notfunction properly and the engine will starve for fuel.
To test for leaks place the tubing onto theintake of the carburetor, and place the other end in your mouth,(end marked with black marker pen). Blow as hard as you can, thecarburetor should not experience a loss of pressure. Thecarburetor should appear as it is blocked entirely. If youexperience a loss of pressure and you have to keep blowing tomaintain pressure, there is another test to further explore theproblem. Dangle the carburetor into a glass jar full of water whileyou are blowing on the end of the tubing. If the gaskets areleaking, you will see tiny bubbles around the edge of the gaskets.It there is no bubbles on the edge of the gasket but the bubblesare coming out of the carburetor, then this may indicate a leakingneedle valve
Picture ofPressure Testing
Chapter 9
Fuel Adjustment Screws
Notice the two fuel adjustment screws on thebottom of the carburetor. They are both of different lengths. Thereis a stamp on the carburetor near each adjustment screw. The screwto the right is H, for high speed, the left is stamped L for lowspeed. Take note which screw goes where, so you will know when youreassemble.
When you remove the fuel adjustment screwsfrom the carburetor, you might want to cut grooves into the headsof the screws. This way you can use a flat blade screwdriver toadjust with.
Next page


