Wood Penguin Waddles in Lifelike Manner
Although hes remarkably realistic in color, size and also in his manner of getting about, this penguin is made of wood and is pushed with a stick. Body and head are shaped from one piece of  -in. plywood while the wings and legs, or feet, are separate parts cut from -in. material and pivoted to the body. The curve of the feet is the important thing as it is this curve which allows the penguin to walk in a lifelike manner. Of course, the feet must be pivoted so that they swing freely. This is done by drilling an oversize hole in each leg for a round-headed screw. A thin washer is placed over the screw between the leg and the body and also under the screw head. The wings can be pivoted in the same way.
Dick Hutchinson, Ithaca, N. Y.
BIRD HUTS and BIRD HOTELS
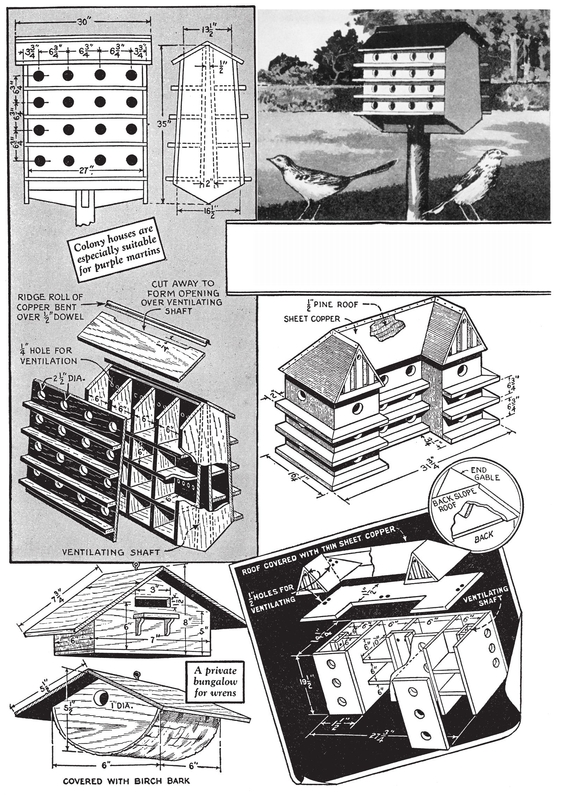
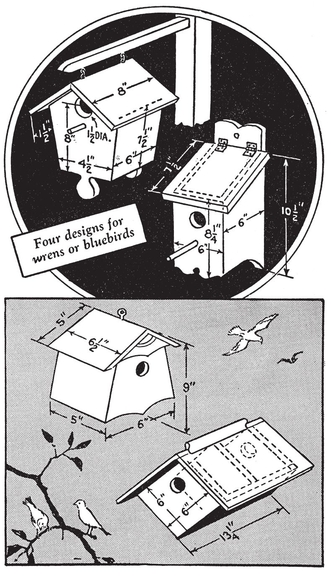
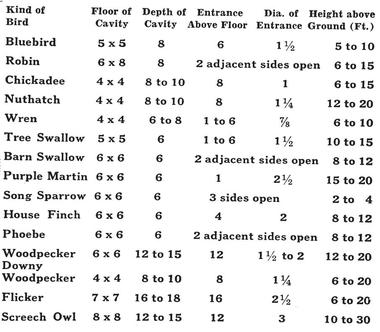
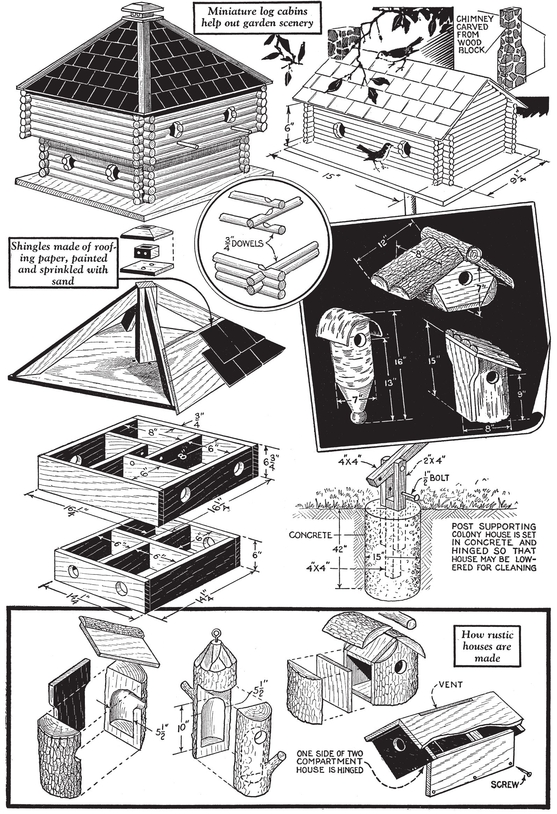
H ERE are several designs for bird houses that should meet the requirements of almost any lover of birds. Among those shown, are colony houses, four-apartment log cabins and single-apartment homes of rustic design, which are made from short sections of logs. Essential dimensions in building bird houses are the sizes of the nesting compartment and the entrance hole, which are given in the table. For colony houses, use -in. selected cypress or California redwood for durability. Small single-apartment homes, for wrens and bluebirds, may be constructed of lighter material, and require no perch as the birds fly directly into the entrances. The small frame houses and the log-cabin types should be colored with brown or green shingle stain, while white paint, with a harmonizing trim color, is best for colony houses. The latter should be mounted rigidly on a stout post, which is pivoted at the bottom so that they can be lowered for cleaning. Also, note that the colony houses have a built-in system of ventilation, which is essential. The construction of the rustic-bark homes is clearly shown. Those made from single logs are ripped, and, after the cavity has been chiseled out, the halves are fastened together with wire or large screws. A thin coating of asbestos-roofing cement spread on the joining faces of the two halves will keep water out of the nesting cavity.
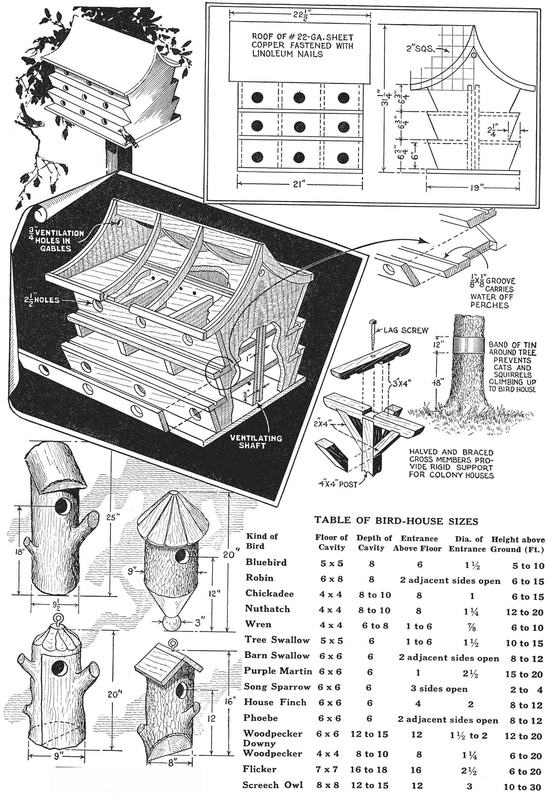
TABLE OF BIRD-HOUSE SIZES
Boomerangs are Fun
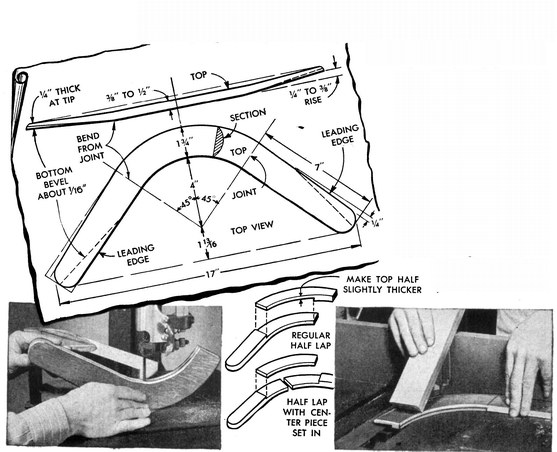
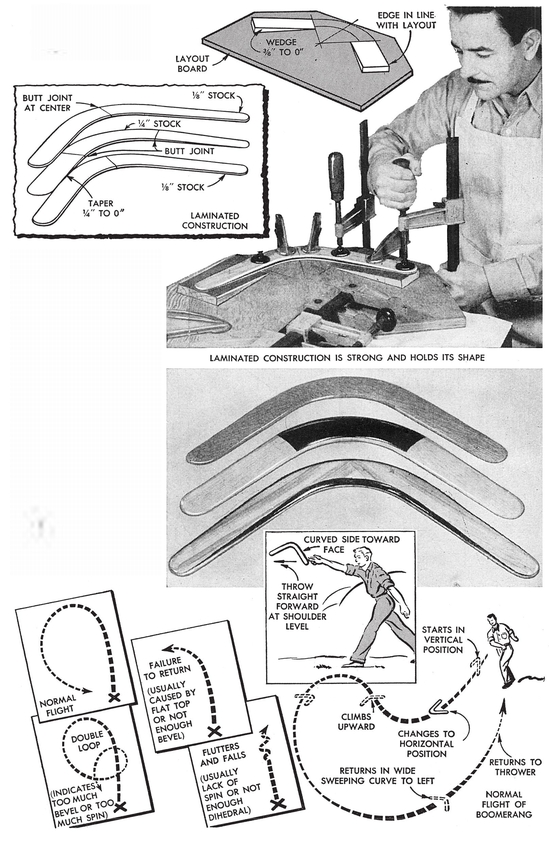
When made and thrown correctly, boomerangs will describe a loop in the air and return to the thrower. Oak, maple or other tough wood is best to use. Laminated construction (several thin pieces glued up to provide the required thickness) is best because of less tendency to warp. However, you can use solid stock  in. thick. In either case, band-saw a piece to a size and shape to represent one half of the completed boomerang. Then rip this piece in half to produce two identical pieces. Glue these to gether to form the completed shape, using a half-lap joint. You can use a regular half lap or one with a center piece set in as indicated, the latter being stronger. A joint is necessary to prevent splitting in the center. Follow the photos and diagrams in gluing up the joint. The top surface is rounded and the bottom is flat except at the tips where it is beveled. If you throw left-handed, bevel the corners opposite those indicated. Normal flight is shown below. The diagrams also show some of the results of faulty construction and how to correct them. In throwing, use plenty of wrist action for a fast spin, yet not too much, as indicated in the lower left hand diagram. Test the boomerang on a calm day as it is erratic in a breeze
Cut outlined shape from  -in. stock, then rip to get two identical pieces
Cut a half-lap joint with a dado head or straight molding cutter. Leave the top lap a little thicker than the bottom
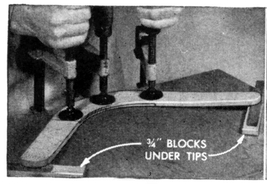
Glue the joint. Spring the tips up. ward on blocks to get required rise
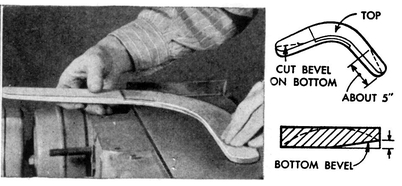
Sand or plane the bottom bevelabout 1/16 in. probably will be enough. You can increase it later if it is necessary
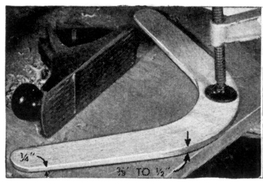
Plane the top surface from joint to tip
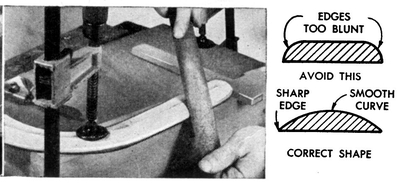
Round the top surface with a wood rasp and sand smooth
ITS TIME for KlTE FLYING
Aerial photography, novel kites and quick-acting reels lend new thrills to kite flying
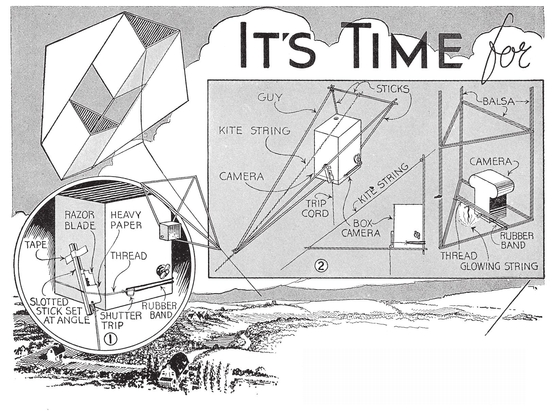
T HINK of the fun youll have taking picturesreal aerial views of the countryside from a high-flying box kite. Its easy when you rig the simple apparatus detailed in Figs. 1 and 2. A triangular frame, to which the camera is lashed, is fastened to the kite string just below the bridle. The camera is lashed in the bottom triangle with a thread holding the shutter release against the pull of a rubber band. Underneath the string is a safety-razor blade sliding in a slotted stick as in Fig. 1. When you pull the trip cord, the razor blade severs the string attached to the rubber band, thus tripping the shutter. Another arrangement, shown at the right in Fig. 2, makes use of a glowing string, the latter attached to a thread holding the shutter release. The string can be 4 or 5 in. long. No separate sling is used, the camera being lashed directly to the frame of the kite. When youre ready for launching, you light the end of the string and blow out the flame as soon as the string starts to glow. Then send up the kite in a hurry. When the glowing string reaches the thread holding the shutter, you have your picture. The secret of taking good pictures in this way is the selection of a day when the wind is blowing steady so that you can maneuver the kite into the desired position.














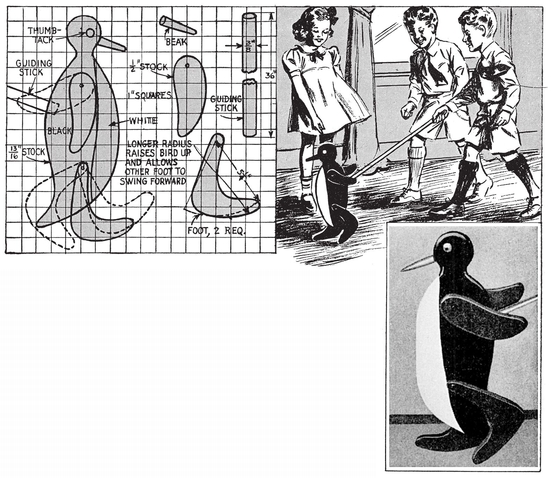
 -in. plywood while the wings and legs, or feet, are separate parts cut from -in. material and pivoted to the body. The curve of the feet is the important thing as it is this curve which allows the penguin to walk in a lifelike manner. Of course, the feet must be pivoted so that they swing freely. This is done by drilling an oversize hole in each leg for a round-headed screw. A thin washer is placed over the screw between the leg and the body and also under the screw head. The wings can be pivoted in the same way.


 in. thick. In either case, band-saw a piece to a size and shape to represent one half of the completed boomerang. Then rip this piece in half to produce two identical pieces. Glue these to gether to form the completed shape, using a half-lap joint. You can use a regular half lap or one with a center piece set in as indicated, the latter being stronger. A joint is necessary to prevent splitting in the center. Follow the photos and diagrams in gluing up the joint. The top surface is rounded and the bottom is flat except at the tips where it is beveled. If you throw left-handed, bevel the corners opposite those indicated. Normal flight is shown below. The diagrams also show some of the results of faulty construction and how to correct them. In throwing, use plenty of wrist action for a fast spin, yet not too much, as indicated in the lower left hand diagram. Test the boomerang on a calm day as it is erratic in a breeze