Popular Mechanics Co. - Projects for the Young Mechanic: Over 250 Classic Instructions & Plans
Here you can read online Popular Mechanics Co. - Projects for the Young Mechanic: Over 250 Classic Instructions & Plans full text of the book (entire story) in english for free. Download pdf and epub, get meaning, cover and reviews about this ebook. year: 2013, publisher: Dover Publications, genre: Children. Description of the work, (preface) as well as reviews are available. Best literature library LitArk.com created for fans of good reading and offers a wide selection of genres:
Romance novel
Science fiction
Adventure
Detective
Science
History
Home and family
Prose
Art
Politics
Computer
Non-fiction
Religion
Business
Children
Humor
Choose a favorite category and find really read worthwhile books. Enjoy immersion in the world of imagination, feel the emotions of the characters or learn something new for yourself, make an fascinating discovery.

- Book:Projects for the Young Mechanic: Over 250 Classic Instructions & Plans
- Author:
- Publisher:Dover Publications
- Genre:
- Year:2013
- Rating:4 / 5
- Favourites:Add to favourites
- Your mark:
Projects for the Young Mechanic: Over 250 Classic Instructions & Plans: summary, description and annotation
We offer to read an annotation, description, summary or preface (depends on what the author of the book "Projects for the Young Mechanic: Over 250 Classic Instructions & Plans" wrote himself). If you haven't found the necessary information about the book — write in the comments, we will try to find it.
The step-by-step instructions are accompanied by charming drawings and photos that clearly illustrate each project. Girls and boys will be captivated by these antique instructions and plans, and adults will appreciate the projects nostalgic appeal.
Popular Mechanics Co.: author's other books
Who wrote Projects for the Young Mechanic: Over 250 Classic Instructions & Plans? Find out the surname, the name of the author of the book and a list of all author's works by series.


Projects for the Young Mechanic: Over 250 Classic Instructions & Plans — read online for free the complete book (whole text) full work
Below is the text of the book, divided by pages. System saving the place of the last page read, allows you to conveniently read the book "Projects for the Young Mechanic: Over 250 Classic Instructions & Plans" online for free, without having to search again every time where you left off. Put a bookmark, and you can go to the page where you finished reading at any time.
Font size:
Interval:
Bookmark:
PROJECTS FOR THE Young Mechanic
OVER 250 CLASSIC INSTRUCTIONS & PLANS
POPULAR MECHANICS CO.
DOVER PUBLICATIONS, INC.
MINEOLA, NEW YORK
Copyright
Copyright 2013 by Dover Publications, Inc.
All rights reserved.
Bibliographical Note
Projects for the Young Mechanic: Over 250 Classic Instructions & Plans, first published by Dover Publications, Inc., in 2013, is a republication of a selection of material from the following works published by Popular Mechanics Co., Chicago: The Boy Mechanic, Book 2 (1915), The Boy Mechanic, Book 3 (1919), and The Boy Mechanic, Book 4 (1924).
International Standard Book Number
eISBN-13: 978-0-486-31606-2
Manufactured in the United States by Courier Corporation
49117X01 2013
www.doverpublications.com
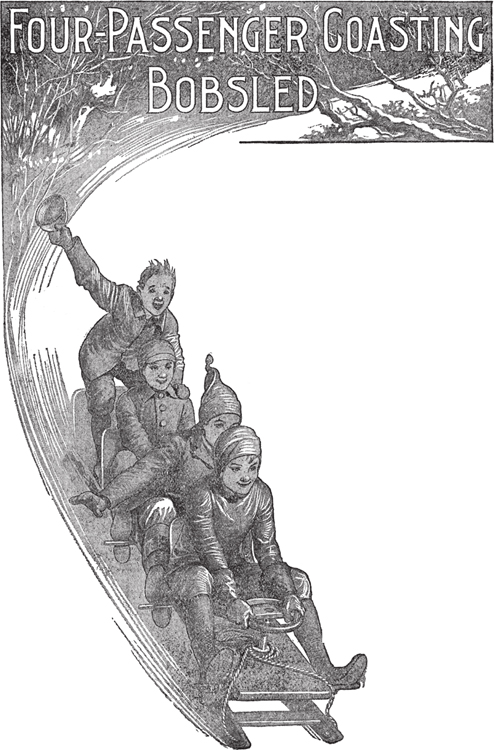
By. R. H. ALLEN
Coasting Is One of the Best Sports a Boy Enjoys during Winter, and a Sled of Luxury Is Something to Be Proud of among Others on a Hill or Toboggan Slide
C OASTER bobs usually have about the same form of construction, and only slight changes from the ordinary are made to satisfy the builder. The one shown has some distinctive features which make it a sled of luxury, and the builder will pride himself in the making. A list of the materials required is given on the opposite page. Any wood may be used for the sled, except for the runners, which should be made of ash.
Shape the runners all alike by cutting one out and using it as a pattern to make the others. After cutting them to the proper shape, a groove is formed on the under edge to admit the curve of a  -in. round iron rod about
  in. deep. The iron rods are then shaped to fit over the runner in the groove and extend up the back part of the runner and over the top at the front end. The extensions should be flattened so that two holes can be drilled in them for two wood screws at each end. If the builder does not have the necessary equipment for flattening these ends, a local blacksmith can do it at a nominal price. After the irons are fitted, they are fastened in place.
The top edges of the runners are notched for the crosspieces so that the top surfaces of these pieces will come flush with the upper edges of the runners. The location of these pieces is not essential, but should be near the ends of the runners, and the notches of each pair of runners should coincide. When the notches are cut, fit in the pieces snugly, and fasten them with long slim wood screws. Small metal braces are then fastened to the runners and crosspiece on the inside, to stiffen the joint.
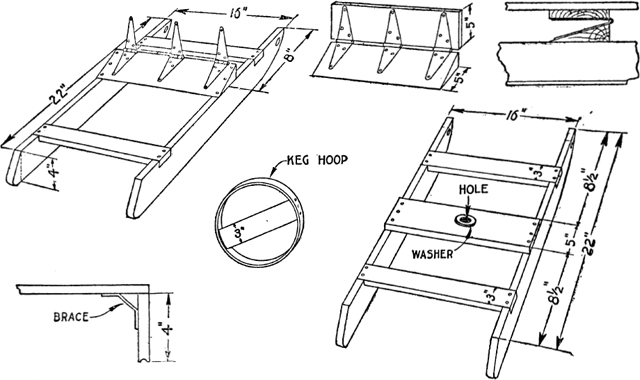
Details Showing the Method of Rear-Sled Oscillation, the Bracing, and the Steering Wheel
As the rear sled must oscillate some, means must be provided for this tilting motion while at the same time preventing sidewise turning. The construction used for this purpose is a hinged joint. The heavy 2 by 5-in. crosspiece is cut sloping on the width so that it remains 2 in. thick at one edge and tapers down to a feather edge at the opposite side. This makes a wedge-shaped piece, to which surface the three large hinges are attached. The piece is then solidly fastened to the upper edges of the runners that are to be used for the rear sled, and so located that the center of the piece will be 8 in. from the front end of the runners.
The supporting crosspiece on the front sled is fastened on top of the runners, at a place where its center will be 11 in. from the front end of the runners.
The top board is prepared by making both ends rounding and planing the surfaces smooth. On the under side, the two crosspieces are placed, which should have two  -in. holes bored through the width of each, near the ends, to receive the eyebolts. They are placed, one with its center 12 in. from the end to be used for the rear, and the other with its center 8 in. from the front end, and securely fastened with screws. The shore is placed in the center of the board, and wires are run over it connecting the eyebolts. The eyebolts are then drawn up tightly to make the wire taut over the shore. This will prevent the long board from sagging.

On the upper side of the board and beginning at the rear end, the backs are fastened at intervals of 18 in. They are first prepared by rounding the corners on the ends used for the tops, and the opposite ends are cut slightly on an angle to give the back a slant. They are then fastened with the small hinges to the top board. On the edges of the top board, 1-in. holes are bored about 1 in. deep, and pins driven for foot rests. These are located 18 in. apart, beginning about 5 in. from the front end. The dowel is used for the pins, which are made 4 in. long.
The steering device consists of a broom handle, cut to 18 in. in length, with one end fastened in a hole bored centrally in the 5-in. crosspiece of the front sled. A hole is bored in the top board through the center of the crosspiece fastened to the under side for the steering post. The broomstick is run through this hole after first placing two metal washers on it. After running the stick through, a hardwood collar is fastened to it just above the top board, so that the top cannot be raised away from the sled. At the upper end of the broomstick a steering wheel is attached, made from a nail-keg hoop. A piece of wood is fastened across its diameter, and the hoop is covered with a piece of garden hose and wrapped with twine. In the center of the crosspiece, a hole is bored to snugly fit on the broom handle, which is then fastened with screws.
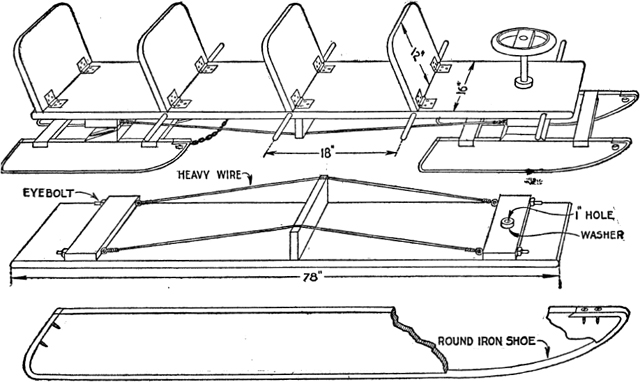
The Top Board is Well Braced on the Under Side and Fitted with Four Backs on Top to Make It a Luxurious Riding Sled, and the Runners are Provided with Metal Shoes for Speed
The rear sled is fastened to the top board with screws through the extending wings of the hinges and into the crosspiece. Holes are bored in the front ends of all runners, and a chain or rope is attached in them, the loop end of the rear one being attached to the under side of the top board, and the one in the front used for drawing the sled.

To Prevent Drill from Catching As It Passes through Metal
The regular slope of a drill will cause the cutting edge to catch as it breaks through the metal on the opposite side of the piece being drilled. But if a twist drill is ground more flat like a flat drill, it will not grab into the metal as it passes through.Contributed by James H. Beebee, Rochester, N. Y
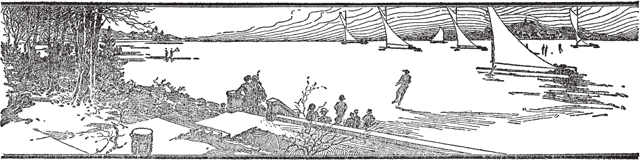
An Ice Boat and Catamaran
By ROBERT K. PATTERSON
T HIS combination is produced by using the regular type of ice boat and substituting boats for the runners, to make the catamaran.
In constructing the ice boat, use two poles, or timbers, one 16 ft. and the other 10
Font size:
Interval:
Bookmark:
Similar books «Projects for the Young Mechanic: Over 250 Classic Instructions & Plans»
Look at similar books to Projects for the Young Mechanic: Over 250 Classic Instructions & Plans. We have selected literature similar in name and meaning in the hope of providing readers with more options to find new, interesting, not yet read works.
Discussion, reviews of the book Projects for the Young Mechanic: Over 250 Classic Instructions & Plans and just readers' own opinions. Leave your comments, write what you think about the work, its meaning or the main characters. Specify what exactly you liked and what you didn't like, and why you think so.