In order to install create-react-app, you need Node.js installed on your machine. You can install the CLI by typing the following command in a console window:
After installation, you can verify whether it is properly installed by typing the following command:
If all is OK, the installed version of create-react-app will be shown.
Adding CSS
We will now change the content of the existing project, my-shop-01, in order to add some CSS code and show the catalog title in red:
- Open a console window.
- Move to the my-shop-1/src folder.
- Create a file, Catalog.css, and add the following code:
h2 { color: red }
- Open the Catalog.js file and add the statement to import the Catalog.css module, as shown here:
import React from 'react';
import './Catalog.css';
class Catalog extends React.Component {
render() {
return
Catalog
;
}
}
export default Catalog;
- Run npm start and look at the result.
You can find a project ready in the my-shop-02 folder at Code/Chapter-2 .
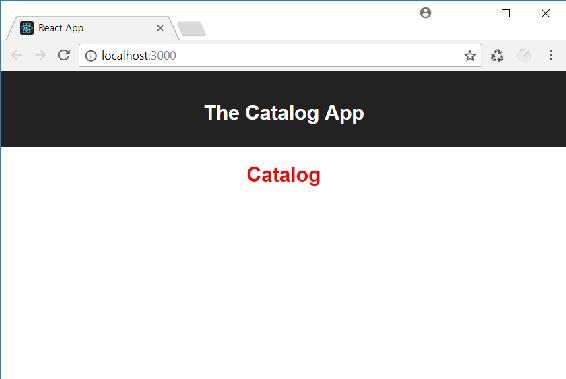
The browser will show the Catalog title in red:
The CSS import is not a React feature, and it is not required by React. It is a convenience provided by the development environment, built by create-react-app. In particular, this feature is provided by webpack, one of the most frequently used bundlers and module loaders.
You should take this aspect into account when you want to migrate the application into a development environment not based on webpack.
Nested Views
In the preceding examples, we implemented view navigation in the App component by using the Switch, Route, and Link components provided by React Router. We can use these routing components inside of any other component so that we can build nested views and nested routes.
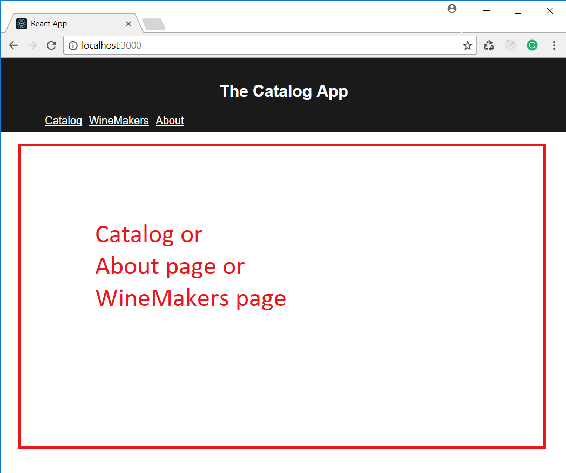
Let's try to illustrate this with an example. Suppose that we want to add a list of winemakers to our application. We can add a new item to the navigation bar that allows us to navigate to a page showing that list.
The following screenshot shows how the new layout will appear:
So, let's change the App component's JSX markup, as follows:
import React, { Component } from 'react';
import './App.css';
import Catalog from './Catalog';
import About from './About';
import WineMakers from './WineMakers'; import { Switch, Route, Link } from 'react-router-dom';
class App extends Component {
render() {
return (
);
}
}
export default App;
We imported the WineMakers component, defined a route that maps the /winemakers path to the new component, and added a link to navigate to it.
We can implement the list of winemakers as follows:
import React from 'react';
import WineMaker from './WineMaker';
import { Switch, Route, Link } from 'react-router-dom';
class WineMakers extends React.Component {
renderWineMakersList() {
return
;
}
render() {
return
...
export default WineMakers;
The WineMakers component has the renderWineMakersList() method that returns the React element implementing a list of links to each winemaker. This method is used as the value of the render attribute of the route matching the /winemakers path in the render() method of the component. The other routes get the path pointing to each specific winemaker and render the WineMaker component according to the identifier code.
You may notice that we are implementing a view in the WineMakers component that is shown inside of the view implemented in the App component. In other words, we implement nested views by composing components that implement views.
Some Notes About the Route Component
Notice that the Route component has the path attribute (which allows us to specify the URL to map) and the component attribute (which allows us to assign the component to render in the current view):
path='/' component={Catalog}/>
path='/about' component={About}/>
The path attribute is used by React Router to detect the component to render, as specified by the corresponding component attribute.
In the previous route mapping, if we click on a Link component associated with the /about URL, the route with the root (/) path will match the starting part of /about, and the Catalog component will be rendered.
When the user requests a URL by clicking on the Link component, the list of routes is scanned in order to find a path value that matches the starting part of the URL. The first matching value determines the component to render.
If we want a strict comparison between the path attribute's value and the URL, we need to specify the exact attribute, which is shown as follows:
exact path='/' component={Catalog}/>
This prevents any URL starting with / from being captured by the first route.
The component attribute of the Route component allows us to specify the component to render. Alternatively, we can use the render attribute to specify the invocation of a function returning a React element, as shown in the following example:
()}/>
This approach is similar to using the component attribute, but it may be useful for inline rendering and when we need to pass values to the element.
The Route component also allows us to specify the children attribute. As with render, we can assign a function to this attribute, but the elements returned by that function will always be rendered, regardless of whether the path matches or not.
Consider the following example:
()}/>
The Footer component will always be rendered, even if the path /footer doesn't match.
Beginning React
Simplify your frontend development workflow and enhance the user experience of your applications with React


![Azat Mardan [Azat Mardan] - React Quickly](/uploads/posts/book/119471/thumbs/azat-mardan-azat-mardan-react-quickly.jpg)
![Emilio Rodriguez Martinez [Emilio Rodriguez Martinez] - React: Cross-Platform Application Development with React Native](/uploads/posts/book/119453/thumbs/emilio-rodriguez-martinez-emilio-rodriguez.jpg)
![Andrea Chiarelli [Andrea Chiarelli] - Beginning React: Simplify Your Frontend Development Workflow and Enhance the User Experience of Your Applications With React](/uploads/posts/book/119447/thumbs/andrea-chiarelli-andrea-chiarelli-beginning.jpg)


