Table of Contents
Guide
List of Illustrations
- Chapter 1
- Chapter 2
- Chapter 3
- Chapter 4
- Chapter 5
- Chapter 6
- Chapter 7
- Chapter 8
- Chapter 9
- Chapter 10
- Chapter 11
- Chapter 12
- Chapter 13
- Chapter 14
- Chapter 15
List of Tables
- Chapter 1
- Chapter 2
- Chapter 3
- Chapter 4
- Chapter 5
- Chapter 6
- Chapter 7
- Chapter 8
- Chapter 9
- Chapter 10
- Chapter 11
- Chapter 12
- Chapter 13
- Chapter 14
- Chapter 15
Pages
Identity with Windows Server 2016 Exam 70-742
Lab Manual
Patrick Regan
| EXECUTIVE EDITOR | Jim Minatel |
| SENIOR EDITORIAL ASSISTANT | Devon Lewis |
| EXECUTIVE MARKETING MANAGER | Michele Szczesniak |
| CONTENT MANAGER | Nichole Urban |
| PRODUCTION COORDINATOR | Nicole Repasky |
| PRODUCTION EDITOR | Umamaheswari Gnanamani |
| PRODUCTION SERVICES | Box Twelve Communications |
Copyright 2018 by John Wiley & Sons, Inc. All rights reserved.
No part of this publication may be reproduced, stored in a retrieval system or transmitted in any form or by any means, electronic, mechanical, photocopying, recording, scanning or otherwise, except as permitted under Sections 107 or 108 of the 1976 United States Copyright Act, without either the prior written permission of the Publisher, or authorization through payment of the appropriate per-copy fee to the Copyright Clearance Center, Inc. 222 Rosewood Drive, Danvers, MA 01923, website www.copyright.com. Requests to the Publisher for permission should be addressed to the Permissions Department, John Wiley & Sons, Inc., 111 River Street, Hoboken, NJ 07030-5774, (201) 748-6011, fax (201) 748-6008, website http://www.wiley.com/go/permissions.
www.wiley.com/college/microsoft
ISBN 978-1-119-40163-6
LAB 1
INSTALLING AND CONFIGURING DOMAIN CONTROLLERS
THIS LAB CONTAINS THE FOLLOWING EXERCISES AND ACTIVITIES:
BEFORE YOU BEGIN
The lab environment consists of student workstations connected to a local area network, along with a server that functions as the domain controller for a domain called adatum.com. The computers required for this lab are listed in .
| Computer | Operating System | Computer Name |
| Server (VM 1) | Windows Server 2016 | LON-DC1 |
| Server (VM 2) | Windows Server 2016 | TOR-DC1 |
In addition to the computers, you will also require the software listed in .
| Software | Location |
| Lab 1 student worksheet | Lab01_worksheet.docx (provided by instructor) |
Working with Lab Worksheets
Each lab in this manual requires that you answer questions, shoot screen shots, and perform other activities that you will document in a worksheet named for the lab, such as Lab01_worksheet.docx. You will find these worksheets on the book companion site. It is recommended that you use a USB flash drive to store your worksheets, so you can submit them to your instructor for review. As you perform the exercises in each lab, open the appropriate worksheet file using Word, fill in the required information, and then save the file to your flash drive.
SCENARIO
After completing this lab, you will be able to:
- Install a new forest
- Demote a domain controller
- Add a domain controller to an existing domain
- Move operations masters
- Seize operations masters
Estimated lab time: 115 minutes
Exercise 1.1 Installing a New Forest
| Overview | In this exercise, you will use the TOR-DC1 server to create a new forest. |
| Mindset | A forest is a collection of domain tree(s) that shares a common AD DS. To create a new forest or a new domain, or to add a new domain controller to an existing domain, you must install the Active Directory Domain Services role on a Windows Server 2016 computer, and then run the Active Directory Domain Services Configuration Wizard. |
| Completion time | 30 minutes |
- Log on to TOR-DC1 as adatum\administrator with the password of Pa$$w0rd.
- On TOR-DC1, right-click the Start button and choose System.
- On the Control Panel System page, in the Computer name, domain, and workgroup settings section, click Change settings.
- In the System Properties dialog box, click Change.
- In the Computer Name/Domain Changes dialog, click Workgroup and then type Workgroup in the text box. Click OK.
- When you are prompted to confirm that you want to continue, click OK.
- When a welcome to the WORKGROUP workgroup message appears, click OK.
- Click OK to restart the computer.
- Click Close to close the System Properties dialog box.
- When a message indicates you must restart your computer to apply these changes, click Restart Now.
- Log on to TOR-DC1 as local administrator with the password of Pa$$w0rd.
- Click Start, then click the Server Manager tile. In Server Manager, click Manage > Add Roles and Features.
- In the Add Roles and Features Wizard, click Next.
- On the Select installation type page, click Next.
- On the Select destination server page, click Next.
- On the Select server roles, click Active Directory Domain Services. When you are prompted to confirm that you want to add some features, click Add Features.
- Back on the Select server roles page, click Next.
- On the Select features page, click Next.
- On the Active Directory Domain Services page, click Next.
- On the Confirm installation selections page, click Install.
- When Active Directory Domain Services is installed, click Close.
- On Server Manager, click the yellow triangle with the black exclamation point and then click Promote this server to a domain controller.
- In the Active Directory Domain Services Configuration Wizard, on the Deployment Configuration, click Add a New Forest.
- In the Root domain name text box, type contoso.com, as shown in . Click Next.
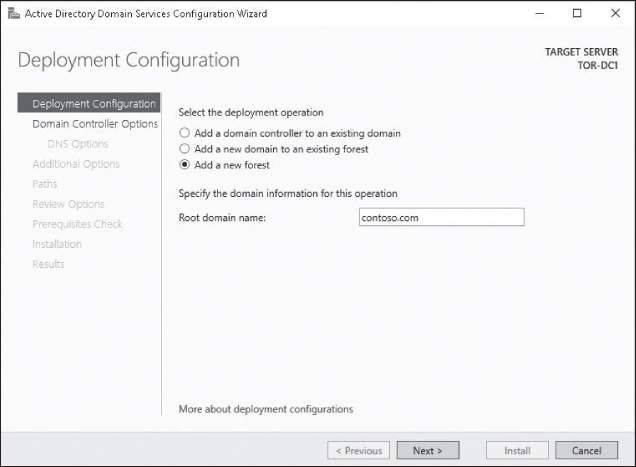 Creating a new forest
 - On the Domain Controllers Options page, type Pa$$w0rd in the Password text box and the Confirm password text box. Click Next.
- On the DNS Options page, answer the following question and then click Next.
Question 1
What is the message displayed in the warning?
- On the Additional Options page, after CONTOSO appears in the NetBIOS domain name text box, click
Next page





 Creating a new forest