1. Directory Services
A directory service is the software that stores, organizes, and provides access to information in a directory or a database of users, groups, computers, and network devices such as printers. The directory service supplies that database to client computers. In most enterprise, educational, and larger institutions, common directory service implementations range from Microsofts Active Directory (AD) to Apples Open Directory (OD) to Novells eDirectory, as well as the open source OpenLDAP. Most modern directory services are based on open standards developed in the public forum.
The publication The Directory: Overview of concepts, models and services defines the most common standard architectural guidelines for the X.500 model, which is the publicly developed standard for electronic directory services. While the concepts and roots of most directories are complex, by their nature they share the simple goal of facilitating unified user management, authentication, and authorization. Directory servers with different origins thus share many commonalities in their structure and accessibility. The Lightweight Directory Access Protocol (LDAP), which nearly every major directory service system utilizes, is a testament to this need for accessibility, as we will discuss later in this chapter. Put simply, any system engineered for large-scale centralized information storage must inherently allow disparate clients to participate; otherwise, it is doomed to a finite growth potential.
In OS X, a number of plug-ins allow it to leverage a variety of directory services. Each computer must at minimum contain a local directory service database to establish a baseline of system-critical data, such as users, groups, and even some configuration data. If every Mac sold required an enterprise directory service just to log in, Apple stores would not be popping up like Starbucks in cities around the world. Local directory databases are a cornerstone of all modern operating systems and often the gateway for small and medium businesses to grow into larger directory systems over time. A common misconception is Apples Open Directory terminology refers only to its enterprise-class network authentication services. In reality, the same term refers to OS Xs local directory services too. In fact, earlier operating systems had the same technology running on Open Directory masters, such as Mac OS X 10.2s netinfod and Mac OS Xs 10.3 Password Server. This concept of architecting miniature directory servers into the base operating system allows for later migration to larger network directory systems with little re-education of entry-level system administrators. The best example of this is Apples parental controls system, which utilizes the same technology managing thousands of OS X systems in enterprise environments every day. Because of such forethought, clients can also be configured out of the box to access a variety of external directories; Apple provides support for several network-based directory service systems without installing any additional software.
This chapter starts with an explanation of how the local directory service works. Once we have covered how to manage local users, we will move on to discuss LDAP, the industry-standard directory database protocol used to access directory services. Next, we will cover various types of directory service bindings for OS X that let end users log in to their computers using a centralized username and password. Finally, we will look at building external accounts and show how to build a directory service based on Apples Open Directory.
Local Accounts
System Preferences in OS X is similar to the Control Panel in Windows; it allows you to configure a wide range of settings. The information you set in its panes is stored in files throughout the operating system. Local directory service configuration is accessed through the Users & Groups preference pane, which provides the ability to add local user accounts. You can add accounts to groups, assign them a type, and set a few other options.
To access a System Preferences pane, choose System Preferences from the Apple menu () in the top-left corner of the screen or launch the application directly from the Applications folder. This displays all the available preference panes. Next, click Users & Groups to view the list of local accounts on the left side of the pane. As you click through each one, the options for that account appear on the right side of the pane. To make changes, you must first authenticate to System Preferences by clicking the Lock button in the lower-left corner of the System Preferences window. This requires a user who is a member of the local directory services admin group.
Tip
The /private/var/db/auth.db SQLite database is used to determine which groups can perform a variety of system changes. In a standard OS X environment, users in the admin group can obtain escalation for all authorization rights, and an administrator can modify this file to provide very granular administrative access. For instance, to allow a nonadmin group to manage users via the Users & Groups pane, an administrator would add the groups name under system.preferences.accounts in the database using the security command-line tool.
Creating Accounts
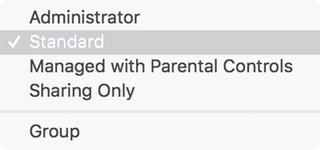
To add an account, first click the Lock button in the Users & Groups pane of System Preferences; then click the plus sign to create an account. In the New Account sheet, youll see the five options shown in Figure . These are the basic account types for OS X.
Figure 1-1.
Menu of account types
Administrator : Administrative user accounts can elevate themselves to root privileges, unlock System Preference panes, and perform most tasks.
Standard : Standard user accounts cannot unlock System Preferences panes and cannot perform any administrative tasks unless an administrator has authorized those privileges.
Managed with Parental Controls : These are standard user accounts with administrative policies applied to them.
Sharing Only : These are user accounts that cannot log onto the local system but can access resources via a network.
Group : This is a group of user accounts that simplifies assigning privileges and permissions to multiple users.
Once you have selected an account type, enter a name in the Full Name field and a short name in the Account Name field. For example, the full name might be John Doe, and the short or account name might be jdoe . By default, the account name is generated from the full name in lowercase with spaces removed. The full name is primarily used for display purposes and can be changed at will. The account name has additional system-level functions. Notably, it is used as the users home folder name when first created, though that directory can be moved to a different location that does not correspond to the short name (such as a mystuff folder on an external drive).
The account name is used for other purposes as well, such as establishing a primary mailbox for the user or for linking scheduled items through cron. Because of this, setting the initial account name demands some consideration. Its also worth noting the account name cannot easily be edited in the prominent user interface, and though right-clicking a user account and choosing Advanced Options allows you to edit this name (as shown in Figure ), doing so has other repercussions, such as the possible loss of group membership (such as admin), possible loss of preference data if an application stores configuration data based on the account name, or disassociation of the users home folder. In most cases when you plan to modify a users account name, you will also want to rename the users home directory to coincide. This is merely for cosmetic reasons and is not a necessity. You can change account name jdoe to psherman and still utilize the original home directory stored at /Users/jdoe . If you do change the home directory field to /Users/psherman , you should make sure you rename the users home folder on the file system to match the new path specified (in this case, from the original home directory value /Users/jdoe to /Users/psherman ).

