Creating a wrapper for a C library is a very easy task with Swift, as the language was designed for interoperability with Objective-C and C, as well as for C++ language. Although this chapter focuses on using the SQLite C API with Swift, you could easily do the reverse and call Swift from these languages. This chapter shows how to create an Objective-C wrapper around the SQLite C API, which can then be interfaced through Swift. This method can be replicated with other C libraries.
Getting Started
Before getting to the bridge, I think it is important to mention the tools that are needed for this book and also for iOS application development in general. All the iOS code for this book is produced through Xcode 8.0 at the time of this writing. I am also using Swift 3.
If you are planning on developing Swift iOS apps for this book or in a production environment, your only choice is Xcode on OSX. Some will argue that Swift can compile and run on Linux also. While this is true, Xcode cannot, and you need Xcode to develop iOS, TVos and OSX apps. You will also need an Apple Developer account. For the development in this book, you can get by with the free edition, but to provision and deploy you will need an Apple Developer license, which you can get though Apple Developer website.
I will also use SQLite Manager in Firefox to create SQLite databases in chapters ; otherwise, all development, including creating SQLite databases, will be done in Xcode.
Xcode can be installed for free through the OSX App Store, which is accessible uniquely on a MAC OSX. While you can purchase a copy of OSX through an Apple store, and it can be installed on a virtual machine, the OSX App Store will only work on a real OSX machine.
Installing Xcode is very easy. Once you select it in the App Store, it is installed automatically on your OSX machine. When you install Xcode, the SDK (for Swift/Objective-C) is also installed. You can install more tools through Xcode. Under the Xcode menu, select Preferences and then Components.
The SQLite library is already included in the iOS SDK, and this is the version that I will be using throughout this book. You can download and install SQLite from the SQLite site, which has extra APIs such as the JSON extension, but this is out of the scope of this book. You can also download and use Swift SQLite frameworks that have been created as wrappers over the SQLite C API. However, I wont be using them in this book, as I find the C API very easy to work with on its own.
Other than Xcode and an Apple OSX computer, you only need Firefox SQLite Manager, which can be downloaded and installed from Mozilla. The SQLite Manager is installed from the Addon marketplace in Firefox.
Lets get started.
Creating the Swift iOS Project
To work with SQLite 3 in iOS Swift applications, you need a bridge header file to interface with the SQLite C API. In fact, this interface is applicable to all interfaces between Swift and Objective-C, C, or C++.
Open Xcode and create a new project from the launchpad. For this project, we are building a SQLite Database Manager app that will allow a developer to connect to a SQLite database. The app will also provide functionality to add or modify tables, views, indexes, and triggers. Finally, one will also be able to insert, update, and select data from the database.
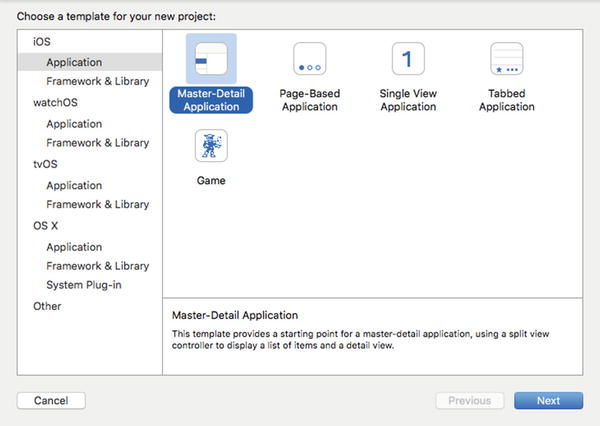
To build this app, select the Master-Detail iOS template from the list of templates under the iOS Application heading. Name the iPad app SQLite Mgr and create it. Figure shows an example of the Master-Detail template under the iOS Application heading. After selecting the template, move to the next page to fill in the app details. This template provides a great classic layout for building iPad apps and takes advantage of the extra screen real estate. The template has a view on the left-hand side that acts as an index by default, although you could replace the UITableView with another view. The view on the right-hand side provides an expansive window to display input forms or other app details, including web pages and tables or other view controllers.
Figure 1-1.
Master-Detail iOS Application template
For this reference app, we will use some of the default design elements that are included with the template, namely the UITableView in the MasterViewController . For the DetailViewController , we will develop a new UI layout.
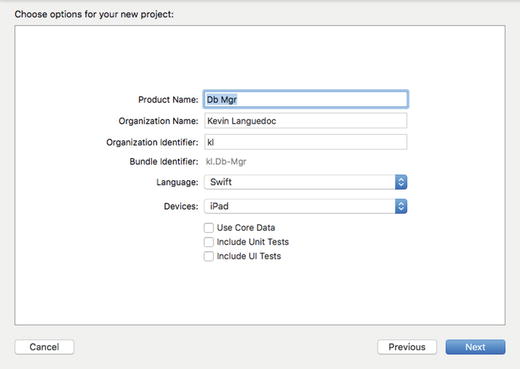
Figure illustrates the information needed to name and set up the basic app structure. The Organization Name is used throughout the project and documentation, such as for the copyright notice. The Organization Identifier is used to create part of the Bundle ID for the App Store and to identify the app in iTunes Connect, for instance.
Figure 1-2.
Enter the app name and other required information
Create the Db Mgr Project Structure
The project structure of a Swift app is identical to that of an Objective-C structure in Xcode. As a matter of preference, I like to organize my app objects into logical groups. So, we will create groups for views, models, and controllers, as well groups for libs, bridge, and utils. The first three are to group the files related to the MVC design pattern. The last two will group the SQLite 3 library and some helper classes that we will use for the app that dont fit in the other groups.
To add files to the project, right click on the group heading and use the context menu to select the Add New File command, which will insert the new file that we will create under that header. You can also add a new file from the menu in Xcode and select from the dialog box for naming the file the group where you want to file to be created.
Adding the SQLite 3 Library
Add the SQLite 3 library to the project as you would normally do through the Linked Libraries and Frameworks. Select the project root in the navigator and scroll down to the Linked Libraries and Frameworks from the General sheet of the Project Properties page, which appears in the main window.
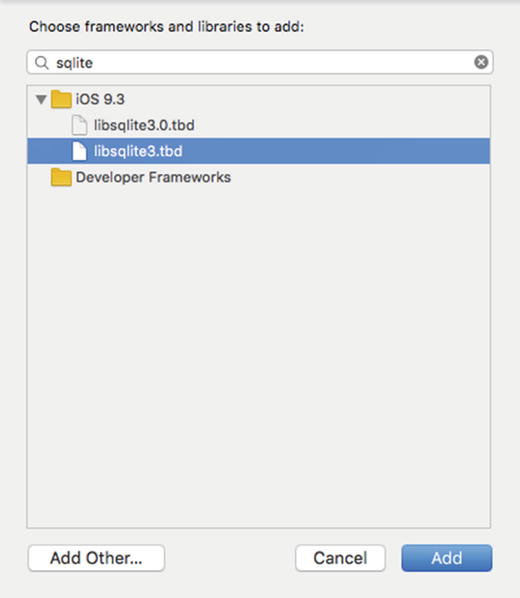
Figure provides an example of the Search dialog box used to add libraries to an Xcode project. Click on the + sign to open the Search window and type "Sqlite3." You will get two results; one of the selections is the library and the second is a link to the library. Select the libsqlite3.tbd file and click the Add button to add the library to the project.
