Iain Hendry - Learn the Micro:Bit using the Arduino IDE
Here you can read online Iain Hendry - Learn the Micro:Bit using the Arduino IDE full text of the book (entire story) in english for free. Download pdf and epub, get meaning, cover and reviews about this ebook. year: 2019, genre: Computer. Description of the work, (preface) as well as reviews are available. Best literature library LitArk.com created for fans of good reading and offers a wide selection of genres:
Romance novel
Science fiction
Adventure
Detective
Science
History
Home and family
Prose
Art
Politics
Computer
Non-fiction
Religion
Business
Children
Humor
Choose a favorite category and find really read worthwhile books. Enjoy immersion in the world of imagination, feel the emotions of the characters or learn something new for yourself, make an fascinating discovery.
- Book:Learn the Micro:Bit using the Arduino IDE
- Author:
- Genre:
- Year:2019
- Rating:5 / 5
- Favourites:Add to favourites
- Your mark:
Learn the Micro:Bit using the Arduino IDE: summary, description and annotation
We offer to read an annotation, description, summary or preface (depends on what the author of the book "Learn the Micro:Bit using the Arduino IDE" wrote himself). If you haven't found the necessary information about the book — write in the comments, we will try to find it.
Iain Hendry: author's other books
Who wrote Learn the Micro:Bit using the Arduino IDE? Find out the surname, the name of the author of the book and a list of all author's works by series.


Learn the Micro:Bit using the Arduino IDE — read online for free the complete book (whole text) full work
Below is the text of the book, divided by pages. System saving the place of the last page read, allows you to conveniently read the book "Learn the Micro:Bit using the Arduino IDE" online for free, without having to search again every time where you left off. Put a bookmark, and you can go to the page where you finished reading at any time.
Font size:
Interval:
Bookmark:
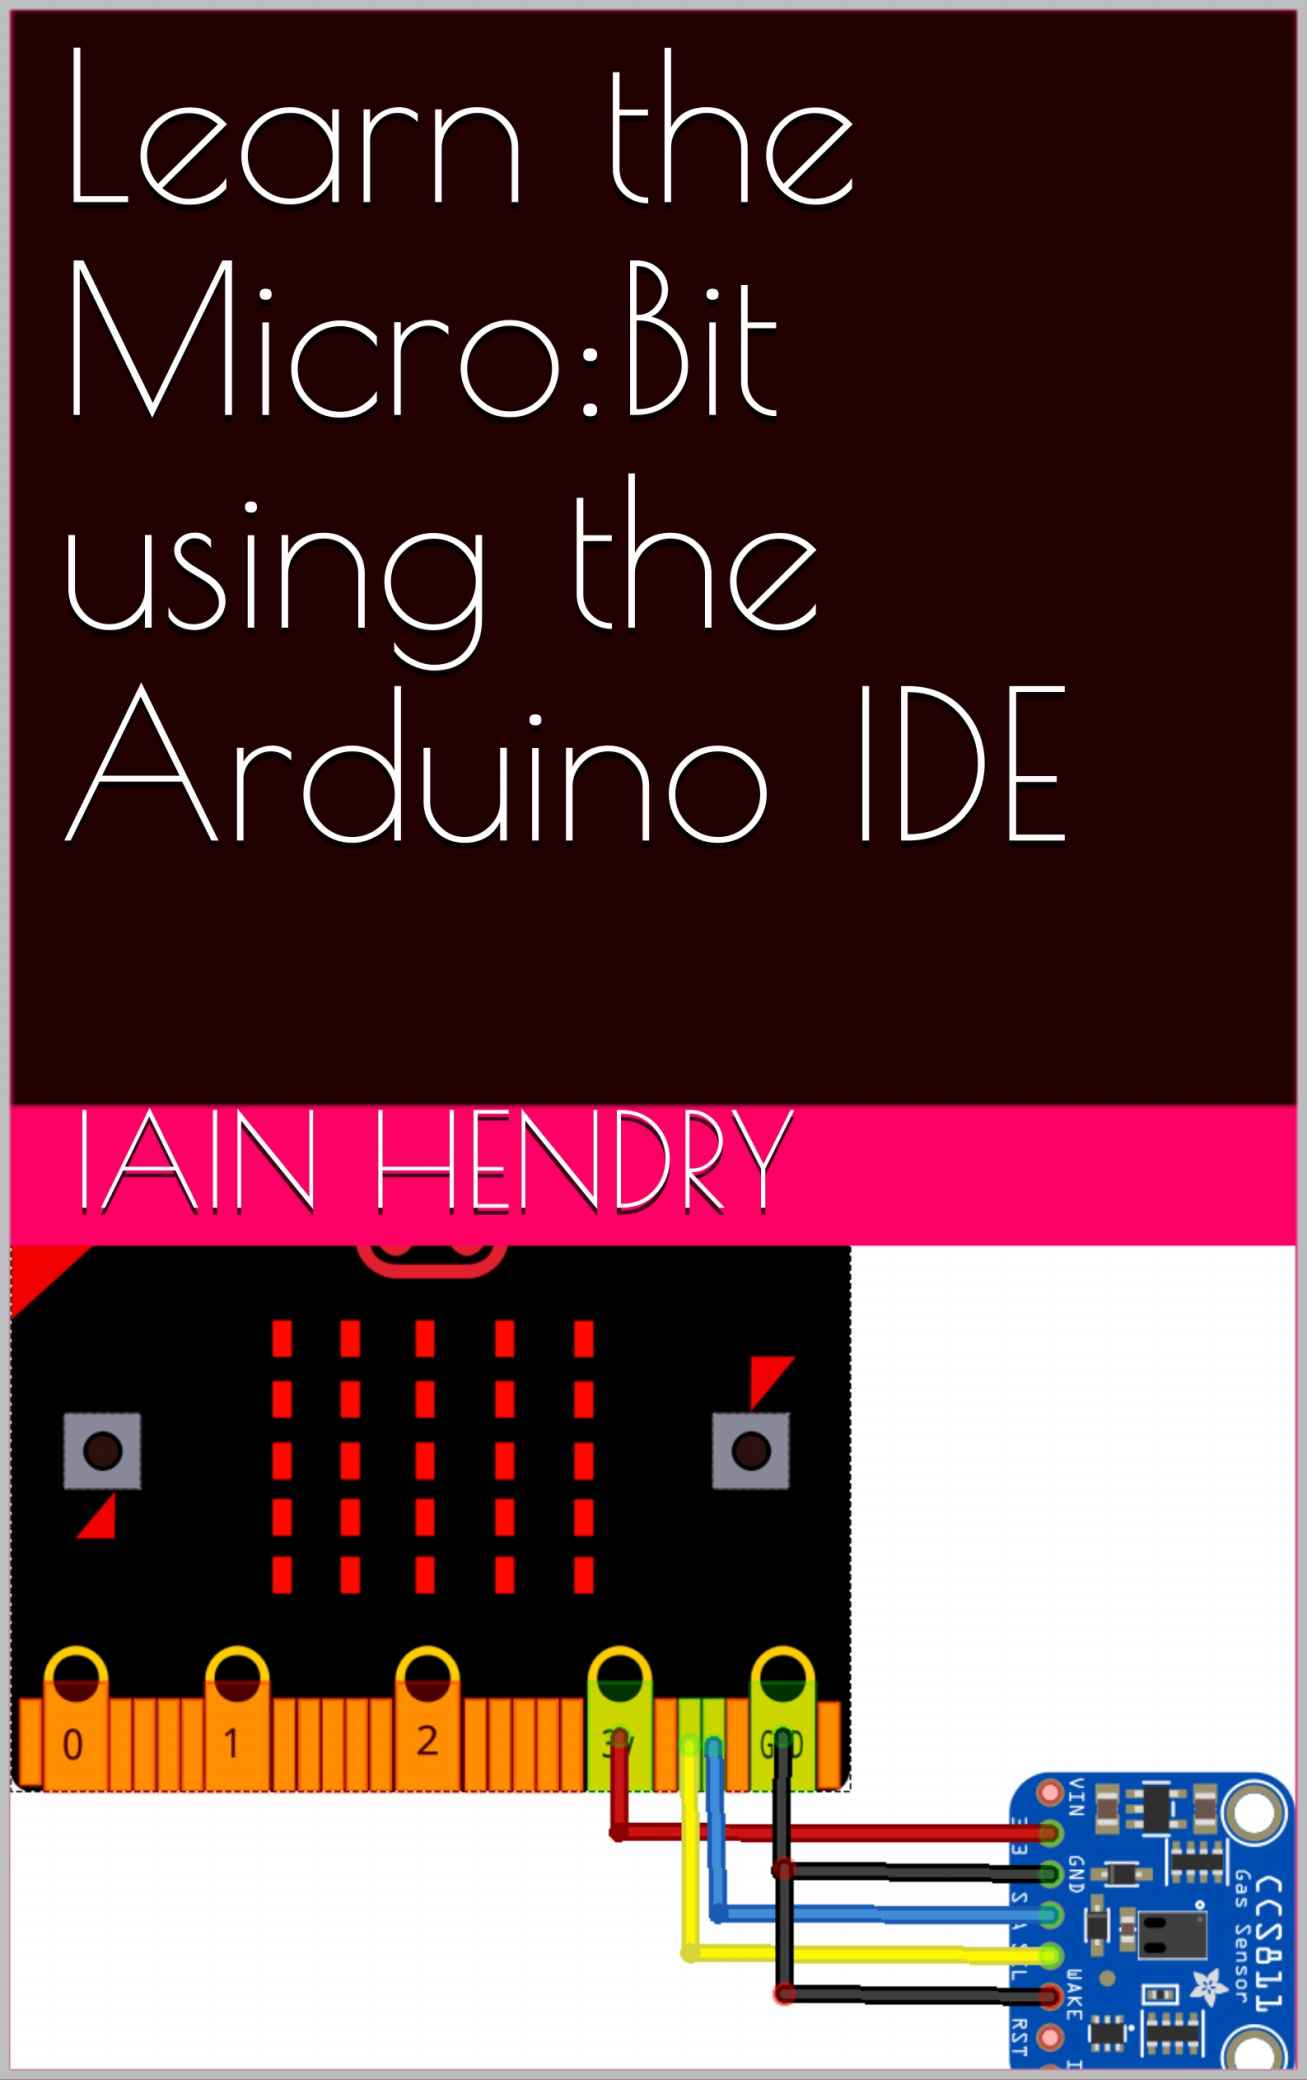
Learn the Micro:Bit
using the Arduino IDE
By
Iain Hendry
Table of Contents
If you have no idea what a Micro:Bit is hen this will introduce you to this intriguing board
The Micro Bit measures 4 5 cm the device has an ARM Cortex-M0 processor, accelerometer and magnetometer sensors, Bluetooth and USB connectivity, a display consisting of 25 LEDs, two programmable buttons, and can be powered by either USB or an external battery pack. The device inputs and outputs are through five ring connectors that are part of the 23-pin edge connector.
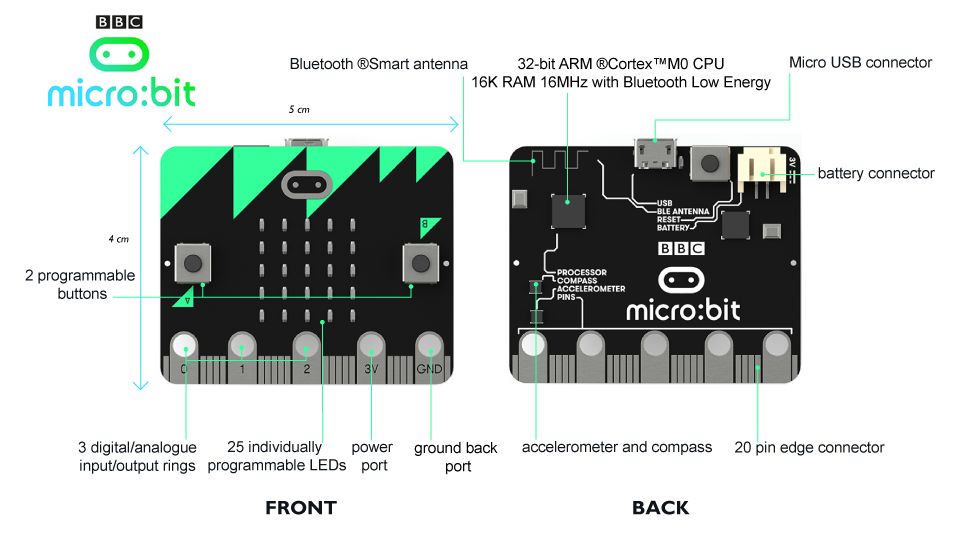
Hardware
The size of the device is described as half the size of a credit card, measuring 43 x 52 mm and, as of the start of final manufacturing,[18] includes: Nordic nRF51822 16 MHz 32-bit ARM Cortex-M0 microcontroller, 256 KB flash memory, 16 KB static ram, 2.4 GHz Bluetooth low energy wireless networking. The ARM core has the capability to switch between 16 MHz or 32.768 kHz. NXP/Freescale KL26Z 48 MHz ARM Cortex-M0+ core microcontroller, that includes a full-speed USB 2.0 On-The-Go (OTG) controller, used as a communication interface between USB and main Nordic microcontroller.
NXP/Freescale MMA8652 3-axis accelerometer sensor via IC-bus.
NXP/Freescale MAG3110 3-axis magnetometer sensor via IC-bus (to act as a compass and metal detector).
MicroUSB connector, battery connector, 23-pin edge connector. Display consisting of 25 LEDs in a 55 array.
Three tactile pushbuttons (two for user, one for reset).
I/O includes three ring connectors (plus one power one ground) which accept crocodile clips or 4 mm banana plugs as well as a 23-pin edge connector with two or three PWM outputs, six to 17 GPIO pins (depending on configuration), six analog inputs, serial I/O, SPI, and IC.
Unlike early prototypes, which had an integral battery, an external battery pack (AAA batteries) can be used to power the device as a standalone or wearable product.
Download the latest version from https://www.arduino.cc/en/Main/Software
You can choose between the Installer (.exe) and the Zip packages. We suggest you use the first one that installs directly everything you need to use the Arduino Software (IDE), including the drivers. With the Zip package you need to install the drivers manually. The Zip file is also useful if you want to create a portable installation.
When the download finishes, proceed with the installation and please allow the driver installation process when you get a warning from the operating system.
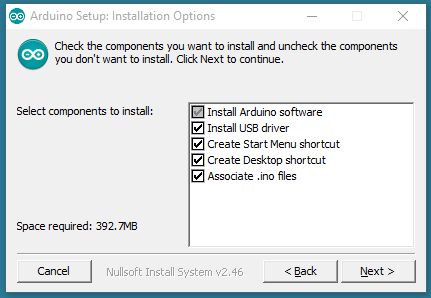
Choose the components to install
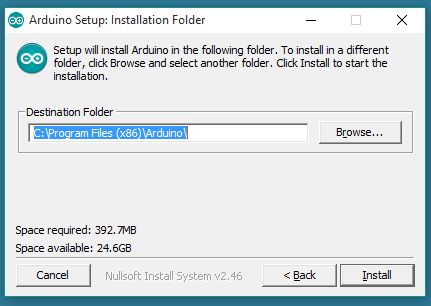
Choose the installation directory (we suggest to keep the default one)
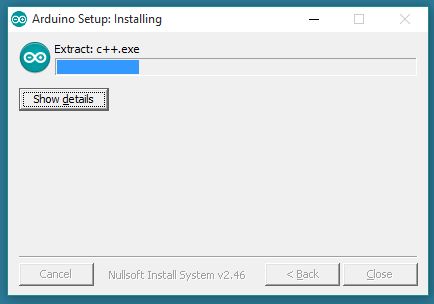
The process will extract and install all the required files to execute properly the Arduino Software (IDE)
You can now use the Arduino IDE to develop and program your Micro:Bit, in my view thats a good thing to add this support as its a popular development tool that is used for many other boards Arduino assumes there's a 'softdevice' radio already installed.
This is the instructions from https://github.com/sandeepmistry/arduino-nRF5 cd , where is your Arduino Sketch folder:
OS X: ~/Documents/Arduino Linux: ~/Arduino
Windows: ~/Documents/Arduino
Create the following directories: tools/nRF5FlashSoftDevice/tool/ Download nRF5FlashSoftDevice.jar to /tools/nRF5FlashSoftDevice/tool/
Restart the Arduino IDE
Select your nRF board from the Tools -> Board menu
Select a SoftDevice from the Tools -> "SoftDevice: " menu
Select a Programmer (J-Link, ST-Link V2, or CMSIS-DAP) from the Tools -> "Programmer: " menu
Select Tools -> nRF5 Flash SoftDevice
Read license agreement
Click "Accept" to accept license and continue, or "Decline" to decline and abort
If accepted, SoftDevice binary will be flashed to the board or Download this zip file, extract it and drag it into your MICROBIT drive - http://www.microbitlearning.com/wp-content/uploads/2017/11/microbit-adv.zip
You should also add support for the BLE_Peripheral library, Adafruit micro:bit library via the Arduino library manager
The micro:bit contains 25 LEDs in a matrix, in this chapter we look at some examples
Code Examples
These use the adafruit library
Example 1
Flash all the LEDs on and off
#include
Adafruit_Microbit_Matrix microbit;
void setup()
{
microbit.begin();
}
void loop()
{
// Fill screen
microbit.fillScreen(LED_ON);
delay(1000);
//empty screen
microbit.fillScreen(LED_OFF);
delay(1000);
}
Example 2
Display a yes and no (tick and cross)
#include
Adafruit_Microbit_Matrix microbit;
void setup()
{
microbit.begin();
}
void loop()
{
// draw a no
microbit.show(microbit.NO);
delay(1000);
// draw a yes
microbit.show(microbit.YES);
delay(1000);
}
Example 3
Display a line and pixel in the middle of the screen
#include
Adafruit_Microbit_Matrix microbit;
void setup()
{
microbit.begin();
}
void loop()
{
microbit.drawPixel(2, 2, LED_ON); //draw a pixel
microbit.drawLine(0, 0, 4, 0, LED_ON); //draw a line
}
Example 4
Draw a string on the led matrix
#include
Adafruit_Microbit_Matrix microbit;
void setup()
{
microbit.begin();
}
void loop()
{
microbit.print("HELLO WORLD");
}
As we saw in the overview for the micro:bit there are 2 onboard buttons, its very easy to use this in the Arduino IDE
Code
Lets play with the push buttons You may have to increase the delay(150), I used this to try and get rid of simple multiple presses and switch bounce
const int buttonA = 5;
const int buttonB = 11;
void setup()
{
Serial.begin(9600);
pinMode(buttonA, INPUT);
pinMode(buttonB, INPUT);
}
void loop()
{
if (! digitalRead(buttonA))
{
Serial.println("Button A pressed");
}
if (! digitalRead(buttonB))
{
Serial.println("Button B pressed");
}
delay(150);
}
Testing
Open the serial monitor and press the buttons
Button A pressed
Button B pressed
Button A pressed
Button A pressed
Button B pressed
Button B pressed
Button B pressed
The MMA8653FC is an intelligent, low-power, three-axis, capacitive micromachined accelerometer with 10 bits of resolution. This accelerometer is packed with embedded functions with flexible user-programmable options, configurable to two interrupt pins. Embedded interrupt functions enable overall power savings, by relieving the host processor from continuously polling data. There is access to either low-pass or high-pass filtered data, which minimizes the data analysis required for jolt detection and faster transitions. The device can be configured to generate inertial wake-up interrupt signals from any combination of the configurable embedded functions, enabling the MMA8653FC to monitor inertial events while remaining in a low-power mode during periods of inactivity.
Font size:
Interval:
Bookmark:
Similar books «Learn the Micro:Bit using the Arduino IDE»
Look at similar books to Learn the Micro:Bit using the Arduino IDE. We have selected literature similar in name and meaning in the hope of providing readers with more options to find new, interesting, not yet read works.
Discussion, reviews of the book Learn the Micro:Bit using the Arduino IDE and just readers' own opinions. Leave your comments, write what you think about the work, its meaning or the main characters. Specify what exactly you liked and what you didn't like, and why you think so.