Installing and Configuring Windows Server 2016 (Hands-on Guide)
Copyright 2016 K. G. Mark
All rights reserved.
Contents
Copyright
The author holds all the rights of publishing and reproducing to this book. The content of this book cannot be reproduced or copied in any form or by any means or reproduced without the prior written permission of the author.
About This Book
This book contains the virtual lab setup guide and the lab exercises for installing and configuring Windows Server 2016. You can create the virtual lab infrastructure on your own system and you can easily perform all the lab exercises mentioned in this book. Candidate having the basic knowledge of Windows operating systems and networking fundamentals can perform all the lab exercises without (or least) the need of a trainer or faculty. This book mainly covers the initial implementation and configuration of core services, such as AD DS, networking services.
Audience and Candidates Prerequisites
This book is intended for the candidates who have basic operating system knowledge, and want to gain the hands-on practice skills and knowledge necessary to implement the core infrastructure services. In addition, this book is also helpful for the candidate who are looking for certification in the Windows Server 2016 platform.
The candidates should have the basic knowledge of the networking fundamentals, Windows-based operating systems, and virtualization platforms to perform the hands-on practices.
Disclaimer
We made almost every effort to avoid errors or omissions in this guide. However, errors may slink in. Any mistake, error or discrepancy noted by the readers are requested to share with us, which will be highly appreciable. The contents and images in this guide could include technical inaccuracies or typographical errors. Author(s) or publisher makes no representations about the accuracy of the information contained in the guide.
Virtual Machines
The virtual machines that will be used throughout this book are listed in the following table.
S. No. | VM Name | Operating System |
| DC1 | Windows Server 2016 |
| SERVER1 | Windows Server 2016 |
| CLIENT1 | Windows 8.1/10 |
| ROUTER | Windows Server 2016 |
| SERVER2 | Windows Server 2016 |
To prepare the virtual machines mentioned in the preceding table, you need ISO images. You can download the evaluation ISO images (Windows Server 2016 (Technical Preview) and Windows 8.1/10) from the Microsoft download center.
To perform the step by step lab exercises, download the ISO images and place them under the D:\ISOs folder on the host machine. You can setup the virtual lab infrastructure on the VMware or Hyper-V platform.
Each virtual machine will act as a separate machine with the unique GUID, SID, and IP address. The following table lists the IP addresses and roles of the respective VMs.
S. No. | VM Name | IP Address | Role |
| DC1 | 10.0.0.100 | Domain controller of the mcsalab.local domain. |
| SERVER1 | 10.0.0.101 | Member server of the mcsalab.local domain. |
| CLIENT1 | 10.0.0.102 | Client machine of the mcsalab.local domain. |
| ROUTER | Internal Subnet: 10.0.0.1 External Subnet: 192.168.0.1 | Router server to perform the LAN routing. |
| SERVER2 | 192.168.0.2 | Workgroup server in the external subnet. |
Preparing Virtual Machines
To create the virtual machines, you need to perform the following tasks on the host machine:
- Install VMware Workstation or Player.
- Install and configure the DC1 virtual machine
- Install and configure the SERVER1 virtual machine
- Install and configure the CLIENT1 virtual machine
- Install and configure the ROUTER virtual machine
- Install and configure the SERVER2 virtual machine
Task 1: Installing VMware Workstation on the Host Machine
To Install VMware Workstation or VMware Player, first you need to download it. Once it is downloaded, just double-click the setup file, and follow the simple steps to complete the installation process.
Task 2: Installing and Configuring the DC1 Virtual Machine
To install and configure the DC1 virtual machine, you need to perform the following steps:
- Make sure that the VMware console is active.
- Select File and then select New Virtual Machine .
- On the New Virtual Machine Wizard , click Next .

- On the Guest Operating System Installation page, select the Installer disc image file (iso): radio button, browse the location of the Server 2016 ISO image file, and then click Next .

Note: If you use the VMware platform that automatically detects the version of the Windows server, you may asked to set the following settings:
- Product key
- Operating system edition
- Administrator password
Otherwise, you may skip it.
- On the Select a Guest Operating System page, select the highest supported version of Windows server (in this case Windows Server 2012 but it will still support Windows Server 2016), and then click Next .

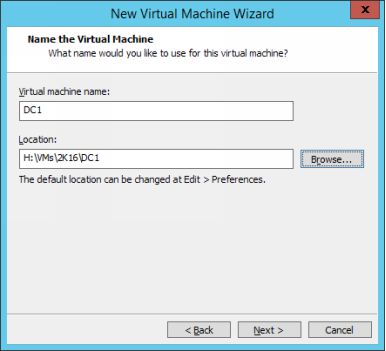
- On the Name and Virtual Machine page, type DC1 in the Virtual machine name field.
- In the Location field, navigate the location where you want to save the virtual machine, such as H:\VMs\2k16\DC1 , and then click Next .
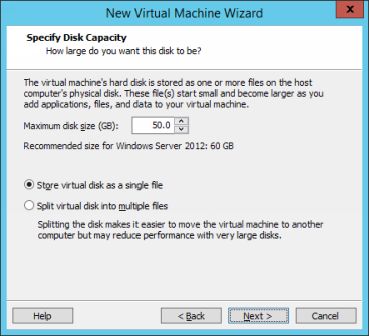
- On the Specify Disk Capacity page, select Store virtual disk as a single file , optionally you can also set the disk size as well, and then click Next .
- On the Ready to Create Virtual Machine page, click Customize Hardware .
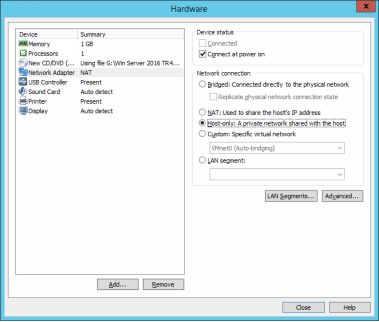
- On the Hardware window, select Network Adapter in the left pane. Select the Host only radio button, and then click Close .
- Click Finish .
- On the VMware console, power on the DC1 virtual machine.
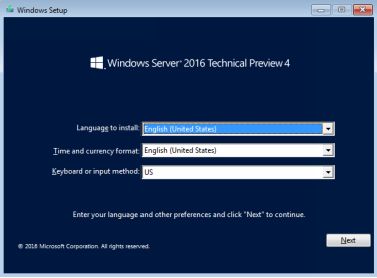
- On the Windows Setup page, click Next , and then click Install Now .
