Humphries Chris. - The Quick Guide to Backing Up Your Apple Life
Here you can read online Humphries Chris. - The Quick Guide to Backing Up Your Apple Life full text of the book (entire story) in english for free. Download pdf and epub, get meaning, cover and reviews about this ebook. genre: Computer. Description of the work, (preface) as well as reviews are available. Best literature library LitArk.com created for fans of good reading and offers a wide selection of genres:
Romance novel
Science fiction
Adventure
Detective
Science
History
Home and family
Prose
Art
Politics
Computer
Non-fiction
Religion
Business
Children
Humor
Choose a favorite category and find really read worthwhile books. Enjoy immersion in the world of imagination, feel the emotions of the characters or learn something new for yourself, make an fascinating discovery.

- Book:The Quick Guide to Backing Up Your Apple Life
- Author:
- Genre:
- Rating:4 / 5
- Favourites:Add to favourites
- Your mark:
The Quick Guide to Backing Up Your Apple Life: summary, description and annotation
We offer to read an annotation, description, summary or preface (depends on what the author of the book "The Quick Guide to Backing Up Your Apple Life" wrote himself). If you haven't found the necessary information about the book — write in the comments, we will try to find it.
Youll learn how to:
Use Time Machine to Back Up your Mac
Use cloud services such as iCloud Drive and Dropbox to save your important files
Use online backup services such as Backblaze to create a web-based backup for your Mac, which can be useful if your Mac gets damaged or stolen
Back up your iOS devices with iCloud and iTunes
Humphries Chris.: author's other books
Who wrote The Quick Guide to Backing Up Your Apple Life? Find out the surname, the name of the author of the book and a list of all author's works by series.
![Yauheni V. Pankov - Network Backup with Bacula [How-to]](/uploads/posts/book/56333/thumbs/yauheni-v-pankov-network-backup-with-bacula.jpg)
The Quick Guide to Backing Up Your Apple Life — read online for free the complete book (whole text) full work
Below is the text of the book, divided by pages. System saving the place of the last page read, allows you to conveniently read the book "The Quick Guide to Backing Up Your Apple Life" online for free, without having to search again every time where you left off. Put a bookmark, and you can go to the page where you finished reading at any time.
Font size:
Interval:
Bookmark:

Copyright
Copyright 2016 by Chris Humphries
All rights reserved. No part of this publication may be reproduced, distributed, or transmitted in any form or by any means, including photocopying, recording, or other electronic or mechanical methods, without the prior written permission of the publisher, except in the case of brief quotations embodied in critical reviews and certain other noncommercial uses permitted by copyright law.
introduction
Youre Here.
Maybe youve experienced a data-loss catastrophe or you are just wanting to create a strong backup system for your digital life. Either way, this book is a quick guide to learning everything you need to know about creating a bulletproof backup system for your Apple life.
By the end of this guide you will have the resources to put a multi-layered backup system in place that not only has you covered in a data loss situation, but also allows you to access your files from anywhere. This guide is designed to get you quickly up and running so that your data is protected as quickly as possible. This stuff really is simple - all it takes is a few hours on a Saturday and you will be good to go.
Lets get started.
Chapter 2
Mac Backups
Youve just purchased your first Mac - what do you buy next? An external hard drive. Hard drives have dropped in price dramatically over time and are now cheaper than ever. Pick a good brand - G-Drive, Buffalo, or WD are good ones - and a good size (between 1TB-3TB is a good place to start), and youre all set. Lets get started with one of the most simple backup systems available for the Mac: Time Machine.
MAC Backups
Time Machine
Time Machine is the built-in backup program for the Mac. Its incredibly simple and works very well. If you are using a Mac, you need to be using Time Machine. Heres how it works:
1. Plug in hard drive.
2. Time Machine recognizes your hard drive and goes to work, backing up your files.
See? Simple as that. If its your first time using Time Machine with your new hard drive, your Mac should ask you when you plug your hard drive in if youd like to use it with Time Machine. Depending on how many files you have on your Mac, it may take some time - so make sure when you get started you are able to leave your Mac in one place for the duration of the initial backup. Youll still be able to use your Mac for other tasks, but its also fine to leave it alone while it goes to work.
Quick Tip : If your hard drive doesnt seem to be working on your Mac, it may need to be reformatted. Time Machine may offer to do this for you, but in case it doesnt or you want to do it yourself, heres a quick guide:
DISCLAIMER: You will need to back up your files before reformatting your drive. Back them up before proceeding!
1. Connect your hard drive to your Mac. If there are files already on the drive, youll need to copy those to a folder on your computer or to a different location. Reformatting involves wiping the drive. Again, copy your files to your computer or another hard drive before doing this!
2. On your Mac, open the application Disk Utility. Its located in the Utilities folder in your Applications folder.
- On the left-hand side of Disk Utility, there is a listing of your hard drive. Youll see the name of your drive listed there. Click on your drive.
Note: If you are using El Capitan (OS X 10.11), then you will see a different view than in previous operating systems. The general concept is the same, but just be aware of these layout differences.
4. Once your drive is selected, click on the Erase tab between the First Aid and Restore tabs. On El Capitan / OS X 10.11, Erase is between Partition and Unmount.
5. In the middle of the screen, theres a field with a drop-down menu called Format. Heres where you select the format you want your drive to be in:
- For a drive being used on Mac, select Mac OS Extended (Journaled).
- If you are going to be using the drive on both Mac and Windows, select ExFat
- If using El Capitan / OS X 10.11, the format settings window will come down when you click on the Erase button. Use the same settings as listed above.
6. Click the Erase button. Your drive will be reformatted.
If all goes well, you should see a pop-up window asking if you want to use the drive with Time Machine. Go ahead and click that button.
Time Machine has an incredibly simple settings menu. To access it, click the icon that looks like a clock with an arrow around it in your menu bar - the top right side of your Mac, where the volume icon is - and click Open Time Machine Preferences. Time Machine can also be accessed from System Preferences. It is typically in the 4th row of preference settings on the right-hand side. When the Time Machine settings menu opens, youll see a few things:
When the settings menu opens, youll see a few things:
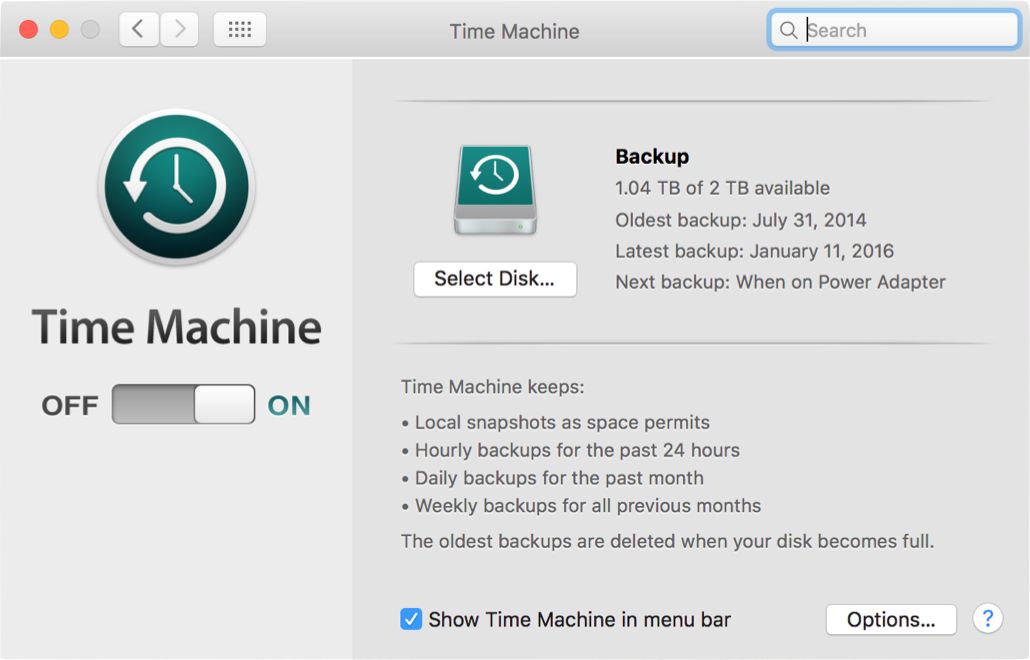
- The ON/OFF Switch - this allows you to turn Time Machine on or off. Typically leave this on.
- The Backup Information Window - provides information about how much space is left for backups on your hard drive, and information about your oldest and latest backup. It also contains info about how often it will be backing up your data.
Restoring Files From Time Machine
Theres one more thing we should look at before moving on - how to restore files from Time Machine. Its pretty simple. Make sure your hard drive is plugged into your computer, then click on the Time Machine icon in the Menu Bar and select Enter Time Machine. This will take you to the restore system, where you can navigate through past backups to restore the files. Its important to know here that Time Machine functions in two ways mainly:
1. To restore single files or groups of files - you do this by the Enter Time Machine function.
2. Restoring a new or new-to-you Mac to your file system. If you have purchased a new Mac or do encounter some sort of file loss situation, you can use your Time Machine back up to completely restore a Mac with all of your files and applications.
Lastly, set a schedule and stick to it . Back your files up once a day, once a week - whatever works best for you. You can use an online backup service or cloud data backup, (discussed in the next section) to fill in the gaps. The main thing is to create and stick to a schedule so that your files are always backed up.
Backups are an essential part of a successful Mac users workflow. Thankfully we are in a time where our technology is more and more fail-proof, but a solid backup system ensures that in data-loss situation, you will be covered.
Section 2
Cloud Data Backups
Theres only one point to make here: start using some sort of cloud storage solution. Today. Whether its iCloud Drive, Dropbox, Google Drive, OneDrive, SkyDrive, Box, or what-have-you, pick one and use it. Save your important documents and data there so that you can access them anywhere. Most services offer some sort of free tier that provides a small amount of storage, but throw $5-10 a month at one of these services and youll have all the space you need.
Next pageFont size:
Interval:
Bookmark:
Similar books «The Quick Guide to Backing Up Your Apple Life»
Look at similar books to The Quick Guide to Backing Up Your Apple Life. We have selected literature similar in name and meaning in the hope of providing readers with more options to find new, interesting, not yet read works.
Discussion, reviews of the book The Quick Guide to Backing Up Your Apple Life and just readers' own opinions. Leave your comments, write what you think about the work, its meaning or the main characters. Specify what exactly you liked and what you didn't like, and why you think so.