If you are an Annies customer and have a question about the instructions on a pattern you have purchased, please visit:
http://www.anniescatalog.com/pages/customer_care/pattern_services.html
Contents
The motifs in this book are squares or hexagons that can be tiled together to make fabric. Squares are fantastic because they make a nice straight edge around the perimeter. Hexagons do not make a straight edge around the perimeter; they make an uneven outer edge, which can be quite beautiful. Sometimes, though, the project could be improved by filling in the outer edge of a hexagon project or adding some diagonals to a square project. In this book you will learn how to make half motifs. That is, you will learn to take a square motif, keep the integrity of the design, but only make part of it. Also, you will learn to make half hexagons, which will neatly fill in edges and give you more flexibility when building a project.
READING STITCH DIAGRAMS
All the motifs and projects in this book have both written word instructions and diagrammed symbol instructions. The visual diagram is another way of communicating the same information as the written text. The stitch diagram offers another way to learn to make the project. You can refer to both sets of instructions or use the one that is easier for you.
Each symbol in a stitch diagram represents one stitch. When following a stitch diagram in rounds, begin in the center and read the diagram outward in a counterclockwise direction. If you are left-handed, you will read the diagram in a clockwise direction. The full motifs are not turned; that is, all rounds are worked on the right side. Half motifs are sometimes turned at the end of the row and sometimes not, so youll have to pay attention. Also, full motifs are worked in rounds, whereas half motifs are worked in rows that are either turned or fastened off at the end. When the next row or round begins, the diagram will indicate the change with a change in color as well as the stitches needed to join and begin the new row or round.
THE WHY OF HALF MOTIFS
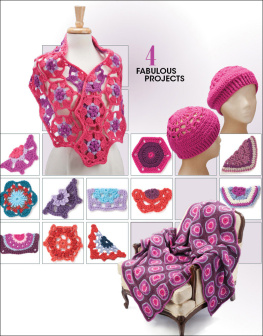
Half motifs either fill in space or add shape. For example, in the Scarf, the half motifs that hug the full ones create a straight edge along the long side. When crocheters are ready to make the jump from blankets and scarves to garments, motif sweaters are a great choice. Using squares, a straight neckline can be turned into a V-neckline by replacing a few full motifs with triangular half squares.
I use the term half motif somewhat loosely. A square has four corners, so you would expect half of a square to have two corners. Mathematically, if a square begins with a round of eight single crochets, you might expect that the half motif would begin with four. Throw these ideas out the window. Mostly, we need to construct the motif so that it will fit where it needs to go. There will be a few extra stitches in the instructions added into the pattern so that the half motif can anchor or connect logically to its neighbor.
The same is true with hexagons. Hexagons have six sides and six corners. To make half of a hexagon, you might logically assume that it would have three sides and three corners. To fill the edge space of a group of hexagons, one of the sides will have deep spaces (like in the Scarf pattern). To fill that space, connecting all the corners and leaving no gaps, the half motif will need to have three sides and four corners.
If you dont want to think about HOW to make a full motif into a half, dont worry. Every motif in this book has an accompanying half version. Some of the squares have half motifs that are rectangles and some that are triangles. If you DO want to make any motif into a half motif, look at the stitch diagram for the full version. Cover the half you dont want with a piece of paper. The half that is still exposed is what you will try to re-create. You will need to add stitches on either end to make the corners, use your pencil to draw in the turning chains that would be appropriate when turning to the next row and use rows instead of rounds. Give it a try! 

SKILL LEVEL

FINISHED MEASUREMENTS
Motif: 4 inches x 4 inches (side to side)
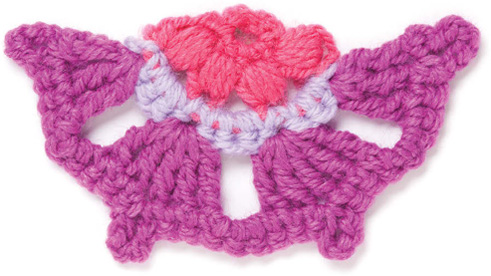
Half Motif: 5 inches wide x 2 inches tall
MATERIALS

 Plymouth Encore Worsted medium (worsted) weight acrylic/wool yarn (3 oz/200 yds/100g per ball):
4 yds #137 California pink (A)
2 yds #458 purple orchid (B)
1 yd #1308 beach berry (C)
 Size I/9/5.5mm crochet hook or size needed to obtain gauge
 Tapestry needle
GAUGE
Motif = 4 inches (blocked)
Take time to check gauge.
PATTERN NOTES
Weave in ends as work progresses.
Join with slip stitch as indicated unless otherwise stated.
Chain-4 at beginning of round counts as a treble crochet unless otherwise stated.
SPECIAL STITCHES
Beginning bobble (beg bobble): Ch 1 loosely, *yo and draw up lp 4 times in st indicated, yo and draw through all lps on hook.
Bobble (bobble): *Yo and draw up lp 4 times in st indicated, yo and draw through all lps on hook.
MOTIF
Rnd 1 (RS): With B, ch 4, join(see Pattern Notes) in first ch to form ring, ch 1, 6 sc in ring, join in first sc. (6 sc)
Rnd 2: Beg bobble(see Special Stitches) in same st as joining, ch 3, [bobble(see Special Stitches) in next st, ch 3] 5 times, join in top of beg bobble. Fasten off. (6 bobbles, 6 ch-3 sps)
Rnd 3: Join C with sc in top of any bobble, 3 sc in next ch-3 sp, [sc in top of next bobble, 3 sc in next ch-3 sp] 5 times, join in first sc. Fasten off. (24 sc)
Rnd 4: Join A in sc over any bobble, ch 4(see Pattern Notes), 4 tr in same st, *ch 3, sk next 3 sts **, 5 tr in next st, rep from * around, ending last rep at **, join in 4th ch of beg ch-4. (30 tr, 6 ch-3 sps)
Rnd 5: Ch 1, sc in same ch as beg ch-1, sc in next st, *(sc, ch 5, sc) in next st, sc in each of next 2 sts, 3 sc in next ch-3 sp**, sc in each of next 2 sts, rep from * around, ending last rep at **, join in first sc. Fasten off. (54 sc, 6 ch-5 sps)
HALF MOTIF
Row 1 (RS): With A, ch 4, join(see Pattern Notes) in first ch to form ring, ch 1, 4 sc in ring, turn. (4 sc)
Row 2: Beg bobble(see Special Stitches) in first st, [ch 3, bobble(see Special Stitches) in next st] 3 times. Fasten off. (4 bobbles, 3 ch-3 sps)
Row 3: With WS facing, join C with sc in first bobble, [3 sc in next ch-3 sp, sc in next bobble] 3 times. Fasten off. (13 sc)
Row 4: With RS facing, join B in first st, ch 4(see Pattern Notes), 2 tr in same st, [ch 3, sk next 3 sc, 5 tr in next sc] twice, ch 3, sk next 3 sc, 3 tr in last sc, turn. (16 tr, 3 ch-3 sps)

