Nicola Tedman is a model maker who has worked on theater and television productions as diverse as In the Night Garden... and the Harry Potter movies.
Sarah Skeate is an illustrator with a strong craft interest and a day job in publishing

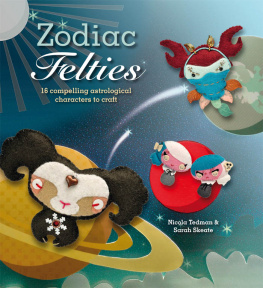
Zodiac Felties
Copyright Ivy Press Limited 2012
All rights reserved. No part of this book may be used or reproduced in any manner whatsoever without written permission except in the case of reprints in the context of reviews.
Andrews McMeel Publishing, LLC an Andrews McMeel Universal company
1130 Walnut Street, Kansas City, Missouri 64106
www.andrewsmcmeel.com
ISBN: 9781449422158
Library of Congress Control Number: 2011932651
This book was conceived,
designed, and produced by
Ivy Press
210 High Street Lewes
East Sussex BN7 2NS
United Kingdom
www.ivy-group.co.uk
Creative Director Peter Bridgewater
Publisher Sophie Collins
Editorial Director Tom Kitch
Senior Designer James Lawrence
Designer Kevin Knight
Photographer Andrew Perris
Illustrator Melvyn Evans
Digital Assistant Emily Owen
Attention: Schools and Businesses
Andrews McMeel books are available at quantity discounts with bulk purchase for educational, business, or sales promotional use. For information, please e-mail the Andrews McMeel Publishing Special Sales Department:
Important
Safety warning: The felties are not toys. All the figures are small and many have removable parts, making them a choking hazard. They are not suitable for children under the age of three.
Contents
Your zodiac lineup:
Plus four planetary felties:
Starting Out
How to make a feltie worthy of its place in the zodiac
Youll want all your creations to hit the heights of the cosmos, so be sure to read these few pages before you make a start. Well describe the stitches you need to use and the clever techniques that will make all the difference to your finished figures. Dont give your felties to the kids, howevermany have small or sharp pieces, so they dont make suitable playthings.
Tools
Use a sharp pair of scissors for cutting and snipping, and the smallest embroidery needle youre happy with to add stitched details and to sew the felties together. A few characters specify use of eyelet pliers. These are inexpensive and available online or from craft storesjust follow the manufacturers directions for your model.
The felties call for two kinds of glue: rubber cement and superglue. The best way to use rubber cement is to spread a thin layer over both the surfaces to be stuck together, wait for a few seconds so that the glue becomes more tacky, then press the glued surfaces together. For very small areas, use a matchstick or a toothpick to help you spread the glue thinly. Superglue is very strong and fast acting; the main thing to be careful about is to avoid inadvertently adhering together items that you didnt mean to.
A nonpermanent fabric marker (again easily available) is used on many of the felties to draw lines on the fabric that disappear after a few days. Use it to mark out stitching or details.
Templates
Visit www.andrewsmcmeel.com/zodiac_patterns.html to download a PDF of the Zodiac Felties template and print from your computer. All the templates are the correct size to make the zodiac felties shown; none needs scaling up or down. (Note: In your print dialog box, make sure "page-scaling" is set to "none" so it doesn't resize the template.)
Stuffing the Felties
Use a loose polyester stuffing to fill your felties. Its light and easy to separate into wisps for stuffing the dolls. Dont be tempted to use cotton balls or batting insteadtheyll clump and make for a less-than-starry result. A matchstick or pointed tweezers will help you to distribute the stuffing evenly in the smallest pieces.
Sewing and Embroidery
All the characters are embroidered and sewn together using embroidery floss. This comes in a small skein with thread made up of six separate strands, and you pull the floss apart to get the number of strands specified in the patterns. Its mostly used in single or double threads, although in a few cases more strands are needed. To get the number of strands you want, cut a short length of floss, around 12 to 16 in. (30 to 40 cm) long, and gently separate the number of strands required from the main piece, pulling gently from one end. Keep the other strands to use later. To secure the thread, either tie a small knot at the end of the floss, or make a tiny cross-stitch (one strand laid over another). Whichever method you choose, start from the wrong side of the felt piece. All the patterns specify using an embroidery needle unless you are sewing on beads, in which case use a beading needle. This has a very narrow head so that the beads slip over it easily.
If you arent used to embroidering, practice on a scrap of felt before working on your zodiac felties. None of the stitches described is difficult, but one or twoFrench knots in particularcan take some practice to get perfect.

The Stitches
Overhand Stitch
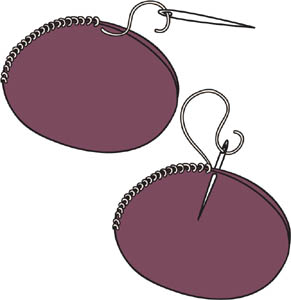
The overhand stitch is used to attach two pieces of fabric together. This isnt a decorative stitch, so always use thread that matches the color of the felt, and keep the stitches small and neat.
Take a strand of embroidery floss and align the two pieces of fabric to be sewn together. Bring the thread through from the wrong side of one of the pieces and make a small stitch at right angles to the edges of both felt pieces, going over both edges and taking the needle through both layers of felt.
Push the needle back through the felt, bringing it out a little farther along from where you started, and make a second stitch over the edges of both pieces of felt.
Backstitch
This stitch makes a plain unbroken line.
Thread the needle with one or two strands of floss, as directed, then bring it up through the fabric at the point at which you want the line of stitching to start.
Make a stitch going in the opposite direction to the way you want your backstitch line to continue, and bring the needle back up through the fabric one stitchs length away in the direction in which you want the stitching line to go.
Take the thread backward and push the needle through the point at which the first stitch finished. Bring it out one stitchs length in front of the thread. Continue until the length of your line of backstitch is complete. Fasten off.

Satin Stitch
This stitch is used for filling small areas solidly.
To cover small areas, make a series of single parallel stitches close to one another, creating a solid area of threads. Satin stitch is usually worked neatly with stitches running exactly parallel, but in some casesfor instance, where an area to be filled in with color is an irregular shapeyou can work stitches that overlap slightly or are placed at a slight angle to one another. If these stitches are made neatly, the effect of solid color will still be achieved.
Next page
