Jody Culkin - Learn Electronics With Arduino: An Illustrated Beginner’s Guide to Physical Computing (Make: Technology on Your Time)
Here you can read online Jody Culkin - Learn Electronics With Arduino: An Illustrated Beginner’s Guide to Physical Computing (Make: Technology on Your Time) full text of the book (entire story) in english for free. Download pdf and epub, get meaning, cover and reviews about this ebook. year: 2017, publisher: Maker Media, Inc, genre: Home and family. Description of the work, (preface) as well as reviews are available. Best literature library LitArk.com created for fans of good reading and offers a wide selection of genres:
Romance novel
Science fiction
Adventure
Detective
Science
History
Home and family
Prose
Art
Politics
Computer
Non-fiction
Religion
Business
Children
Humor
Choose a favorite category and find really read worthwhile books. Enjoy immersion in the world of imagination, feel the emotions of the characters or learn something new for yourself, make an fascinating discovery.

- Book:Learn Electronics With Arduino: An Illustrated Beginner’s Guide to Physical Computing (Make: Technology on Your Time)
- Author:
- Publisher:Maker Media, Inc
- Genre:
- Year:2017
- Rating:4 / 5
- Favourites:Add to favourites
- Your mark:
Learn Electronics With Arduino: An Illustrated Beginner’s Guide to Physical Computing (Make: Technology on Your Time): summary, description and annotation
We offer to read an annotation, description, summary or preface (depends on what the author of the book "Learn Electronics With Arduino: An Illustrated Beginner’s Guide to Physical Computing (Make: Technology on Your Time)" wrote himself). If you haven't found the necessary information about the book — write in the comments, we will try to find it.
This book is your introduction to to physical computing with the Arduino microcontroller platform. No prior experience is required, not even an understanding of basic electronics. With color illustrations, easy-to-follow explanations, and step-by-step instructions, the book takes the beginner from building simple circuits on a breadboard to setting up the Arduino IDE and downloading and writing sketches to run on the Arduino. Readers will be introduced to basic electronics theory and programming concepts, as well as to digital and analog inputs and outputs. Throughout the book, debugging practices are highlighted, so novices will know what to do if their circuits or their code doesnt work for the current project and those that they embark on later for themselves. After completing the projects in this book, readers will have a firm basis for building their own projects with the Arduino.
- Written for absolute beginners with no prior knowledge of electronics or programming
- Filled with detailed full-color illustrations that make concepts and procedures easy to follow
- An accessible introduction to microcontrollers and physical computing
- Step-by-step instructions for projects that teach fundamental skills
- Includes a variety of Arduino-based projects using digital and analog input and output
**
About the AuthorJody Culkin is an artist and teacher. Her comic, Arduino! has been translated into 12 languages and her illustrations have appeared in Make magazine. She has received grants and awards from the National Science Foundation, the New York State Council on the arts and many other organizations. She is currently a Professor at CUNYs Borough of Manhattan Community College in the Media Arts and Technology Department. She has a BA from Harvard University in Visual Studies and an MPS from NYUs Interactive Telecommunications Program. Jody enjoys showing projects at the annual New York City World Maker Faire.
Eric Hagan is an interactive and kinetic artist and assistant professor based out of Astoria, NY. He has written articles for publications including Make: magazine and Popular Science. He has also worked on several art installation projects around New York City including the annual holiday windows on 5th Avenue and Kara Walkers A Subtlety. He is currently a Professor at SUNY Old Westbury in the Visual Arts Department. He has a BA from Duke University in Philosophy and an MPS from NYUs Interactive Telecommunications Program. Eric enjoys showing projects at the annual New York City World Maker Faire.
Jody Culkin: author's other books
Who wrote Learn Electronics With Arduino: An Illustrated Beginner’s Guide to Physical Computing (Make: Technology on Your Time)? Find out the surname, the name of the author of the book and a list of all author's works by series.


Learn Electronics With Arduino: An Illustrated Beginner’s Guide to Physical Computing (Make: Technology on Your Time) — read online for free the complete book (whole text) full work
Below is the text of the book, divided by pages. System saving the place of the last page read, allows you to conveniently read the book "Learn Electronics With Arduino: An Illustrated Beginner’s Guide to Physical Computing (Make: Technology on Your Time)" online for free, without having to search again every time where you left off. Put a bookmark, and you can go to the page where you finished reading at any time.
Font size:
Interval:
Bookmark:
Appendix: Reading Resistor Codes
I f you have just purchased a resistor, it will generally come with some sort of label, but that doesnt help if you find your resistor sitting unaccompanied on a table or in your parts box. Fortunately, every resistor has a set of color bands printed on its casing that tells you the value of the resistor. While there are resistors with six, three, or even one band, the most commonly found resistors by far have four bands, and we are looking at that type in this appendix.
Lets take a close look at a resistor in . A resistor has two wire leads and a body with color bands on it.

A resistor
Not only do the colors of the bands matter, but also the order in which the colors appear. How do you know what each color means? The first step is to orient your resistor in the correct direction, as shown in . On one side of the resistor, the band color will be either silver or gold. This band should be placed on the right-hand side of the resistor. Look for the silver or gold band on the resistor body and place it on the right-hand side.

Orient your resistor.
Now that your resistor is oriented correctly, you can identify the other color bands on the resistor body. We have labeled the bands in in order. The colors on each band have a particular significance.

Numbering the bands on the resistor
is a standard color chart that all resistors follow. You can find similar charts online. Well go over what each band means in detail. The colors mean the same thing for all resistors.
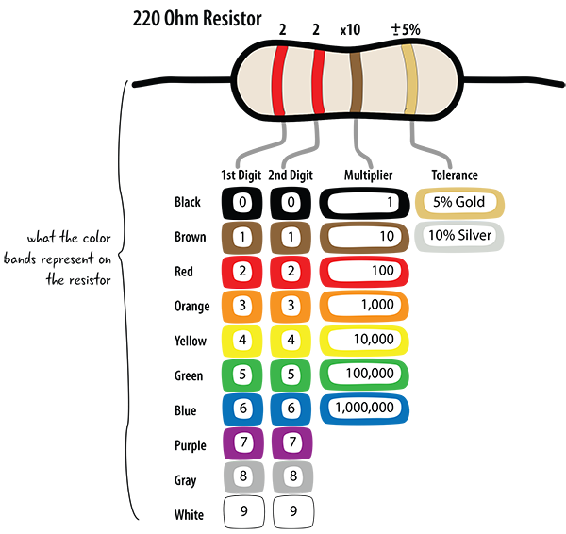
Resistor band color chart
Now that youve seen the color chart, well show you how to apply it to a resistor.
The first band represents the most significant digit, or the first digit in the number. For example, on our resistor in , the first band is red. Looking at the color chart, you see that red on the first band equates to the number 2.
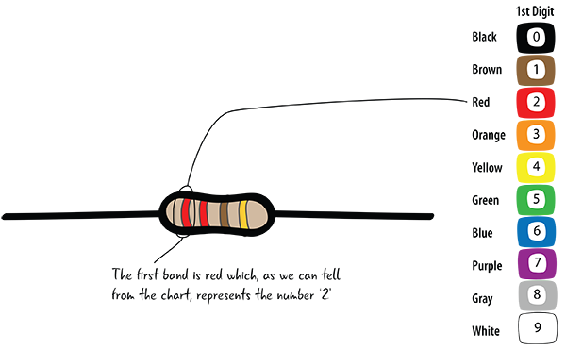
The first band
The second band signifies the second most significant digit. On this resistor, the second band is also red. As you see in , the chart indicates again that the number 2 is represented by the red color of your second band.
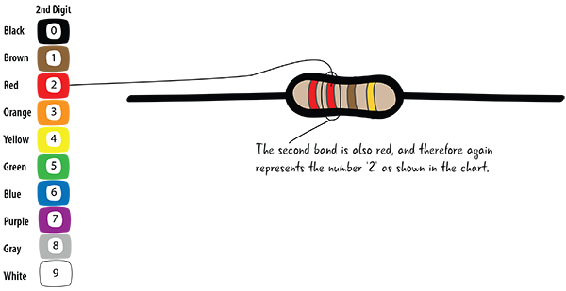
The second band
The first two bands taken together give us the number 22. The first two bands on a resistor will always represent a number between 10 and 99. (Well explain what these numbers mean shortly.) The third digit is a little bit different.
The third band, shown in : the first two digits times the multiplier equals the resistance (in ohms).
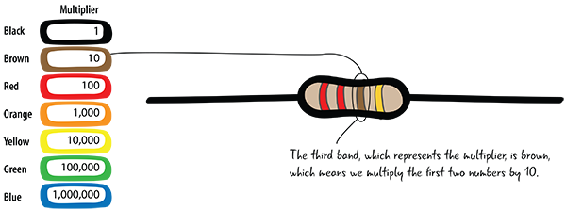
The third band

Calculating the value of a resistor
This means that our red-red-brown resistor is a 220-ohm resistor. In fact, all red-red-brown resistors have a value of 220 ohms.
The fourth band of our resistor, , represents the resistors tolerance or possible range of accuracy. With a gold band, the accuracy is plus or minus 5 percent, which means that our resistor could be as high as 231 ohms (2201.05) or as low as 209 (2200.95). (This variation is caused by imperfections in the resistors manufacturing process.)

The fourth band
Since the fourth band is always going to be gold or silver, and these are not colors any of the other bands use, we can always use the fourth band to orient our resistor correctly.
- Q: Are the band colors universal, and will I have to remember what each color means?
- A: All resistors use the same standard color codes we have talked about here regardless of the manufacturer. You dont have to memorize them you can easily find the color information online, and there are a number of free smartphone apps for all the platforms.
- Q: What if the bands are hard to see or they have been painted over or erased?
- A: If your resistors are missing the color bands, you can always use a multimeter to confirm the resistance value.
- Q: How accurate do I need to be with my resistors?
- A: Good question. Hobby electronics and electrical components are not super sensitive to minor variations in resistance. The difference between 209 ohms and 231 ohms is not enough to cause any issue with your LED. However, using a resistor with a much higher rating (double or more) or a much smaller rating (half or less) is enough to cause issues.
Although the four-band resistor is very common, some resistors have a different number of bands. The colors indicate the same numbers in the first three bands, but the tolerance values are calculated differently.
Lets look at another resistor and evaluate its color bands to figure out its total resistance value. The resistor in has the color bands brown, black, orange, and gold.

A resistor with the bands labeled
The first step is to orient the resistor correctly. To do that, make sure that the gold band is on the right-hand side ().

Orienting the resistor
Refer back to to reference the color values. You can always look up the chart whenever you need to calculate a resistance value.
The first band is brown, so we can look at the color chart and know that the first digit is a 1 ().

First band
The next color band on the resistor is black, which makes the second digit a 0 ().

Font size:
Interval:
Bookmark:
Similar books «Learn Electronics With Arduino: An Illustrated Beginner’s Guide to Physical Computing (Make: Technology on Your Time)»
Look at similar books to Learn Electronics With Arduino: An Illustrated Beginner’s Guide to Physical Computing (Make: Technology on Your Time). We have selected literature similar in name and meaning in the hope of providing readers with more options to find new, interesting, not yet read works.
Discussion, reviews of the book Learn Electronics With Arduino: An Illustrated Beginner’s Guide to Physical Computing (Make: Technology on Your Time) and just readers' own opinions. Leave your comments, write what you think about the work, its meaning or the main characters. Specify what exactly you liked and what you didn't like, and why you think so.