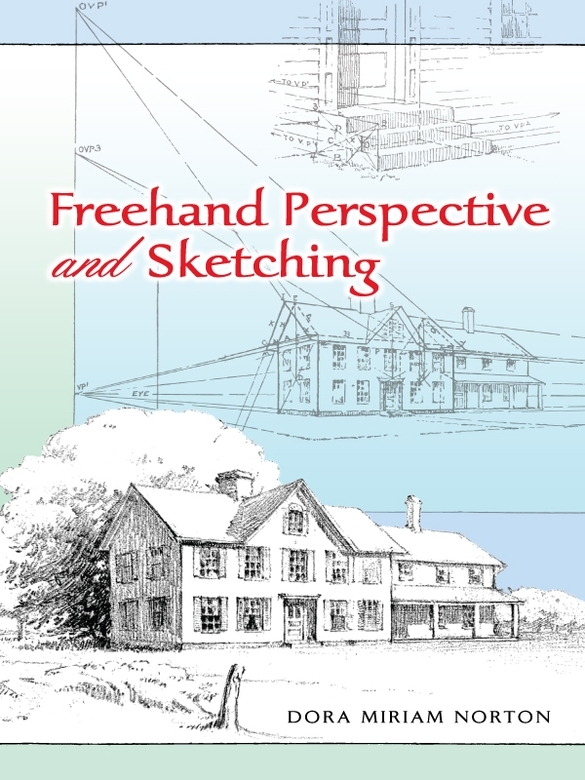
Dora Miriam Norton - Freehand Perspective and Sketching
Here you can read online Dora Miriam Norton - Freehand Perspective and Sketching full text of the book (entire story) in english for free. Download pdf and epub, get meaning, cover and reviews about this ebook. year: 2012, publisher: Dover Publications, genre: Home and family. Description of the work, (preface) as well as reviews are available. Best literature library LitArk.com created for fans of good reading and offers a wide selection of genres:
Romance novel
Science fiction
Adventure
Detective
Science
History
Home and family
Prose
Art
Politics
Computer
Non-fiction
Religion
Business
Children
Humor
Choose a favorite category and find really read worthwhile books. Enjoy immersion in the world of imagination, feel the emotions of the characters or learn something new for yourself, make an fascinating discovery.
- Book:Freehand Perspective and Sketching
- Author:
- Publisher:Dover Publications
- Genre:
- Year:2012
- Rating:4 / 5
- Favourites:Add to favourites
- Your mark:
Freehand Perspective and Sketching: summary, description and annotation
We offer to read an annotation, description, summary or preface (depends on what the author of the book "Freehand Perspective and Sketching" wrote himself). If you haven't found the necessary information about the book — write in the comments, we will try to find it.
The essential guide to rendering perspective, Freehand Perspective and Sketching uses a series of illustrated exercises and explanations to help artists master one of arts greatest challenges. Generations of art students and amateurs have found it an indispensable resource of the time-honored principles and methods that empower artists to express themselves.
More than 260 figures offer precise demonstrations in the representation of shapes, shadows, angles, and proportion. Author Dora Miriam Norton discusses how to combine these elements to create realistic-looking compositions, focusing primarily on the techniques of proportion and foreshortening. Freehand sketching, she explains, means drawing by the trained eye and judgment. This book provides a foundation of definite knowledge that enables artists to draw items individually or in groups without needing to see actual models.
Dora Miriam Norton: author's other books
Who wrote Freehand Perspective and Sketching? Find out the surname, the name of the author of the book and a list of all author's works by series.


Freehand Perspective and Sketching — read online for free the complete book (whole text) full work
Below is the text of the book, divided by pages. System saving the place of the last page read, allows you to conveniently read the book "Freehand Perspective and Sketching" online for free, without having to search again every time where you left off. Put a bookmark, and you can go to the page where you finished reading at any time.
Font size:
Interval:
Bookmark:

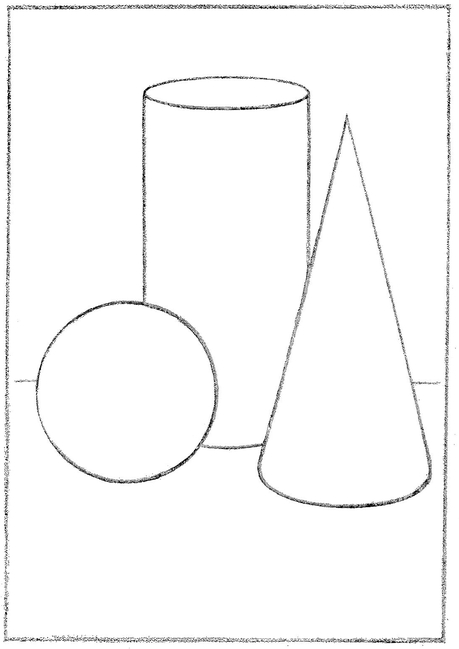
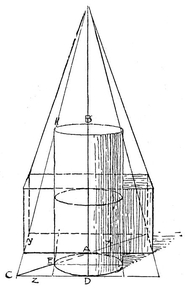
FIG. 248
THE Cone. After the cylinder is drawn, the base of the cone is This is actually a circle, and of the same size as next placed. This is actually a circle, and of the same size as the cylinder base. Its position will be clear from the plan ( Through its lower end (0) the real diameter of its circular base passes. Being at the same distance into the picture as the axis, and like it parallel with the picture plane, it appears in its true proportion to the axis (one half). It is therefore so set off, equally on each side of O, giving AB. If right, this true diameter should measure a little greater than the diameter of the cylinder. The base of the cone, though actually of the same size as the cylinder, will appear both a little larger and a little rounder, because nearer. The short diameter of this base (CD) is therefore set off greater than that of the cylinder base, remembering that as 0 is the real center, DO must be larger than CO. The long diameter (the light line in front of AB) is next drawn, exactly in the middle of CD and a very little longer than AB. The ellipse is then sketched through the four points A, B, C, and D, taking care to have it touch the base of the cylinder, and to make the greatest length not on AB, but on the long diameter. The cone is completed by drawing its sides from the apex tangentially to this elliptical base.
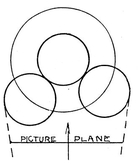
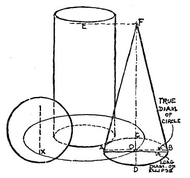
The Ball. If the ball be rolled about and touching the cylinder it will follow the same path as the center of the cone base, so that its resting point will always be somewhere in the ellipse representing that path (its center being always vertically above the resting point). We should therefore mark some point in the large ellipse (in this case x ) for the resting point of the ball. If we stoop to bring the eye nearly to the table level, and look at the ball, we shall see it resting on this spot. But if we return to the point from which the group was to be viewed, we shall find this point hidden by the projecting mass of the ball. The circle which represents the boundary of the ball is therefore drawn with its lower edge a little below x, and its center vertically over that point. Being nearer the eye, its diameter is greater than AB.
The Block. This should be drawn first. Since its front face is parallel with the picture plane, it will appear in its true shape, and the block ends will vanish in VP1 like the book ends in Chapter XII. In setting off the apparent width of f the top, we remember that it is actually narrower in proportion than the book cover.
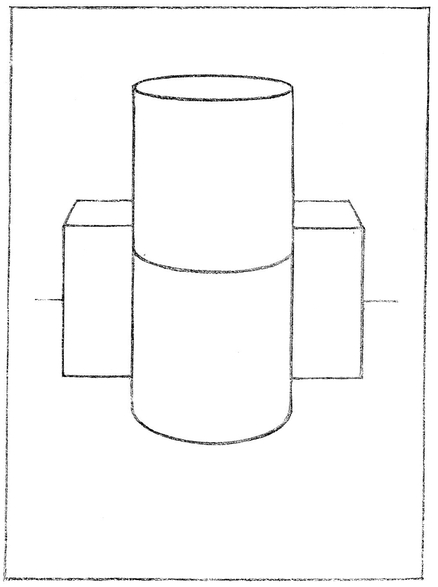
FIG. 251
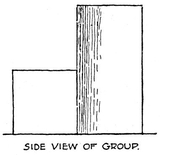
The Cylinder. The cylinder rests against this block (side view, The middle of the front of this rectangle (point D) will be the front of the base of the cylinder. Its back will be A, and its long diameter, EF, can be set off on a line sketched half way between this front and back, marking E and F half way between AD and the ends of the construction rectangle. Through these four points the bottom ellipse is drawn.
For the top ellipse a similar rectangle can be constructed directly above it. This will give a much more foreshortened ellipse, as would be expected. The back and front of the middle ellipse are drawn as directed in Chapter IV.
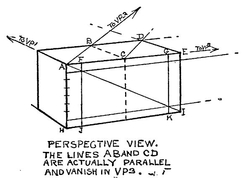
The Rectangular Block. This solid is drawn in the same manner as the book similarly placed. Recall that it is equal to two cubes, as shown in , where a diagonal (AB) of the horizontal top face of the first cube is carried to its vanishing point VP3, from which a perspectively parallel line is drawn back to C, cutting the back edge in D, which becomes the farthest corner of the second cube, and of the whole block. A line through D, vanishing in VP1 gives the corner E.
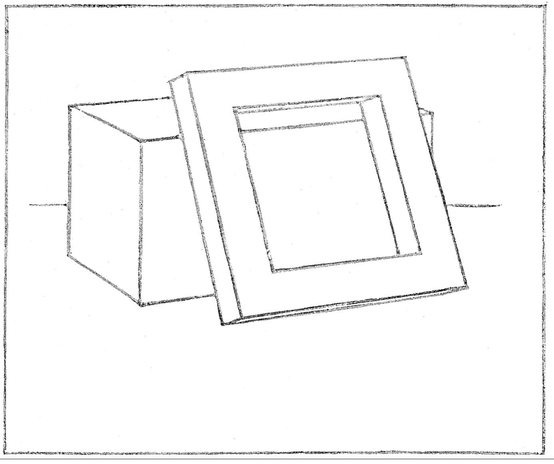
FIG. 254
The Frame. For this the lower face only may be first considered. This face rests on AE in points one eighth of AE from either end, which can be easily found by the method used on page 79 for the steps. (The vertical edge AH is divided into eighths, and lines from points 1 and 2 vanished to VP2. Where they cross the diagonal A1 verticals are erected, marking points F and G.)
Now by placing a card against one of the side thicknesses of the frame () is actually equal to half the block width; that is, to J3, and can be easily measured by a line through J parallel to H3 (vanishing with it to VP4). From where this line meets the continuation of the edge HN (in point 4) a line parallel to HI (vanishing in VP2) gives the corners L and M, and the ground edge of the frame.
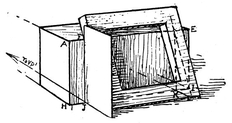
FIG. 256
The leaning edges of the square are drawn from L and M through F and G, and will be found to vanish in OVP1. They vanish a little less (have a more distant vanishing point) than the horizontal edge LM, and should therefore be made slightly longer, but shorter than if standing erect from L. We can check our estimate by comparison with LO, the height of the frame at that point (EH). To obtain this, the height of the block at J is carried forward to P on the vertical (by lines vanishing in VP1) and one half of LP added at the top, making LO.
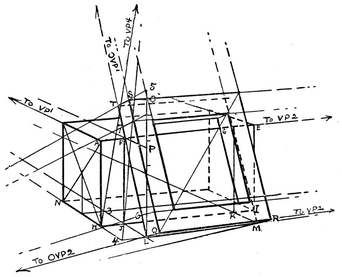
The Thickness Edges. These edges must vanish sharply (or have a near vanishing point) because the edges at right angles to them (the ones to OVP1) are foreshortened but little. Hence OVP2 is placed but little below the group. To this point these short edges are drawn, carrying them forward of the corners indefinitely for a short distance. The foreshortening of these edges (actually one sixth of the long edges of the square) will be much greater than that of the long edges; and a corner is marked accordingly at Q. From this corner a horizontal edge vanishes to VP2, and a long oblique one to OVP1, giving respectively R and S where each crosses a thickness edge. From S the other horizontal edge vanishes to VP2 and from R the other long oblique one to OVP1, completing the square.
Font size:
Interval:
Bookmark:
Similar books «Freehand Perspective and Sketching»
Look at similar books to Freehand Perspective and Sketching. We have selected literature similar in name and meaning in the hope of providing readers with more options to find new, interesting, not yet read works.
Discussion, reviews of the book Freehand Perspective and Sketching and just readers' own opinions. Leave your comments, write what you think about the work, its meaning or the main characters. Specify what exactly you liked and what you didn't like, and why you think so.