Contents
Guide
200
EMBROIDERED
flowers
Hand embroidery stitches and projects
for flowers, leaves and foliage
Kristen Gula

www.sewandso.co.uk
Contents
Introduction
Modern hand embroidery, to me, is the idea of creating more with less.
Mastering just a few stitches and, as I like to think of it, painting with thread allows for less time focusing on techniques and more time focusing on the art itself. The possibilities are boundless and, with the help of this book, you will be able to begin your journey into floral hand embroidery.
This collection of patterns is designed to equip you with the resources to stitch beautiful modern florals and plants. With practice anyone, regardless of skill level, will be able to recreate all of the patterns found in this book. The projects at the end of the book show where you can take these designs, and what you can ultimately create once you have absorbed all aspects of modern floral hand embroidery, the Gulush way!

HOW TO USE THIS BOOK
Each pattern comes with a stitched reference, a pattern breakdown, and a color code key all the information you need to paint a picture in thread! Use the stitch key at the bottom of each page to match with the color codes in the pattern (along with the required strands or str of thread) and voila, you now have the map to create an endless supply of forever flowers.
Working the patterns in the book may seem daunting but, with some practice, you can (and will) become a master of modern hand embroidery! Before you start, look at the pattern and take note of any stitches that would create an outline these form the lines that you will color in with thread and should therefore be stitched first (these are not included in every pattern). Then look for the filling stitches and work these from the center outwards. Each pattern differs, but can be completed in a similar way just make sure to start from the center of the pattern and work your way out. Once the base of the design is stitched, the final step is to add any details.
The best thing about modern hand embroidery is that the processes can be altered to suit each individual artists preferences, and that is true for the patterns in this book. Dont like a stitch? Dont use it. Dont like a color choice? Change it. This book is meant to spark a fire in your heart, igniting a love for an age-old medium but in a new and refreshing way.
MATERIALS & EQUIPMENT

THREAD
The embroideries have all been stitched with DMC six-strand embroidery floss (stranded cotton), but there are many other thread choices available, as well as yarns, cords and ribbons. Anything is possible, although some options are trickier than others!
NEEDLES
Your threading medium determines needle choice: e.g., DMC gold embroidery needles (sizes 1, 3, 5) have smaller eyes for single strands of floss, while the DMC chenille needle (size 18) has a larger eye for thicker thread types, such as cord or yarn, or for stitching with all six strands of floss. A chenille needle (size 18) was used to work all the embroideries here. Explore the options but choose a needle that has a pointed tip, rather than a blunt-tip tapestry needle.
FABRIC
Anything (and everything) can be embroidered onto: from linen to burlap, to silk, to paper. A favorite for modern hand embroidery, and the fabric used in this book, is a linen-look/linen-blend fabric, which can either be a combination of linen/rayon or linen/cotton, such as Charles Craft Carolina linen. Experiment with fabrics to find the type that works best for you.
HOOPS & FRAMES
The best frame for your work depends on what type of fabric you are embroidering. Sometimes an item is sturdy enough to not need a frame (such as a baseball cap or a shirt collar), but most often, a frame of some kind is required. A wooden embroidery hoop or a PVC Q-Snap frame is best for these embroideries.
SCISSORS
The tool you will use the most besides your needle will be your scissors, to clip thread lengths and cut off excess fibers, and very sharp, pointed embroidery scissors or snips are best. I use DMC peacock embroidery scissors, but as long as the scissors you choose are sharp and small enough to get into the hard-to-reach places, you will have found the perfect pair. A larger pair of fabric-cutting scissors is also useful.
TRANSFER PENS & PENCILS
Before stitching, you need to transfer the pattern to your fabric (see Transferring Patterns: ). My preferred method is to use a standard pencil, a white colored pencil or a ballpoint pen, depending on the color and the thickness of the fabric; there are many types of transfer pens and pencils for you to try; whichever you choose, remember it is important to ensure the pattern sticks to the fabric and doesnt rub off when stitching.
TRANSFER PAPER
This is a good option for transferring patterns to dark or thick fabrics (see Transferring Patterns: ). I use DMC carbon tracing paper, which comes in two colors: yellow for dark and blue for light fabrics. Using transfer paper can get messy, but your technique will improve with practice.
TRANSFERRING PATTERNS
SIMPLE PATTERN TRANSFER
Pattern transfer, especially onto darker fabrics, can appear daunting, but with practice (and the right tools and tricks), anyone can become a transfer master. One of the easiest ways to transfer a pattern to fabric is to place the fabric over the pattern and simply trace over the pattern with a pencil or transfer pen.
Place the fabric in an embroidery frame (wooden hoop or PVC Q-Snap frame), and pull the fabric taut: tighten the frame until the fabric makes a sound when tapped (imagine tapping the head of a drum).
Take the frame and turn it upside down over the pattern, so that the fabric is pressing right against the pattern.
For darker fabrics, place the pattern and fabric-filled frame over an illuminated surface such as a light box, a window or an electronic tablet to make the pattern more visible through the fabric (1).
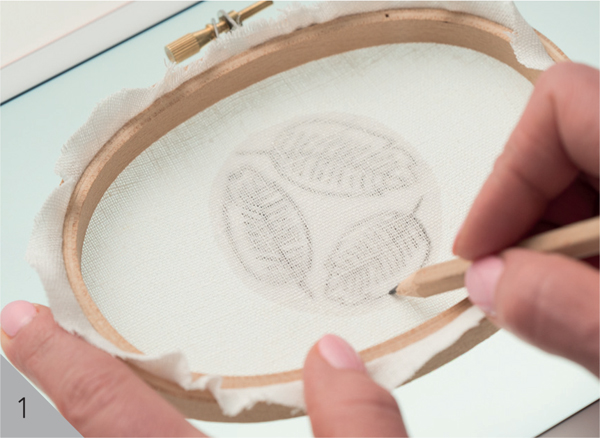
Using a standard pencil for lighter fabrics and a white colored pencil for darker fabrics, trace the pattern onto the fabric (1).
Once the pattern has been transferred, take the fabric out of the frame and then reset the fabric into the frame with the pattern facing up. Now you are ready to begin stitching.
COMPLEX PATTERN TRANSFER
If you are working on darker fabrics and you do not have a light source for the simple pattern transfer, or if the fabric you want to embroider is too thick, then a more complex pattern transfer is needed. For this method, an embroidery frame is not required, and the pattern is transferred directly onto the right side of the fabric with a carbon tracing paper (I use DMC transfer paper: see ).

