Buck Tilton - Ropes, knots, and hitches
Here you can read online Buck Tilton - Ropes, knots, and hitches full text of the book (entire story) in english for free. Download pdf and epub, get meaning, cover and reviews about this ebook. year: 2020, publisher: Falcon Guides/FalconGuides, genre: Home and family. Description of the work, (preface) as well as reviews are available. Best literature library LitArk.com created for fans of good reading and offers a wide selection of genres:
Romance novel
Science fiction
Adventure
Detective
Science
History
Home and family
Prose
Art
Politics
Computer
Non-fiction
Religion
Business
Children
Humor
Choose a favorite category and find really read worthwhile books. Enjoy immersion in the world of imagination, feel the emotions of the characters or learn something new for yourself, make an fascinating discovery.

- Book:Ropes, knots, and hitches
- Author:
- Publisher:Falcon Guides/FalconGuides
- Genre:
- Year:2020
- Rating:4 / 5
- Favourites:Add to favourites
- Your mark:
Ropes, knots, and hitches: summary, description and annotation
We offer to read an annotation, description, summary or preface (depends on what the author of the book "Ropes, knots, and hitches" wrote himself). If you haven't found the necessary information about the book — write in the comments, we will try to find it.
Buck Tilton: author's other books
Who wrote Ropes, knots, and hitches? Find out the surname, the name of the author of the book and a list of all author's works by series.
Ropes, knots, and hitches — read online for free the complete book (whole text) full work
Below is the text of the book, divided by pages. System saving the place of the last page read, allows you to conveniently read the book "Ropes, knots, and hitches" online for free, without having to search again every time where you left off. Put a bookmark, and you can go to the page where you finished reading at any time.
Font size:
Interval:
Bookmark:
A FIXED LOOP, THE STANDARD TIE-IN KNOT FOR CLIMBERS
Since the tie-in knot is where a climber is attached to a climbing rope, it is of critical importance, since the climber could fall and depend on the ropeand the knotfor life. The figure 8 follow-through is most often chosen. If you can know only one knot well, beginning climbers are often told, the figure 8 follow-through is the one.
Figure 8 Follow-Through: Step 1
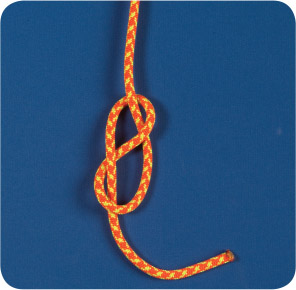
Tie a figure 8 knot (see page 10) in the working end of the rope. You will need this knot to be2 to 3 feet from the end of the rope.
Figure 8 Follow-Through: Step 2
With the working end, begin to trace, or follow the lead of, the first figure 8, as shown in the photograph.
It is not only a strong and secure loop but easy to visually inspect for correctness. The working end follows the path of the rope through a figure 8 that has already been tied, thus the name. The figure 8 follow-through is no more than a figure 8 loop (see page 16), but it is tied differentlyin this case the loop being often tied around an object, most often the climbers harness. Sometimes called the Flemish bend, it is not a bendthe Flemish bend is another name for the figure 8 bend, a knot used for tying two different ropes together. Before trusting this knot to save your life, leave enough working end to back up the knot with a stopper. The double overhand (see page 42) is an excellent choice. The figure 8 follow-through may also be used by campers and boaters, typically in situations where someones life is not on the line.
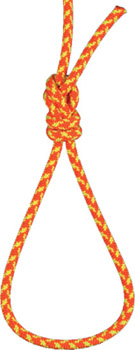
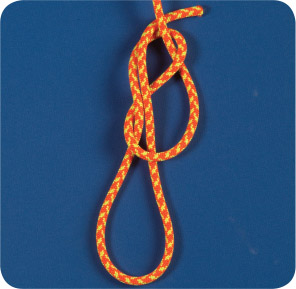
Figure 8 Follow-Through: Step 3
Continue to follow the lead of the figure 8.
Figure 8 Follow-Through: Step 4
The working end needs to come out of the knot in line with the standing part, as shown in the photograph.
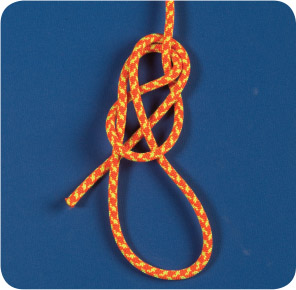
A VARIATION OF THE FIGURE 8 THAT CREATES TWIN LOOPS IN THE ROPE
The figure 8 double loop (sometimes called bunny ears) creates twin loops that allow a climber to secure one rope to two anchors. Once mastered, this knot ties quickly and forms two secure fixed loops that will not alter in size when weight is applied to either or both loops. If loops of differing sizes are needed, however, the loops can be adjusted to different sizes during the tyingand they too will remain secure.
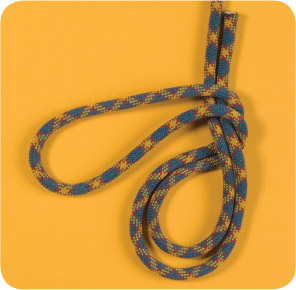
Figure 8 Double Loop: Step 1
Form a large bight in the rope and twist the bight into a loop as if starting a simple figure 8 (see page 10).
Figure 8 Double Loop: Step 2
Reach through the loop and grasp the doubled rope, as shown in the photograph.
As with the double bowline (see page 56), the figure 8 double loop could be used in an emergency as a chair sling to raise or lower a person if, of course, the loops are made large enough. When used as a chair sling, both these knots share the common characteristic of being highly uncomfortable. This knot was first described in print in 1944 by Clifford Ashley. How long it was in use prior to Ashleys description is not known.
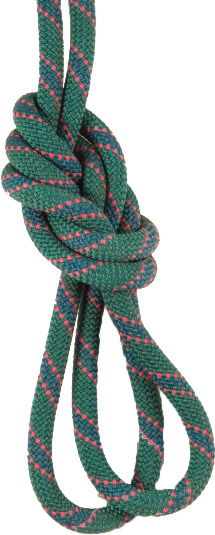
Figure 8 Double Loop: Step 3
Bring the doubled rope through the loop as if tying a figure 8 with draw loop (see page 12). The doubled section of rope pulled through the loop will become the double loop.
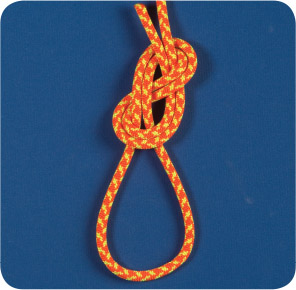
Figure 8 Double Loop: Step 4
Bring the remaining single loop down in front of the knot, take the doubled loops throughthe single loop, and move the single loop up to the top of the knot. Carefully tighten everything.
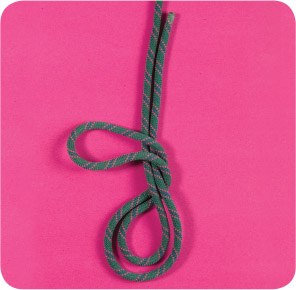
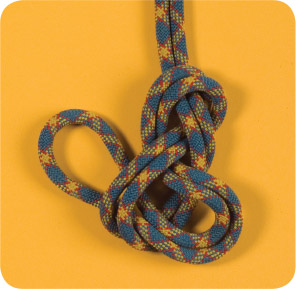
A VARIATION OF THE FIGURE 8 THAT CREATES THREE LOOPS IN THE ROPE
Figure 8 Triple Loop: Step 1
Form a large bight in the rope and twist the bight into a loop as if starting a simple figure 8 (see page 10).
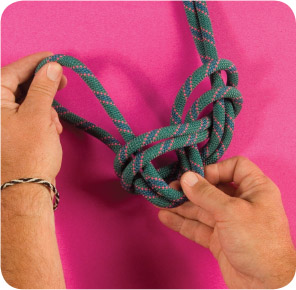
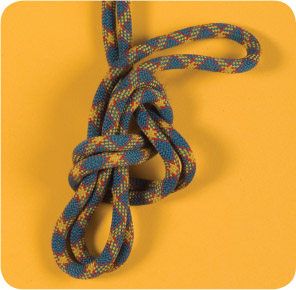
Figure 8 Triple Loop: Step 2
Reach through the loop and grasp the doubled rope. Bring the doubled rope through the loop as if tying a figure 8 with draw loop (see page 12). You are now at a point where you could tie a figure 8 double loop (see page 98).
The figure 8 triple loop (sometimes called the triple figure 8 loop) creates three loops that allow a climber to secure one rope to three anchors. Once mastered, this knot ties quickly and forms three secure fixed loops that will not alter in size once the final knot is tightened. As with the triple bowline (see page 58), the figure 8 triple loop could be used, in an emergency, as a chair sling to raise or lower person, with one loop for each leg and the third loop around the torso beneath the armpits. Though not recommended except in extreme circumstances, it could be used to lower an unconscious person. This knot could also be used by campers and boaters who want to attach three objects to the end of one rope.

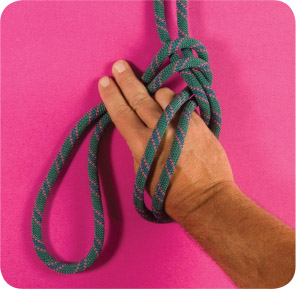
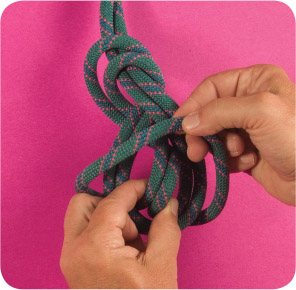
Figure 8 Triple Loop: Step 3
Bring the remaining single loop over the top of the knot.
Figure 8 Triple Loop: Step 4
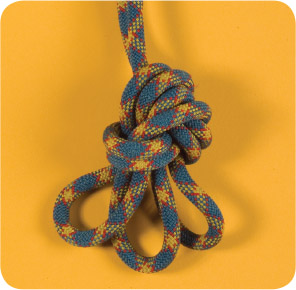
Bring this loop down through the original loop to create three loops. Carefully tighten everything. (The three loopsin the photograph are smaller than most climbers would need but are shown small for photographic purposes.)
Font size:
Interval:
Bookmark:
Similar books «Ropes, knots, and hitches»
Look at similar books to Ropes, knots, and hitches. We have selected literature similar in name and meaning in the hope of providing readers with more options to find new, interesting, not yet read works.
Discussion, reviews of the book Ropes, knots, and hitches and just readers' own opinions. Leave your comments, write what you think about the work, its meaning or the main characters. Specify what exactly you liked and what you didn't like, and why you think so.