Michael G. Lafosse - Geometric Origami
Here you can read online Michael G. Lafosse - Geometric Origami full text of the book (entire story) in english for free. Download pdf and epub, get meaning, cover and reviews about this ebook. publisher: Tuttle Publishing, genre: Home and family. Description of the work, (preface) as well as reviews are available. Best literature library LitArk.com created for fans of good reading and offers a wide selection of genres:
Romance novel
Science fiction
Adventure
Detective
Science
History
Home and family
Prose
Art
Politics
Computer
Non-fiction
Religion
Business
Children
Humor
Choose a favorite category and find really read worthwhile books. Enjoy immersion in the world of imagination, feel the emotions of the characters or learn something new for yourself, make an fascinating discovery.

- Book:Geometric Origami
- Author:
- Publisher:Tuttle Publishing
- Genre:
- Rating:4 / 5
- Favourites:Add to favourites
- Your mark:
Geometric Origami: summary, description and annotation
We offer to read an annotation, description, summary or preface (depends on what the author of the book "Geometric Origami" wrote himself). If you haven't found the necessary information about the book — write in the comments, we will try to find it.
Michael G. Lafosse: author's other books
Who wrote Geometric Origami? Find out the surname, the name of the author of the book and a list of all author's works by series.


Geometric Origami — read online for free the complete book (whole text) full work
Below is the text of the book, divided by pages. System saving the place of the last page read, allows you to conveniently read the book "Geometric Origami" online for free, without having to search again every time where you left off. Put a bookmark, and you can go to the page where you finished reading at any time.
Font size:
Interval:
Bookmark:
Designed by Michael G. LaFosse
Eight-pointed stars are a natural development in modular origami because of the common division of a right angle by folding in half. Only eight units will close the shape in a flat form. Indeed, there are many eight-point origami stars. Here is one that is among the simplest to fold and build, and once built it is especially sturdy. The geometric pattern on the front is different from the back; both sides are well suited for display.
You can experiment with this star-making method to come up with many interesting variations.
You will need eight congruent squares for this project. Select one, two, four or eight different colors. This project can be folded from small or large squares. Begin with the white side up if using standard origami paper. 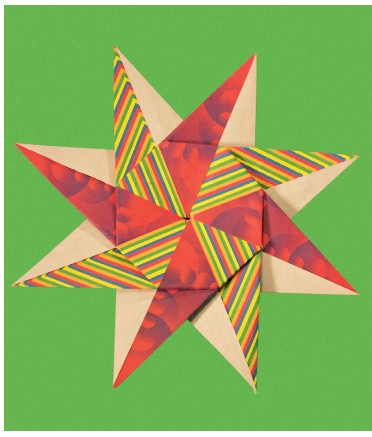
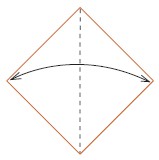 Valley-fold in half, diagonally.
 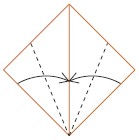 Valley-fold the bottom edges to meet at the middle crease, forming a kite.
 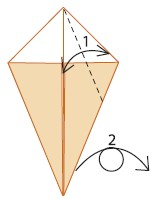 1. 1.
1. 1.
Valley-fold the top right edge of the kite to the middle crease. Unfold. 2. Turn over, left to right. 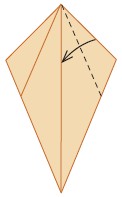 Valley-fold the top right edge of the kite to the middle crease.
 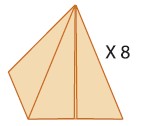 The completed module. The completed module.
You will need a total of eight. 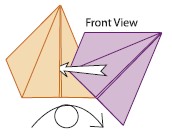 From the front view: Insert the bottom left obtuse corner of one module part way into the slot on the front of another. Turn over, left to right.
 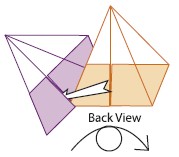 From the back view: Insert the bottom left acute corner into the short slot on the back. Turn over. 1. 1.
Mountain-fold the top corner of the first module behind the top edge of the second module. 2. Mountain-fold the combined module layers, following the folded edge of the star point on the right. 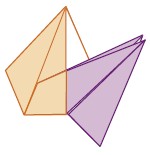 Two modules locked together.
 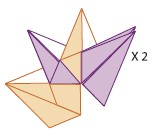 Add and lock modules until you have a group of four.
 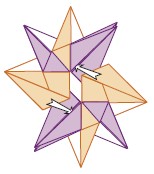 Slide the two groups of four together using the same sets of corners and slots that you used to add unit modules.
 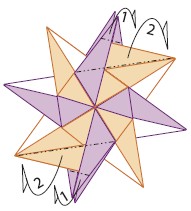 Mountain-fold to lock the groups together.
  The completed Compass Star.
Designed by Michael G.
The Aster
Designed by Michael G.
LaFosse
Flower blossoms folded from a single, uncut square tend to be complex and time consuming. Many flowers have five or six petals, and single sheet models folded from squares often have four or eight petals, and often seem clunky. Modular flowers, on the other hand, are easy to fold and the elements lock together quickly with just a tuck or fold. The modular flower repertoire in origami is now huge, especially when compared to the published set of blossoms folded from single squares. This stunning design makes a great ornament or attention-getter. You could wear a smaller aster as a brooch or as a background for a nametag.
Enjoy this abstract aster design by folding a few petals whenever you have some free time while waiting for something or someone. When they do arrive, you will have an attractive gift for them! You will need eight congruent squares for this project. Select one, two, four or eight different colors. This project can be folded from small or large squares. Begin with the white side up if using standard origami paper. Unfold. 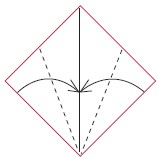 Valley-fold the bottom edges to meet at the middle crease, forming a kite.
 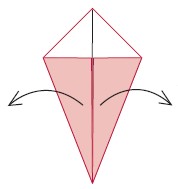 Unfold the two right triangle flaps.
 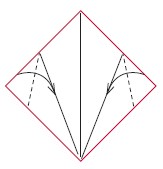 Valley-fold the right angle corners of the right triangle flaps to the nearest crease.
  Use the existing creases to valley-fold the flaps to meet at the center crease.
 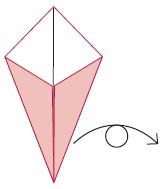 Your paper should look like this. Your paper should look like this.
Turn over, left to right. 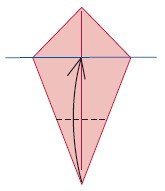 Valley-fold the bottom corner to the level of the two obtuse corners.
 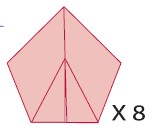 The completed module. You will need a total of eight.
 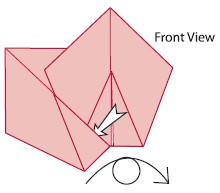 From the front view: Insert the bottom left obtuse corner of one module part way into the slot on the front of another.
 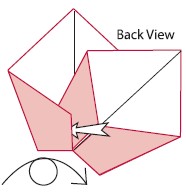 From the back view: Insert the bottom left obtuse corner into the short slot on the back. Turn over.
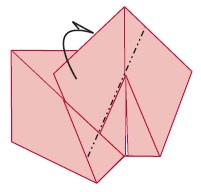
Font size:
Interval:
Bookmark:
Similar books «Geometric Origami»
Look at similar books to Geometric Origami. We have selected literature similar in name and meaning in the hope of providing readers with more options to find new, interesting, not yet read works.
Discussion, reviews of the book Geometric Origami and just readers' own opinions. Leave your comments, write what you think about the work, its meaning or the main characters. Specify what exactly you liked and what you didn't like, and why you think so.