REALISTIC TEXTURES
By Diane Cardaci

2006, 2011 Walter Foster Publishing, Inc. Artwork 2006 Diane Cardaci. All rights reserved.
This book has been produced to aid the aspiring artist. Reproduction of the work for study or finished art is permissible. Any art produced or photomechanically reproduced from this publication for commercial purposes is forbidden without written consent from the publisher, Walter Foster Publishing, Inc.
Digital edition: 978-1-61059-859-0
Softcover edition: 978-1-5601-0997-6
CONTENTS
INTRODUCTION
A pencil seems like a simple tool. It is inexpensive and portable, and no extensive training or high-tech equipment is required to use it. Youve probably used one all your life and never thought much about it. Yet for those who wish to explore its versatility, the pencil can provide endless hours of enjoyment. A pencils point can unleash a world of creative satisfaction. And although many artists may view it as a simple sketching tool, it also can be used to express the captivating textures of both the natural and manufactured worlds. A pencil can capture the fragile beauty of a butterflys wing or the imposing form of a steel skyscraper. From the delicate lines created by a sharpened, hard lead point to the velvety, deep values of a soft graphite, the range of possibilities is infinite.
Over the years, my continuous fascination with texture has inspired me to use the pencil as a powerful tool of artistic expression. I have learned from teachers and fellow artists, as well as from studying the drawings of the Old Masters. Some of my favorite techniques, however, have come from just taking the time to experiment with hand position, pressure, the grade of the graphite, and different types of papers. This book is designed to share some tried-and-true techniques, as well as to inspire you to play with pencil textures. In addition to standard step-by-step lessons, Ive also included creative exercises that focus on your artistic nature. Explore the world of textures and see what you can create on your own. See what your pencil is truly capable of and let it become a part of your creative palette. Enjoy!
TOOLS AND MATERIALS
You can create almost any texture imaginable with a pencil and paper. You wont need a lot of supplies to follow the exercises in this book, but its important to get acquainted with the basics. As you work, you can experiment with different tools to discover which ones suit you best.
Pencils
Pencils are labeled with numbers and letters. The letter indicates hard lead (H) or soft lead (B), and the number describes the gradethe higher the number, the more intense the hardness or softness of the lead. So a 9B is the softest of the B leads; a 2B is mildly soft. HB is in between hard and soft. Soft leads create thicker, darker lines; hard leads produce thinner, lighter lines.
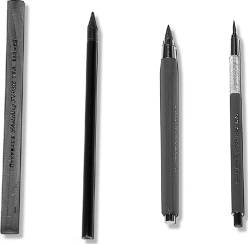
There are several types of pencils to choose from: Woodless pencils feature larger leads that can form fine points; mechanical pencils create uniform strokes; carpenters pencils create very wide strokes; water-soluble pencils produce washes that are similar to watercolor paint when manipulated with water; and lead holders are sleeves that can hold any grade of lead.
Choosing Your Pencil Pictured from left to right are a carpenters pencil, a woodless graphite pencil, and large and small lead holders.
Papers
Your choice of paper is as important as your choice of pencil. I mainly use Bristol board, a heavy paper available in vellum (rough) or plate (smooth) finish. Rough, cold-pressed papers create a deeper tone and break up the stroke, which is great for drawing stone and landscape textures. Smooth, hot-pressed papers provide the ideal surface for delicacy and detail. The rougher the surface, the more tooth (or texture) the paper has. Use acid-free papers whenever possible to avoid yellowing and deterioration.

Experimenting with Papers There is a great variety of papers you can choose from. Pictured from top to bottom are a small handmade paper, which has a deckle edge and is ideal for smaller drawings; a rough watercolor paper, which has a very rugged, but regular, pattern; a tinted pastel paper, which has a nice tooth; a cold-pressed watercolor paper, which is great for laying washes with water-soluble pencil; and finally a heavyweight handmade paper, which has a very rough, irregular tooth.
Erasers
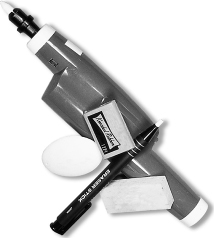
Erasers are great for creating highlights and for shading. I prefer kneaded erasers because they can be molded into different shapes and sizes to suit my needs. Theyre softer and more flexible than vinyl erasers, the type you usually see in schools. They are great for cleaning up a finished drawing because they dont leave crumbs.
Cleaning Up Pictured here are a battery-powered eraser, a kneaded eraser, vinyl erasers, and a pen eraser.
Sharpeners
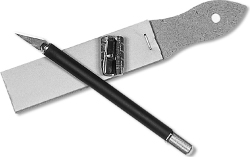
Carpenters pencils and other specialty pencils can be sharpened manually with a single-edge blade and/or a sandpaper block. Mechanical pencils have special sharpeners for the leads, called pointers. For my wood pencils, I usually use an electric sharpener. Most artists use a combination of all these sharpeners, depending on the type of point they want. A mechanical sharpener will give you a very fine point, but you have little control over it. Sandpaper can make some nice blunt points that are difficult to create with other types of sharpeners. Some artists even use a utility knife to whittle their pencils into hard, sharp shapes.
Sharpening Your Tools Each type of pencil has a specific sharpener. If youre using a carpenters pencil, you can find a blade and sandpaper at the hardware store. When youre done sharpening, the shavings can be used as graphite powder, also called carbon dust.
Blending Tools
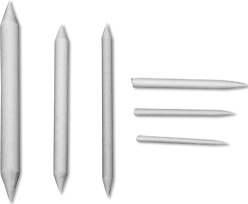
There are several tools that can be used to smudge and blend graphite. A blending stump is a rolled piece of paper that can be used for blending so you dont get your fingers dirty. A tortillon is similar, but shaped differently. When youre working with a larger area, you can use a chamois cloth for blending. These are important to have on hand for creating certain textures.


