Acknowledgements to Elinor Parker,
for kindness beyond the call of editorship,
and to sheep, who gave their wool.
APPENDIX OF POSSIBLY UNFAMILIAR TERMS AND IDIOSYNCRATIC PROCEDURES IN THE FOREGOING TEXT.
SSK (slip, slip, knit )
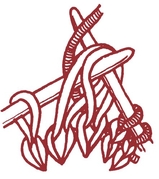
An excellent decrease of 1 stitch which slants to the left. A substitute for sl 1, K 1, psso: SSK: slip the first and second stitches knitwise one at a time, then insert the tip of left-hand needle into the fronts of these two stitches from the left, and knit them together from this position. (From A Treasury of Knitting Patterns by Barbara Walker.)
M 1 (make 1)
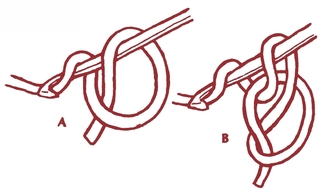
A quick, neat, and fairly invisible way to increase: Put a firm backward loop over the right-hand needle. (A) For absolute symmetry in a double-increase, make the two loops in opposing directions. (A and B)
Emily Ockers Circular Beginning
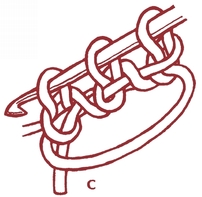
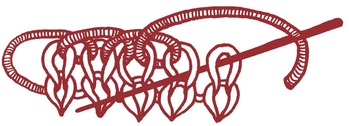
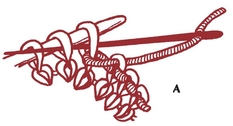
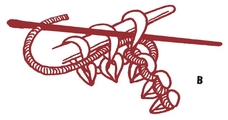
This is a series of single crochet stitches worked on a loopas-many-as-you-want stitches; the loop is later tightened. Make a simple loop with the short end below. *With crochet-hook make 2nd loop through this loop (A). With crochet-hook make 3rd loop through 2nd loop (B). Rep from * until there are enough loops on the crochet-hook. Place them on 3 or 4 needles, and continue around. After several inches, pull short end tight, and finish off.
Sideways Border
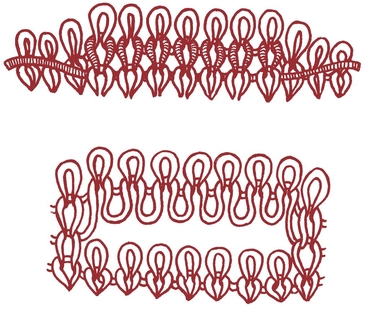
A firm elastic edge which avoids casting-off. When final row or round of work is finished, cast on 6 sts, (or desired number). *K 5, K 2 tog (the last of the 6 sts + 1 st from final row of work). Turn. K 6 Rep from * along (or around) entire border. Weave or sew end to beginning.
Weaving
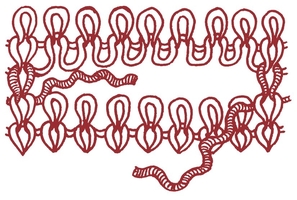
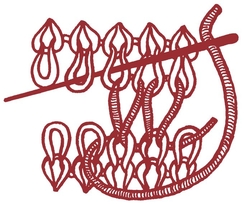
Having made two swatches as described on p. 47, thread blunt needle with wool and go down through first st at right-hand end of lower piece and up through second stitch. Rep. on upper piece. Go down through second st on lower piece and up through third. Rep on upper piece. And so on.
Garter Stitch Weaving
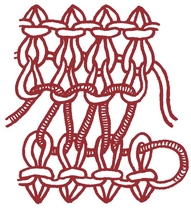
See to it that both threads hang at righthand end of work. Break one and weave with the other. The stitches must lie as in illustration. *Go down through first st on lower piece and up through second. Go up through first st on upper piece and down through second. Rep from * on second and third stitches. And so on.
Casting-on Casting-off
An outline-stitch casting-off which deceives. Break the wool, and thread it through a good blunt needle. Hold work with right side towards you, with wool coming from left end. Work from Left to Right: *Keeping working wool above, go into second st from front and first st from back. Pull wool through both sts. Slip first st off. Rep from * This is easiest if sts are taken off the needle.
Sewn Casting-off
Especially good for garter-stitch. Break wool and thread through good blunt needle. Work from Right to Left. *Put needle through first 2 sts from R to L, and pull through (A). Put needle back through first st from L to right, pull through and slip st off (B). Rep from *.
NB
Both these castings-off are supremely useful for the lower edges of a sweater knitted from the top down.
Invisible Casting on
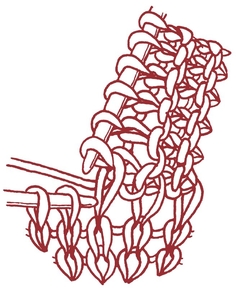
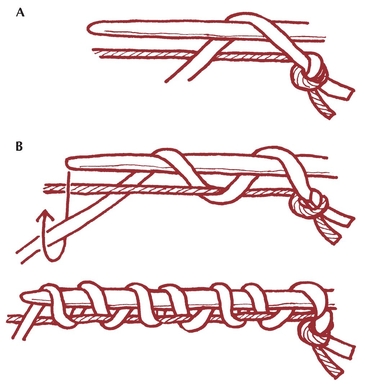
This may be taken out for work to be continued downward. Loosely knot end of wool to a piece of smooth thick twine. Place needle in right hand, holding knot between thumb and forefinger. Hold both threads taut in left hand with twine above. *With needle in right hand come down in front of twine, behind and under wool, and up. (A) Now come down behind twine, behind and under wool, and up (B). Rep from * until the desired number of sts has been formed by loops of wool around needle and twine, simply ducking down alternately in front of and behind twine and fishing up a loop of wool each time. For first row, knit into all loops as if they were stitches. When time comes to knit down, or weave, from this casting-on, undo loose knot, pull out twine, place revealed stitches on needle and go to it.
Thumb-Trick
For a 15-stitch thumb.
When you come to the base of the thumb, take a piece of contrasting wool and knit 7 stitches (1 st less than  of 15). Put the 7 sts back on left needle and continue as if nothing had happened. When mitten is finished, pull out the piece of wool and 13 sts will appear. Pick them up on 3 needles plus an extra stitch at each end, which should be twisted to avoid a hole. Work to thumb-length, thread wool through all sts and pull tight. Finish off. I like to have the starting-end at the palm-side of the thumb, so that this corner can be finished off extra strongly.
Afterthought Pocket
Decide where you want a pocket and where the middle of the opening will be. Snip one stitch at this point and unravel in either direction. When hole is wide enough, pick up sts and work to desired length on 4 needles. Weave or sew front to back. Pop into place. Neaten corners with unravelled ends.








 of 15). Put the 7 sts back on left needle and continue as if nothing had happened. When mitten is finished, pull out the piece of wool and 13 sts will appear. Pick them up on 3 needles plus an extra stitch at each end, which should be twisted to avoid a hole. Work to thumb-length, thread wool through all sts and pull tight. Finish off. I like to have the starting-end at the palm-side of the thumb, so that this corner can be finished off extra strongly.