Pattern Services and Revisions
If you are an Annies customer and have a question about the instructions on a pattern you have purchased, please visit:
AnniesCatalog.com/pages/customer_care/pattern_services.html
Templates
To download templates for easy printing, view the download instructions at the end of this book or click the Templates chapter in the Table of Contents.
Templates
To download templates for easy printing, go to:
AnniesCatalog.com/customers/check_code.html
and enter 141389745
Introduction
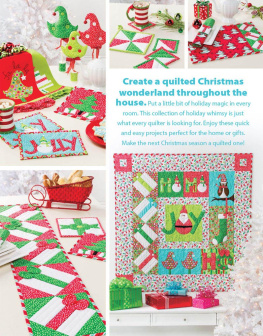
There is something very warm and welcoming about a home that is festively decorated for the holidays. And quilters love to make things for their home, so a collection of whimsical Christmas characters, colorful fabrics and creative stitching can be fun to do and can help give your decorating style some zing. I hope you enjoy making some of these projects for gifts or for yourself. Make it Christmas all through your house!
Meet the Designer
Chris Malone has been sewing and crafting most of her life. As an accomplished sewer, quilter and designer, she has had hundreds of designs published in sewing and quilting publications and has authored several books of her own.

She is a regular contributor to Quilters World magazine and Annies quilting and sewing book titles. Chriss whimsical style has been a favorite of many quilters and sewers and is easily recognizable at a glance.
Chris resides in the diverse and beautiful Willamette Valley of Oregon.
Table of Contents
General Information
You probably already have most of the supplies you will need for these projects. Even so, here are a few tips on materials and tools, general assembly instructions, and embellishment and finishing tips that you may find helpful.
Materials & Tools
Basic Quilting Tools & Supplies
Scissors for paper and fabric
Rotary cutter and mat (optional)
Nonslip quilting rulers
Nonpermanent fabric-marking tools
Sewing machine
Walking or even-feed foot (optional)
Hand-sewing needles
Straight pins and pincushion
Curved safety pins for basting
Seam ripper
Steam/dry iron and ironing surface
Fabric
For best results, use only good quality 100 percent cotton fabric. Your time is worth it. If you are prewashing, do so with ALL of the fabrics being used. Generally, prewashing is not required in quilting.
Batting
Almost any low or mid-loft batting will work for these projects. For items that will be subjected to heat, such as hot pads and coasters, using one or two layers of cotton batting along with a needle-punched insulated batting is suggested.
A needle-punched insulated batting reflects heat and cold back to the source. This breathable material has deep fibers that prevent conduction and a reflective metalized film that prevents radiant energy from passing through. Do not add this batting in anything that you will be using in the microwave.
Walking Foot
A walking foot attachment for your sewing machine is a very helpful tool when sewing layers, and it is useful for simple quilting patterns as well. This foot feeds the upper and lower layers of fabric through the machine at the same rate.
Pinking Shears
Since a lot of the projects have curved pieces that are sewn and turned, consider adding a pair of pinking shears to your toolbox if you dont already have them.
If you cut around curved seams with the pinking shears, you eliminate the need to clip the curves with straight-edge scissors, saving some time and effort. Pinking shears can also be used to control fraying on seam edges.
General Assembly Instructions
Read all instructions carefully before beginning each project.
All seams are " unless otherwise directed.
The measurements given for each project include the outer seam allowance.
Press each seam as you sew.
Embroidery Embellishments
Some of the appliqus include simple embroidery stitches to complete the embellishments. Besides the embroidery thread listed in the materials list, be sure to have a good embroidery needle with a sharp point and an elongated eye on hand.
Transferring Patterns
Use a sharp pencil, an air- or water-soluble pen or a heat-soluble pen to transfer or trace the lines of embroidery patterns to a projects fabric.
Place the pattern, printed side up, on a window or light box, and then layer the fabric on top, right side up. Trace the embroidery pattern.
You can also use a transfer, graphite or dressmakers carbon paper to trace the lines.
Place the fabric on a smooth, hard surface. Top with the transfer paper, color side down, and then the pattern. Trace over the lines with a stylus or ballpoint pen to transfer.
Embroidery Stitches
The following embroidery stitches have been used in this book as embellishment.
Outline Stitch
For the outline stitch, bring the needle and thread up at A and insert the needle at B. Keeping the thread down, bring the needle back up at C (halfway between A and B). Insert the needle at D and bring it back out at the end of B. Continue on the line, always bringing the needle out in the hole of the previous stitch and keeping the thread above the needle.

French Knot
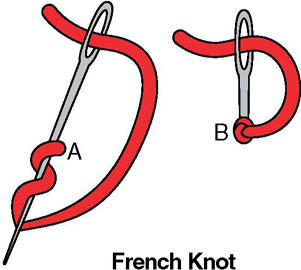
To make a French knot, bring the needle and thread up at A. Hold the thread taut and wrap it around the needle twice; then pull it gently to keep the wraps snug but not too tight. Keeping the tension, insert the needle back into the fabric at B, about one thread away from position A. Push the loops down the needle to lie on top of the fabric and then pull the needle through carefully.
Blanket Stitch
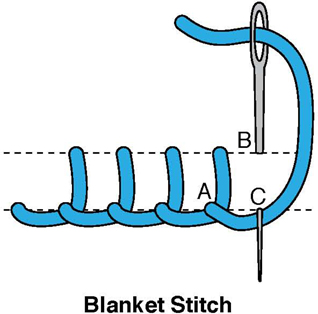
To hand-stitch a blanket stitch, bring the needle and thread up at A. Note: If you are appliquing a shape to the background, position A will be on the background, next to the edge of the appliqu. Hold the thread down with the thumb of your non-needle hand and insert the needle at B, which is over and above position A (and inside the appliqu edge). Bring needle back up at C, which is directly under B, with the working thread under the needle tip. Repeat to make the next stitch.
Appliqu pieces can also be stitched to their background pieces using your sewing machine's blanket or buttonhole stitch. Refer to your machine's manual for tips.
Button Embellishments
Of course you know how to sew on a button! But, there are quite a few buttons used as embellishments in these projects, so here is an easy way to attach them.
Instead of making a knot each time and having to bury it in the layers, cut a length of thread and push both ends through the eye of the needle (Figure A).


