March - Sew it All Learning & Reference Manual
Here you can read online March - Sew it All Learning & Reference Manual full text of the book (entire story) in english for free. Download pdf and epub, get meaning, cover and reviews about this ebook. year: 2015, publisher: F+W Media, genre: Home and family. Description of the work, (preface) as well as reviews are available. Best literature library LitArk.com created for fans of good reading and offers a wide selection of genres:
Romance novel
Science fiction
Adventure
Detective
Science
History
Home and family
Prose
Art
Politics
Computer
Non-fiction
Religion
Business
Children
Humor
Choose a favorite category and find really read worthwhile books. Enjoy immersion in the world of imagination, feel the emotions of the characters or learn something new for yourself, make an fascinating discovery.

- Book:Sew it All Learning & Reference Manual
- Author:
- Publisher:F+W Media
- Genre:
- Year:2015
- Rating:4 / 5
- Favourites:Add to favourites
- Your mark:
Sew it All Learning & Reference Manual: summary, description and annotation
We offer to read an annotation, description, summary or preface (depends on what the author of the book "Sew it All Learning & Reference Manual" wrote himself). If you haven't found the necessary information about the book — write in the comments, we will try to find it.
March: author's other books
Who wrote Sew it All Learning & Reference Manual? Find out the surname, the name of the author of the book and a list of all author's works by series.


Sew it All Learning & Reference Manual — read online for free the complete book (whole text) full work
Below is the text of the book, divided by pages. System saving the place of the last page read, allows you to conveniently read the book "Sew it All Learning & Reference Manual" online for free, without having to search again every time where you left off. Put a bookmark, and you can go to the page where you finished reading at any time.
Font size:
Interval:
Bookmark:
Sign up for our newsletter and receive special offers, access to free content, and information on the latest new releases and must-have crafting resources! Plus, receive a coupon code to use on your first purchase from Store.MarthaPullen.com for signing up.

or visit us online to sign up at
http://marthapullen.com/ebook-promo
Whether youre making a pencil skirt for yourself or a bedskirt for the guest room, taking accurate measurements is the key to successful sewing. Discover must-have measuring tools and learn how to take exact measurements for garments and home-dcor.
These tools will help you measure up ():
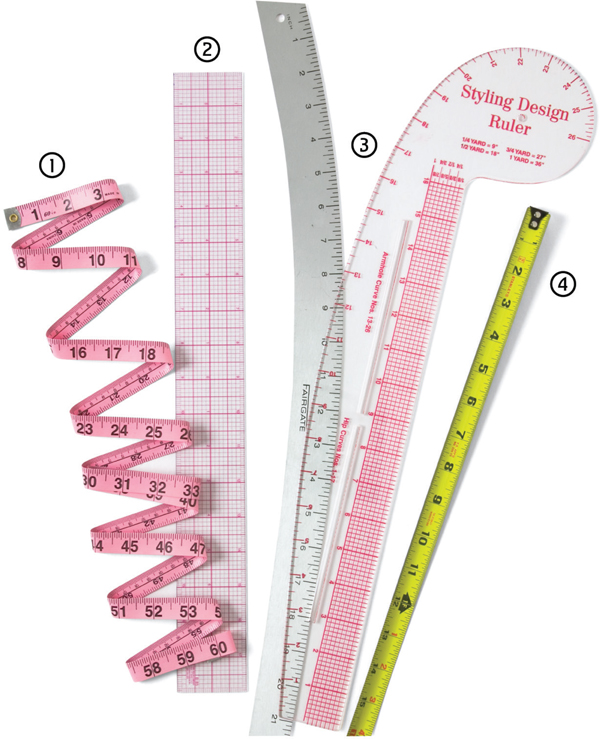
Figure 1
- Flexible Tape Measure: Use this flexible, nonstretchy tape measure to take body measurements.
- Clear Ruler: This allows you to see what youre measuring and marking at multiple points. Use it to check the fabric grain-line and to mark evenly placed buttonholes.
- Curved Rulers: Curves come in a variety of shapes and sizes and are handy for measuring and marking curved edges.
- Steel Measuring Tape: Use this rigid measuring tape to take home-dcor measurements.
Major pattern companies follow a set of standard body measurements that differ from ready-to-wear, so your pattern size will differ from your ready-to-wear size. These measurements are usually listed on the back of the pattern envelope. The first step to finding the correct pattern size is to take body measurements.
If youre measuring yourself, have a friend help you. Wear your usual undergarments and stand in your natural posturedont stand up extra straight or suck in your stomach. The goal isnt to get the smallest possible number on the tape measureits to get the most accurate measurement so that your garments fit well.
Use a tape measure that doesnt stretch. Take measurements at the designated areas, holding the tape measure comfortably, not tightly, around you. Make sure the tape measure is parallel to the floor. Record each measurement, and then compare them to those on the pattern envelope to find your size ():
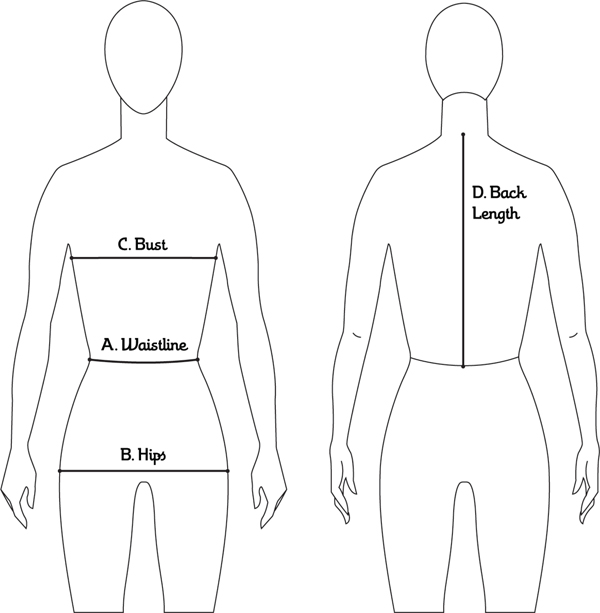
Figure 2
- Waistline: Your natural waist is located where you naturally bend from side to side (A). Tie a string around your waistline as a reference for finding your hip and back length measurements.
- Hips: Measure around the fullest part of the hip, which is usually 7" (17.8cm) to 9" (22.9cm) below the waist (B).
- Bust: Place the tape measure under your arms, straight around your back and the fullest part of your bust (C).
- Back Length: Bend your head forward and feel for the most prominent vertebra at the base of your neck. Measure from this point down to the waistline (D).
Use a steel measuring tape instead of a yardstick or cloth or plastic tape measure.
Mount the hardware before taking any measurements.
Measure and record the measurements for every window, even if windows appear to be the same size.
Use a carpenters level to make sure rods and mounting boards are installed straight. Dont assume window moldings, floors and ceilings are squareeven in a new house.
()
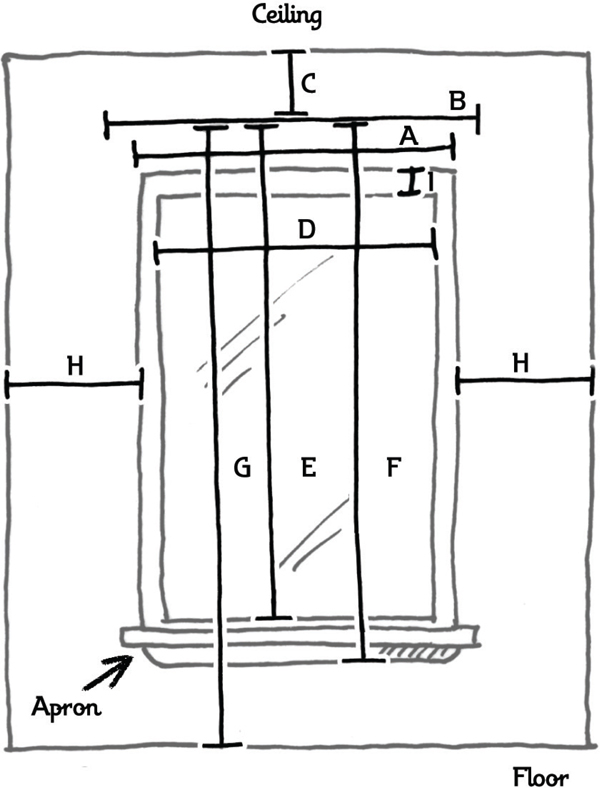
Figure 3
- Outside width (including frames) (A)
- Width between mounted brackets (B)
- Distance from ceiling to hardware upper edge (C)
- Inside window width (D)
- Length from rod upper edge to sill upper edge (E)
- Length from rod upper edge to apron lower edge (F)
- Length from rod upper edge to floor (G)
- Amount of room available on each side of the window (H)
- Frame outside edge to frame (I)
To determine the yardage for basic flat rod pocket curtains, follow these steps:
- Measure the rod width.
- Multiply by 212" (6.4cm).
- Add 5" (12.7cm) for the side hems.
- Divide by the fabric width to determine the number of panels (round up to the nearest whole number).
- Measure the desired finished length from the rod upper edge.
- Add the amount for the rod pocket and header. To determine the rod pocket size, measure around the rod or pole and add 1" (2.5cm) (this measurement may vary from 1 12" [3.8cm] to 10" [25.4cm]). The header size is usually 2" (5.1cm) or 3" (7.6cm), depending on the rod size and fabric weight. Multiply the header size by two and add to the rod pocket size.
- Add 8" (20.3cm) for the hem.
- Multiply by the number of panels needed.
- Divide by 36" (91.4cm) to determine the total yardage needed.
Refer to these standard lengths when creating window treatments:
| WINDOW TREATMENT | STANDARD LENGTH |
|---|---|
| Drapes hang to the sill | Finish 18" (3mm) above the sill |
| Drapes hang below the sill | Finish 2" (5.1cm) below the sill |
| Drapes hang to the floor | Finish within 12" (1.3cm) of the floor |
| Puddled hems | Drape 10" (25.4cm) to 20" (50.8cm) onto the floor |
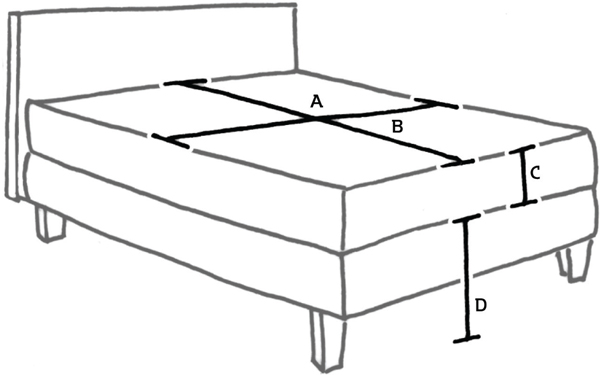
Figure 3
To determine the size and yardage for a comforter, follow these steps:
- Measure from the bed head to the bed foot (A) for the finished length.
- Measure across the bed from side to side (B) for finished width.
- Measure from the mattress upper surface to 6" (152.cm) to 7" (17.8cm) below the mattress line (C) for the drop (allows for shrinkage during quilting).
- Add A + C + 1" (2.5cm) seam allowance to determine cut length.
- Add B + (2 x C) + 1" (2.5cm) seam allowance to determine the cut width.
- To determine yardage, divide the comforter cut width (found in step 5) by the fabric width (round to nearest whole number). This figure indicates how many panels are needed to construct the comforter.
- If the fabric has a repeat print, add repeat distance to the cut length (found in step 4); multiply by the number of panels for the fabric amount needed. Divide by 36 to determine the total yardage.
Font size:
Interval:
Bookmark:
Similar books «Sew it All Learning & Reference Manual»
Look at similar books to Sew it All Learning & Reference Manual. We have selected literature similar in name and meaning in the hope of providing readers with more options to find new, interesting, not yet read works.
Discussion, reviews of the book Sew it All Learning & Reference Manual and just readers' own opinions. Leave your comments, write what you think about the work, its meaning or the main characters. Specify what exactly you liked and what you didn't like, and why you think so.