Mariska Vos-Bolman - Sew cute to carry: 12 stylish bag patterns for handbags, purses & totes
Here you can read online Mariska Vos-Bolman - Sew cute to carry: 12 stylish bag patterns for handbags, purses & totes full text of the book (entire story) in english for free. Download pdf and epub, get meaning, cover and reviews about this ebook. City: Newton Abbot;England, year: 2014, publisher: F+W Media;David & Charles, genre: Home and family. Description of the work, (preface) as well as reviews are available. Best literature library LitArk.com created for fans of good reading and offers a wide selection of genres:
Romance novel
Science fiction
Adventure
Detective
Science
History
Home and family
Prose
Art
Politics
Computer
Non-fiction
Religion
Business
Children
Humor
Choose a favorite category and find really read worthwhile books. Enjoy immersion in the world of imagination, feel the emotions of the characters or learn something new for yourself, make an fascinating discovery.
- Book:Sew cute to carry: 12 stylish bag patterns for handbags, purses & totes
- Author:
- Publisher:F+W Media;David & Charles
- Genre:
- Year:2014
- City:Newton Abbot;England
- Rating:3 / 5
- Favourites:Add to favourites
- Your mark:
Sew cute to carry: 12 stylish bag patterns for handbags, purses & totes: summary, description and annotation
We offer to read an annotation, description, summary or preface (depends on what the author of the book "Sew cute to carry: 12 stylish bag patterns for handbags, purses & totes" wrote himself). If you haven't found the necessary information about the book — write in the comments, we will try to find it.
Mariska Vos-Bolman: author's other books
Who wrote Sew cute to carry: 12 stylish bag patterns for handbags, purses & totes? Find out the surname, the name of the author of the book and a list of all author's works by series.


Sew cute to carry: 12 stylish bag patterns for handbags, purses & totes — read online for free the complete book (whole text) full work
Below is the text of the book, divided by pages. System saving the place of the last page read, allows you to conveniently read the book "Sew cute to carry: 12 stylish bag patterns for handbags, purses & totes" online for free, without having to search again every time where you left off. Put a bookmark, and you can go to the page where you finished reading at any time.
Font size:
Interval:
Bookmark:

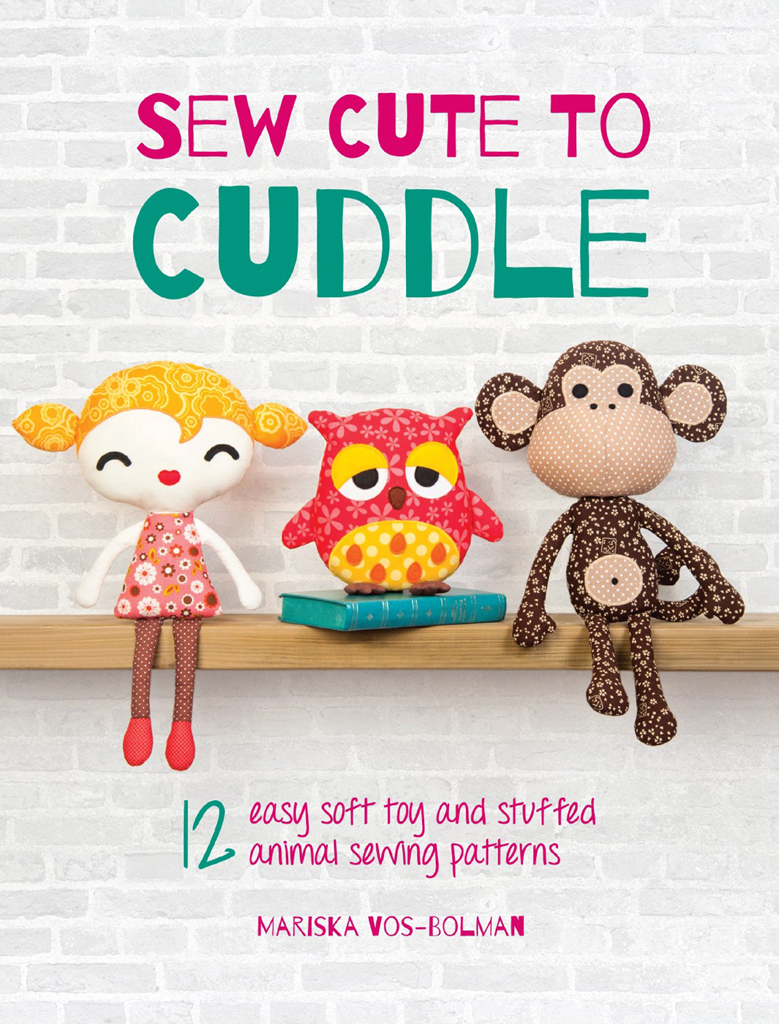
Seven years ago I bought a sewing machine and my first creation was a little star-shaped pillow with big eyes. This was the first of many soft toys that I have made since then. After a few years of creating soft toys for family and friends, I decided to share my passion for designing character toys. I started to make sewing patterns and kits, and I named my pattern collections DIY Fluffies. My toys sold very successfully and after so much great feedback, I decided to change my profession from 3D computer modeller to full-time soft-toy creator. So soft-toy making has really changed my life.
When writing this, my first book of soft-toy patterns, I wanted to keep true to those qualities that have made my patterns so successful, in particular the step-by-step tutorials that are generously illustrated each step of the way, making the creation of my soft toys so easy to understand and therefore so enjoyable to make. I have known many beginner sewers make even my most advanced patterns because my tutorials are so detailed, and their results always look great! Also, the actual size patterns I provide mean you can trace them straight off the page and start sewing immediately.
I am often asked what inspires me and the answer is Japanese toys and my two young sons. My approach to my pattern instructions is based on the fantastic detail of Japanese pattern books, where each step is broken down in amazing detail. And, as for the toys themselves, my boys always have great ideas for mummy to make (my oldest son loves Daron the dragon, while my youngest son likes them all!).
So now it is time for a book filled with nothing but DIY Fluffies patterns, and I am very grateful to the team at F+W Media for giving me this opportunity. It is a dream come true. The toys featured in this book have been my secret projects for over a year and Im very excited that I can finally share them with you. The toy chapters are ordered according to level of difficulty, starting with Joey the bear, a great project for beginners, and ending with Daron the dragon, a more challenging project for more advanced sewers. At the back of the book youll find the full-size toy patterns as well as information about tools and fabrics, stitching and stuffing techniques, and there are super-helpful tips all along the way. I hope you have as much fun creating these adorable toys as I did designing them.
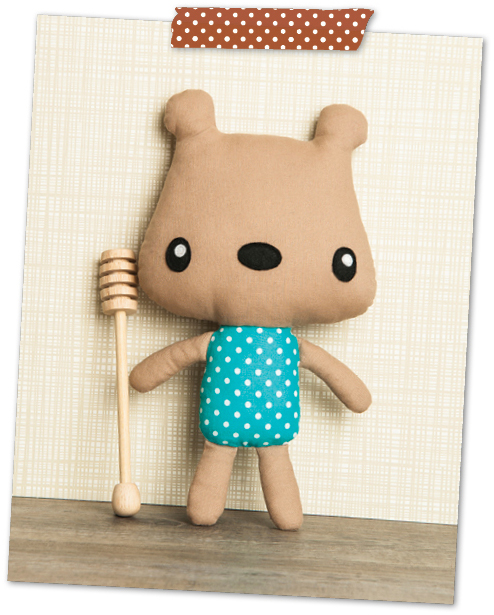
Joey may be small but make no mistake he is one brave little bear. Dragons and dinosaurs are his favourite toys and he can growl like a full-grown T-Rex, so prepare to be scared. But who will growl loudest Joey or his owner? Make one for your little one and find out. This is a very easy sewing project, so it makes the perfect starting point if you are a beginner to soft-toy making.
Light brown cotton fabric for the head, legs and arms: 45 30cm (18 12in)
Blue cotton fabric for the body: 25 15cm (10 6in)
Black felt for the eyes and nose: 5 5cm (2 2in)
Small piece white felt for the eye centres
Sewing thread
Toy filling
Basic tool kit (see )
1 Make a copy of all the pattern pieces for Joey the bear (see ), remembering to transfer all the pattern markings too; cut out your pattern pieces. Note that the pattern pieces are without seam allowance, so you will need to add a 1cm (in) seam allowance after you draw the pattern on the fabric as required.
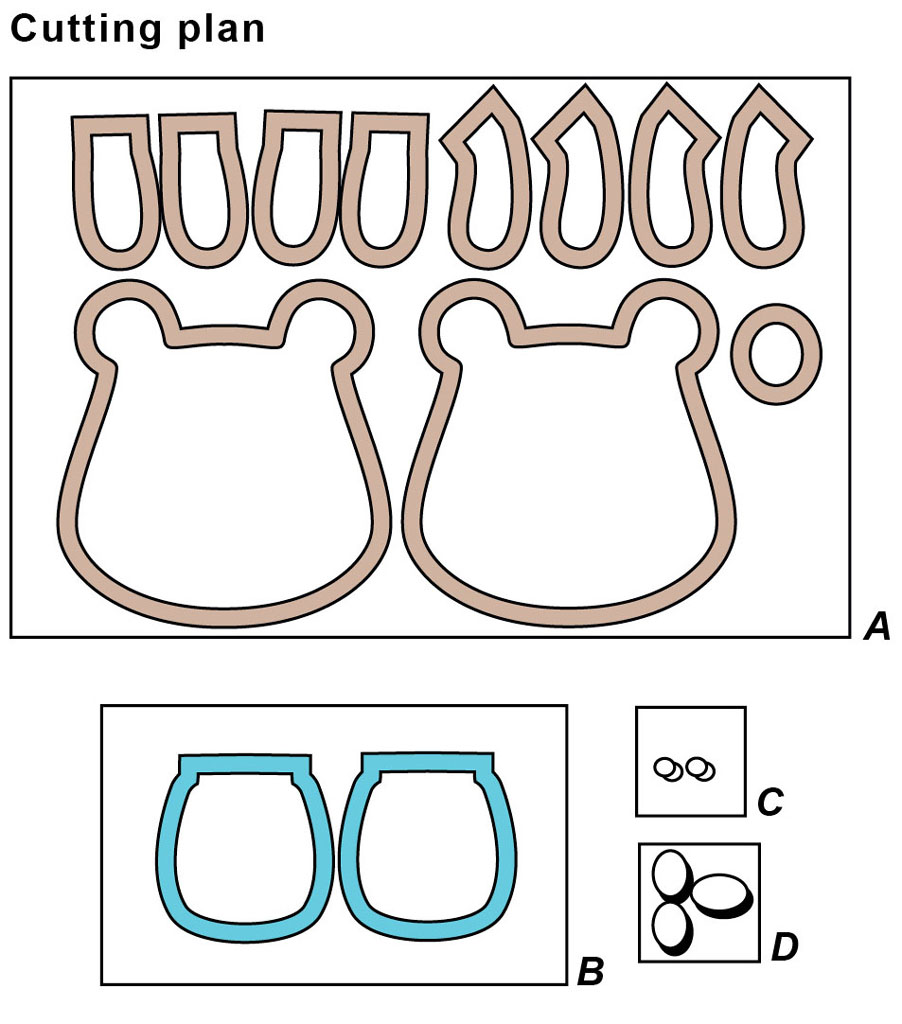
2 Working on the wrong side of your fabric, using your pattern pieces and allowing for a 1cm (in) seam allowance, draw and cut out: from the light brown cotton fabric (A), two heads (one reversed), four arms (two reversed), one tail and four legs (two reversed); and from the blue cotton fabric (B), two bodies (one reversed). Draw and cut out the following from the pieces of felt without seam allowance: from the white felt (C), two eye centres; and from black felt (D), two eyes (one reversed) and one nose.
3 Referring to the markings on the pattern piece, pin and sew the nose and the eyes onto the front of the face. Sew the eye centres onto the eyes. Place the two head pieces together with right sides facing and pin. Sew all the way around the head leaving an opening for the neck. Trim the seam allowance; turn right side out and stuff with toy filling.
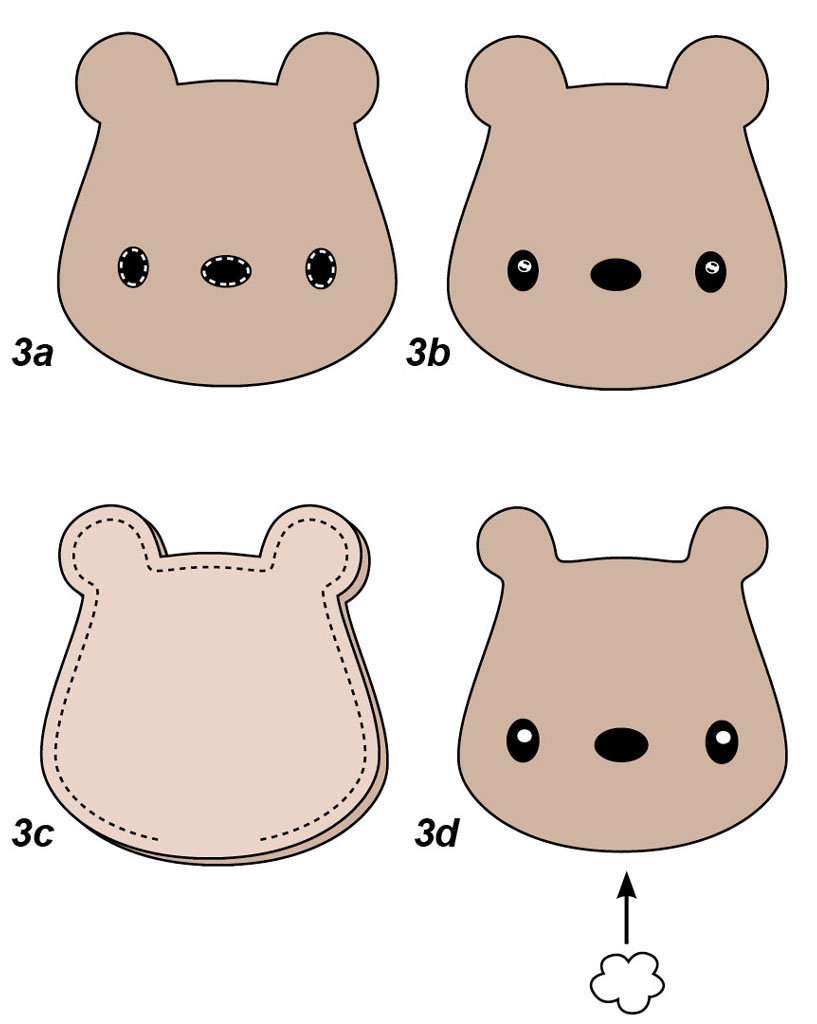
Tip: For an easy-to clean toy, replace the felt used for the bears facial details with fleece a material that wont fray but which is machine-washable.
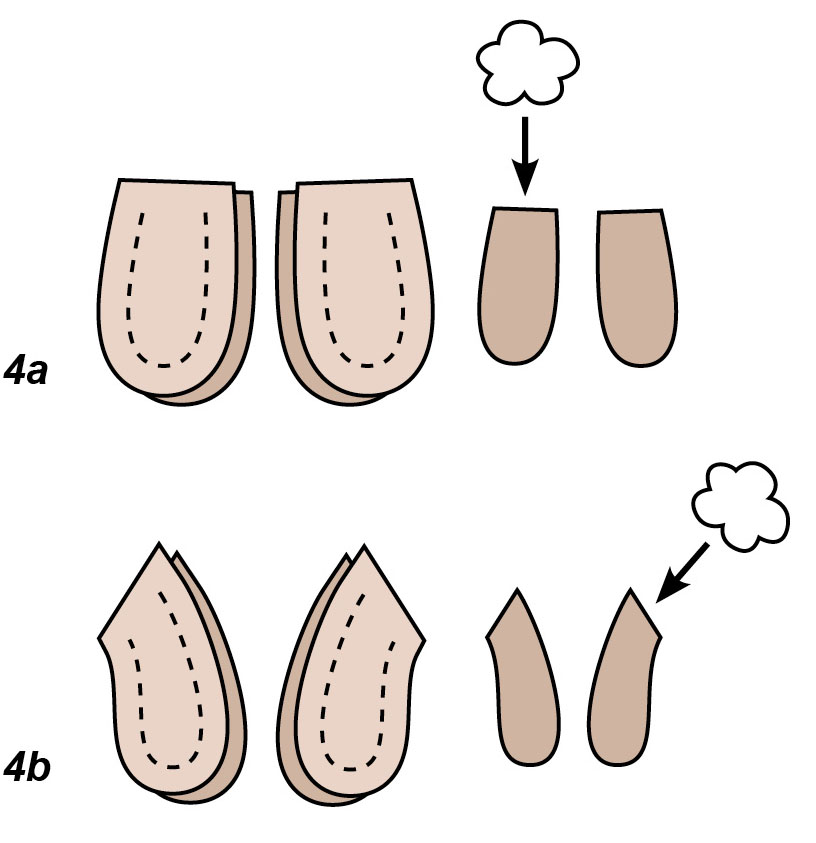
4 Pair up the leg pieces (4a) and the arm pieces (4b) with right sides facing; pin, then sew together leaving the straight edge unstitched. Trim the seam allowances; turn the legs and arms right side out and stuff with toy filling.
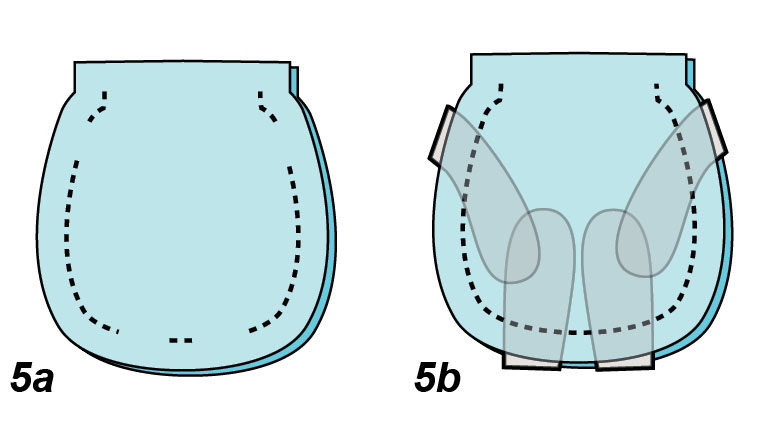
5 Place the front and back body pieces together with right sides facing; pin, then sew together leaving openings for the neck, arms and legs as marked on the pattern (5a). Push the arms into the arm holes and sew in place, then push the legs into the leg holes and sew in place (5b). Turn the body right side out and stuff it with toy filling.
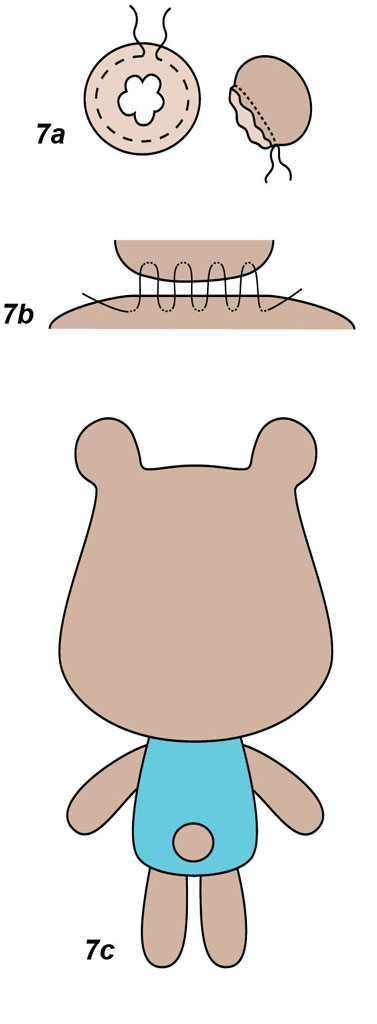
6 Take the completed body and push it into the neck opening of the head. Hand sew the front of the body to the front of the face before adding a little more toy filling to the head from the back of the neck, then hand sew the back of the body to the back of the head using ladder stitch (see ).

Tip: Sewing the front of the body in place first means you can continue to stuff the head with toy filling without the neck bending.
Tip: If you find it hard to sew in the legs as shown in the diagram above, turn the body right side out first, push the legs into the leg holes and hand sew in place with ladder stitch (see ).
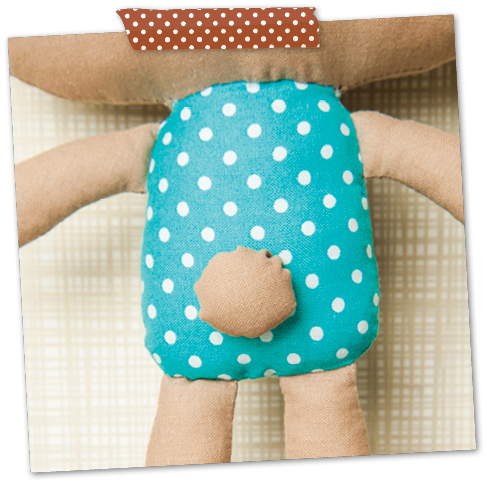
7 Take the tail piece and hand sew a line of large running (gathering) stitches around the edge. Put a little bit of toy filling in the middle and pull up the thread to create the tail, securing the thread with a knot. Ladder stitch the tail onto the back of the body, so that it is centred above Joeys legs (see ).
Tip: If you want to make Joey a girlfriend, make her up in the same way but use the body of Missy the Koala when cutting out the pattern pieces and make a bow for her hair.
Font size:
Interval:
Bookmark:
Similar books «Sew cute to carry: 12 stylish bag patterns for handbags, purses & totes»
Look at similar books to Sew cute to carry: 12 stylish bag patterns for handbags, purses & totes. We have selected literature similar in name and meaning in the hope of providing readers with more options to find new, interesting, not yet read works.
Discussion, reviews of the book Sew cute to carry: 12 stylish bag patterns for handbags, purses & totes and just readers' own opinions. Leave your comments, write what you think about the work, its meaning or the main characters. Specify what exactly you liked and what you didn't like, and why you think so.