Stanley-Millner - Authentic American Indian Beadwork and How to Do It
Here you can read online Stanley-Millner - Authentic American Indian Beadwork and How to Do It full text of the book (entire story) in english for free. Download pdf and epub, get meaning, cover and reviews about this ebook. year: 2012, publisher: Dover Publications, genre: Home and family. Description of the work, (preface) as well as reviews are available. Best literature library LitArk.com created for fans of good reading and offers a wide selection of genres:
Romance novel
Science fiction
Adventure
Detective
Science
History
Home and family
Prose
Art
Politics
Computer
Non-fiction
Religion
Business
Children
Humor
Choose a favorite category and find really read worthwhile books. Enjoy immersion in the world of imagination, feel the emotions of the characters or learn something new for yourself, make an fascinating discovery.

- Book:Authentic American Indian Beadwork and How to Do It
- Author:
- Publisher:Dover Publications
- Genre:
- Year:2012
- Rating:5 / 5
- Favourites:Add to favourites
- Your mark:
Authentic American Indian Beadwork and How to Do It: summary, description and annotation
We offer to read an annotation, description, summary or preface (depends on what the author of the book "Authentic American Indian Beadwork and How to Do It" wrote himself). If you haven't found the necessary information about the book — write in the comments, we will try to find it.
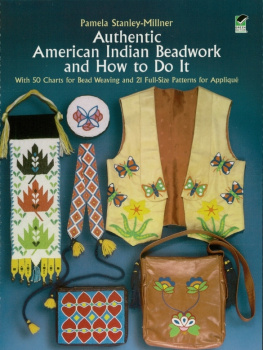
This start-to-finish guide enables even beginners to create beautiful beadwork based on designs that originated with the Chippewa, Iroquois, Pawnee, Seminole, Winnebago, and other tribes. Step-by-step instructions include diagrams for 71 patterns. Patterns include stars, geometrics, sunbursts, flowers, and other motifs for two types of traditional applications: bead weaving and applique weaving.
Stanley-Millner: author's other books
Who wrote Authentic American Indian Beadwork and How to Do It? Find out the surname, the name of the author of the book and a list of all author's works by series.


Authentic American Indian Beadwork and How to Do It — read online for free the complete book (whole text) full work
Below is the text of the book, divided by pages. System saving the place of the last page read, allows you to conveniently read the book "Authentic American Indian Beadwork and How to Do It" online for free, without having to search again every time where you left off. Put a bookmark, and you can go to the page where you finished reading at any time.
Font size:
Interval:
Bookmark:

You will need the following wood and hardware: one 36 7 board (base of the loom);* two 11 x 7 boards (sides of the loom); 8 wood screws, 1 long; 2 medium-sized nails, long.
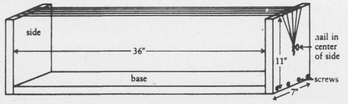
 from one end and using a sharp knife, make the notches
  deep and
  apart. Use a ruler as a placement guide. Cut approximately 100 notches in the top of each side, leaving a margin at each end. These notches will space the warp threads and hold them in position.
 The Warp Count. Before you warp the loom, refer to the charted design from which you are planning to work. Each vertical line equals one warp thread. Check for the number of warp threads the design requires. For your convenience, this count is given under every bead-weaving chart in this volume. The warp count is always one more than the total number of beads across one horizontal row of the design.
To center the warp threads on the loom, divide the warp count in half. Then, along both sides of the loom, count that halved number of notches from the center toward either end; be sure to count in the same direction on both sides. Mark these parallel notches temporarily with a small piece of tape.

Continue in this manner, warping first in one direction and then in the other, always through the next set of parallel notches, wrapping around one nail and the other in turn, until you have the total number of warp threads necessary for the design. Again, as at the beginning, tie off the thread on a nail and cut. *A common bead weaving is the belt. If you plan to fit waist sizes larger than 36 inches, make your loom with a longer base; or else plan to adjust the fit by extending the leather backing of the bead weaving. The Charts . In all 50 charts for bead weaving, each square on the chart equals one bead.
As you weave, read the charts in horizontal rows from top to bottom, returning to the top of the chart for the repeat unless otherwise indicated. Read each row from left to right. Each chart is accompanied by a key to the bead color represented by each symbol. The unmarked squaresthe backgroundare beaded in white unless another color is specified. Technique . 16 beading needle with a two-foot single strand of Size 0 nylon thread (Remember to wax it). 16 beading needle with a two-foot single strand of Size 0 nylon thread (Remember to wax it).
The warped loom is held across the lap, extending to the left and right, or may be supported on a table. A couple of inches from the left notches, tie the loose end of the nylon thread to the warp thread closest to you. Then, reading from left to right across the top row of the design chart, pick up, in order, with the point of the threaded needle, the number and color of beads needed to complete the first row of the design. Slide the beads down the nylon thread to the knot. Next, pass the needle and thread carrying the strung beads under the warp threads from left to right (away from you) and hold the needle in back (on the right) so that the thread with the beads is fairly taut underneath the warp. With the index finger of your free hand, push up each bead in turn, from left to right (front to back), between a pair of warp threads.
Eventually your index finger will be holding the entire row of beads in place. The return of the threaded needle through the beads above the warp threads will secure the row. Work from right to left (back to front) in four- or five-bead sections until the entire row of beads is threaded above the warp threads as well as below (see ). Then return to the chart for the second row, third and so on. Each row is worked the same way.
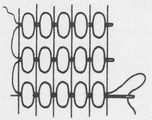
If you dont have enough to pass both under and over the warp to secure an entire row of beads, go back one row and run the needle and thread from the outside edge through a half dozen or so beads. No knot is necessary; the tucked thread will hold. Cut off any loose end remaining. Then rethread the needle, wax the thread, but dont tie it to the warp. Instead, in the last row worked, run the needle and thread through a half dozen or so beads to the outside edge, securing the end in this way without a knot. Proceed to reading the next row of the chart and picking up the necessary beads in order.
Fit and Sizing. The many belts shown on both the inside front and the back covers fulfill two essentials of strong impact: the design repetitions are not only complete but also symmetrically spaced along the total length. The ends join visually as well as functionally, as is necessary in a belt. When both fit and look are critical, plan ahead by checking the gaugethe number of beads to the horizontal inch and the number of rows to the vertical inchand using it to your advantage. Lets assume you wish to make a belt to fit a 25 waist and are not concerned about width. On the design chart you plan to use, the count of horizontal rows from the beginning to the end of one complete design is 25.
By weaving a small sample with the beads you plan to use, you discover that there are 5 rows of beads to the inch. Dividing 25 by 5 yields the design length: 5. Allowing of waist size for securing the belt ends together, your bead weaving 25 long could conceivably consist of 5 design repetitions; but there would then be no space whatsoever in between. Four repetitions, however, would leave background space, 5 altogether that would distribute evenly in 1 units, 5 rows of background beads each. The choice is yours before the commitment of time and effort. In many design charts, background can be added and subtracted as fit requires.
In the few designs that run continuously, if you cannot adjust size by adding or subtracting a design repetition, you may need to switch to another size bead. Of course, you can always add length by means of the leather or other material used in the finishing of your bead weaving. Binding Off and Finishing. 1 masking tape is very handy for binding off a bead-weaving project at each end. While the completed piece is still on the taut warp threads of the loom, run the tape above and below the warp threads next to the first and last rows of beads. Press the tape-warp-tape sandwiches together; the warp threads, permanently secured against unraveling, can then be cut, leaving the masking tape seals at either end of your bead weaving.
Font size:
Interval:
Bookmark:
Similar books «Authentic American Indian Beadwork and How to Do It»
Look at similar books to Authentic American Indian Beadwork and How to Do It. We have selected literature similar in name and meaning in the hope of providing readers with more options to find new, interesting, not yet read works.
Discussion, reviews of the book Authentic American Indian Beadwork and How to Do It and just readers' own opinions. Leave your comments, write what you think about the work, its meaning or the main characters. Specify what exactly you liked and what you didn't like, and why you think so.