About the Author
For 25 years, Dave Cross has been helping photographers and creative professionals get the most out of their Adobe software. He has a bachelor of education, is an Adobe Certified Instructor in Photoshop, and is a Certified Technical Trainer. Dave has taught for Adobe and at Photoshop World, the Texas School of Photography, the Santa Fe Workshops, Imaging USA, and numerous corporate locations. He has written many articles and several books, co-hosted Photoshop User TV, and appeared in many DVDs and online courses for Kelby Training, creativeLIVE, and udemy.com. He runs Dave Cross Workshops in his own photo studio and workshop space in Tampa, Florida.
Over the last 13 years, Dave has taught Photoshop in every state in the United States, throughout Canada and in Europe, consistently earning rave reviews. He is well known for his engaging style, his humor, and his ability to make complex topics easy to understand. In 2009, Dave was inducted into the Photoshop Hall of Fame.
Twitter: @davecross
Google+: google.com/+davecross
Facebook: PSGuyDaveCross

Photo by Dave Cross
Customizing to Increase Productivity
When people think of productivity in Photoshop, they often assume actions and automation. Although thats a big part of being more productive, its only one piece of the productivity puzzle (and the second book in this series). This book focuses on an often-overlooked aspect of increasing productivity, and thats making Photoshop look and operate the way you want. Why dig through countless menu choices when you can streamline menus to display only the items you want? How about applying keyboard shortcuts to functions that you use often, rather than what Adobe decides you use often? Why not make presets to save you time when you find yourself applying the same set of criteria over and over?
Even longtime Photoshop users often overlook the benefits of this kind of customizing. Thats why its become one of my favorite topics and is the subject of this book. In these pages, I provide examples of various methods to customize the way that Photoshop looks and operates. My real goal is to know that, by the end of this book, you have customized Photoshop to your liking, and you are more productive as a result.
Preferences
The whole concept of the Preferences dialog in Photoshopand every applicationis to set things to look and operate the way you want. Essentially, you want things to work to your preference. When you change a setting in the Preferences dialog, it will remain the default until you change it again. Having said that, you can change preferences, work for an hour, and then set the preferences back the way they were. Theres no rule that says you can only change the preferences once and never change them again. It seems that many people think of preferences as a one-time, set-it-and-forget it function. The way I look at preferences is a little different: If changing a setting in preferences helps me for the next hour, Ill change that setting. Then Ill take a few seconds to change it back when Im done.
Setting Preferences
To open the Preferences dialog, choose Photoshop > Preferences (Mac) or Edit > Preferences (Windows). As you review the tabs in the Preferences dialog, be on the lookout for things that you might want to change. Setting preferences is a very personal thing, so Ill only mention a couple of examples here.
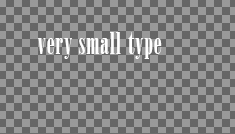
Heres an example of a preference you might set for a specific project or as an ongoing option. From the time layers were introduced, Photoshop has used a white-and-gray checkerboard to indicate transparency (). In some cases, this can be pretty inconvenient, such as when working with small white type (with the Background layer hidden).

Figure 1.1Default transparency indicator.
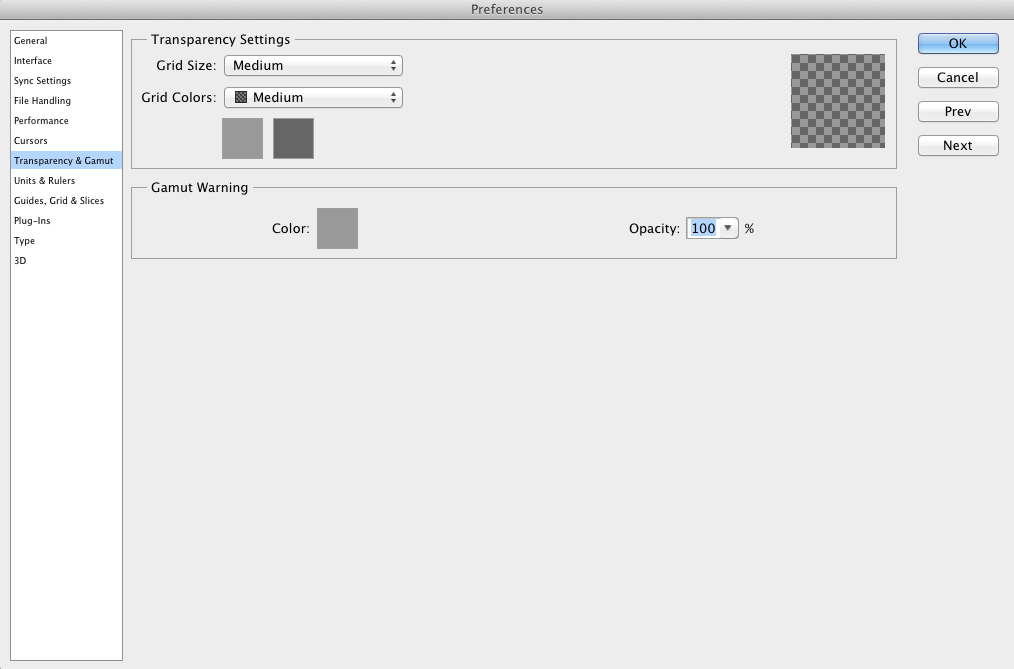
The smaller the type, the more difficult it is to read and work with. So why not change the preference? In the Preferences dialog, click Transparency & Gamut at left. Then, either choose a different grid color or choose your own darker colors (Figures 1.21.3).

Figure 1.2Transparency & Gamut Preferences.

Figure 1.3Modified transparency indicator.
Now its much easier to see what youre doing when working with white text (or other white objects) and a transparent layer. You may choose to always work this way, or go back and change this preference once youre finished with this particular project.
Note
Most changes to preferences occur right away, but a few require you to restart Photoshop. In that case, a small alert displays as shown in .
Figure 1.4The alert indicating that you need to restart Photoshop for preferences to take effect.
Resetting Preferences
If Photoshop should ever start misbehaving, the standard solution is to reset your preferences. Its important to note that when you do this, all your preferences are changed back to the out-of-the-box settings, and youll have to put everything back to the way you had it. Still, its a small price to pay for fixing annoying glitches that can occur. Heres how to reset your preferences:
Quit Photoshop.
Relaunch Photoshop while holding down these keys: Command-Option-Shift (Mac) or Ctrl-Alt-Shift (Windows).
Keep the keys held down until an alert asks if you want to Delete the Adobe Photoshop Settings file?
Click Yes. Photoshop continues launching and your preferences are set back to the defaults.
As mentioned earlier, you now need to put any settings back the way you had them. Depending on how many customizations you may lose, its a good idea to keep a backup of your preferences file.
Creating a Preferences Backup
As a failsafe, make a backup copy of your preferences and store it somewhere outside of Photoshop. Then, when any quirky behavior starts, you can replace the existing preferences with your backup copy. Sounds easy enough, but the challenge is remembering to make a backup copy of your preferences in the first place...when everything is working well!
Finding the preferences can be a bit of a challenge: youre looking for a file called Adobe Photoshop XX Prefs.psp, with XX being your version number. On the Mac, the Library that contains this file is hidden by default and can be accessed in the Finder by holding down Option and going to the Go menu.


