Table of Contents
Guide
Pages
To download templates for easy printing, go to: AnniesCatalog.com/customers/check_code.html and enter 141444490 The following is a reference guide. For more information, consult a comprehensive quilting book.
Quilt Backing & Batting We suggest that you cut your backing and batting 8" large than the finished quilt-top size. If preparing the backing from standard-width fabrics, remove the selvages and sew two or three lengths together; press seams open. If using 108"-wide fabric, trim to size on the straight grain of the fabric. Prepare batting the same size as your backing.
You can purchase prepackaged sizes or battings by the yard and trim to size. Quilting Press quilt top on both sides and trim all loose threads. Make a quilt sandwich by layering the backing right side down, batting and quilt top centered right side up on flat surface and smooth out. Pin or baste layers together to hold. Mark quilting design on quilt top and quilt as desired by hand or machine. Note: If you are sending your quilt to a professional quilter, contact them for specifics about preparing your quilt for quilting. When quilting is complete, remove pins or basting.
Trim batting and backing edges even with raw edges of quilt top. Binding the Quilt Join binding strips on short ends with diagonal seams to make one long strip; trim seams to " and press seams open (Figure A). 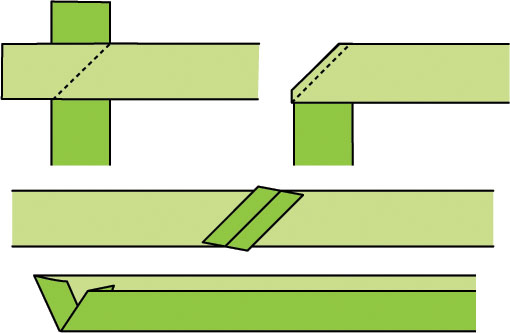 Figure A Fold 1" of one short end to wrong side and press. Fold the binding strip in half with wrong sides together along length, again referring to Figure A; press. Starting about 3" from the folded short end, sew binding to quilt top edges, matching raw edges and using a " seam.
 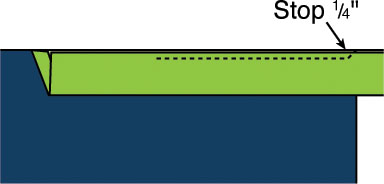 Figure B Fold binding up at a 45-degree angle to seam and then down even with quilt edges, forming a pleat at corner, referring to Figure C.
  Figure C Resume stitching from corner edge as shown in Figure C, down quilt side, backstitching " from next corner.
  Figure C Resume stitching from corner edge as shown in Figure C, down quilt side, backstitching " from next corner.
Repeat, mitering all corners, stitching to within 3" of starting point. Trim binding end long enough to tuck inside starting end and complete stitching (Figure D). 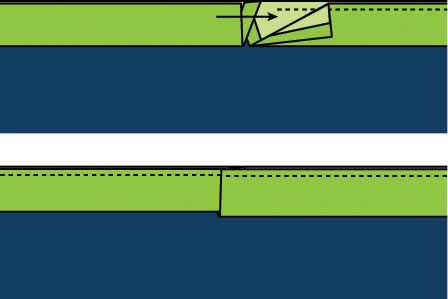 Figure D Fold binding to quilt back and stitch in place by hand or machine to complete your quilt. Please join us in thanking the talented designers whose work is featured in this collection. Sandi Colwell Farm Fresh Bed Runner Holly Daniels Mamas Scrap Basket Karen DuMont Bits & Pieces Susan Emory Farm Fancy Pillows Bev Getschel Chicken Wire Cathey Laird Country Stars Runner Chris Malone Sunny Side Up Topper Tricia Lynn Maloney Red-Letter Day Place Mats Wash Day Nancy Walhout Recker Starry Paths Runner Nancy Scott Barn Beauty Kristine Smith Country Comfort We would like to thank the following manufacturers who provided materials to our designers to make sample projects for this book. thread from Aurifil. Red-Letter Day Place Mats: Oxford by Sweetwater wovens and prints from Moda. Country Comfort: Chenille-It Blooming Bias from www.fauxchenille.com. Country Stars Runner: Colorworks collection from Northcott, Soft & Bright batting from The Warm Co., and thread from Aurifil. Wash Day: Oxford by Sweetwater wovens and prints from Moda. Mamas Scrap Basket: Warm & White batting from The Warm Co. Barn Beauty: Surfaces fabric by Lynnea Washburn from Robert Kaufman, Warm 80/20 batting from The Warm Co., and digital quilting pattern from TK Quilting & Design. Chicken Wire: Batting from Fairfield. Chicken Wire: Batting from Fairfield.
You cant get more farmhouse than fabric ticking and chickens. Make a set of these gorgeous pillows this weekend. Designs by Susan Emory of Swirly Girls Design 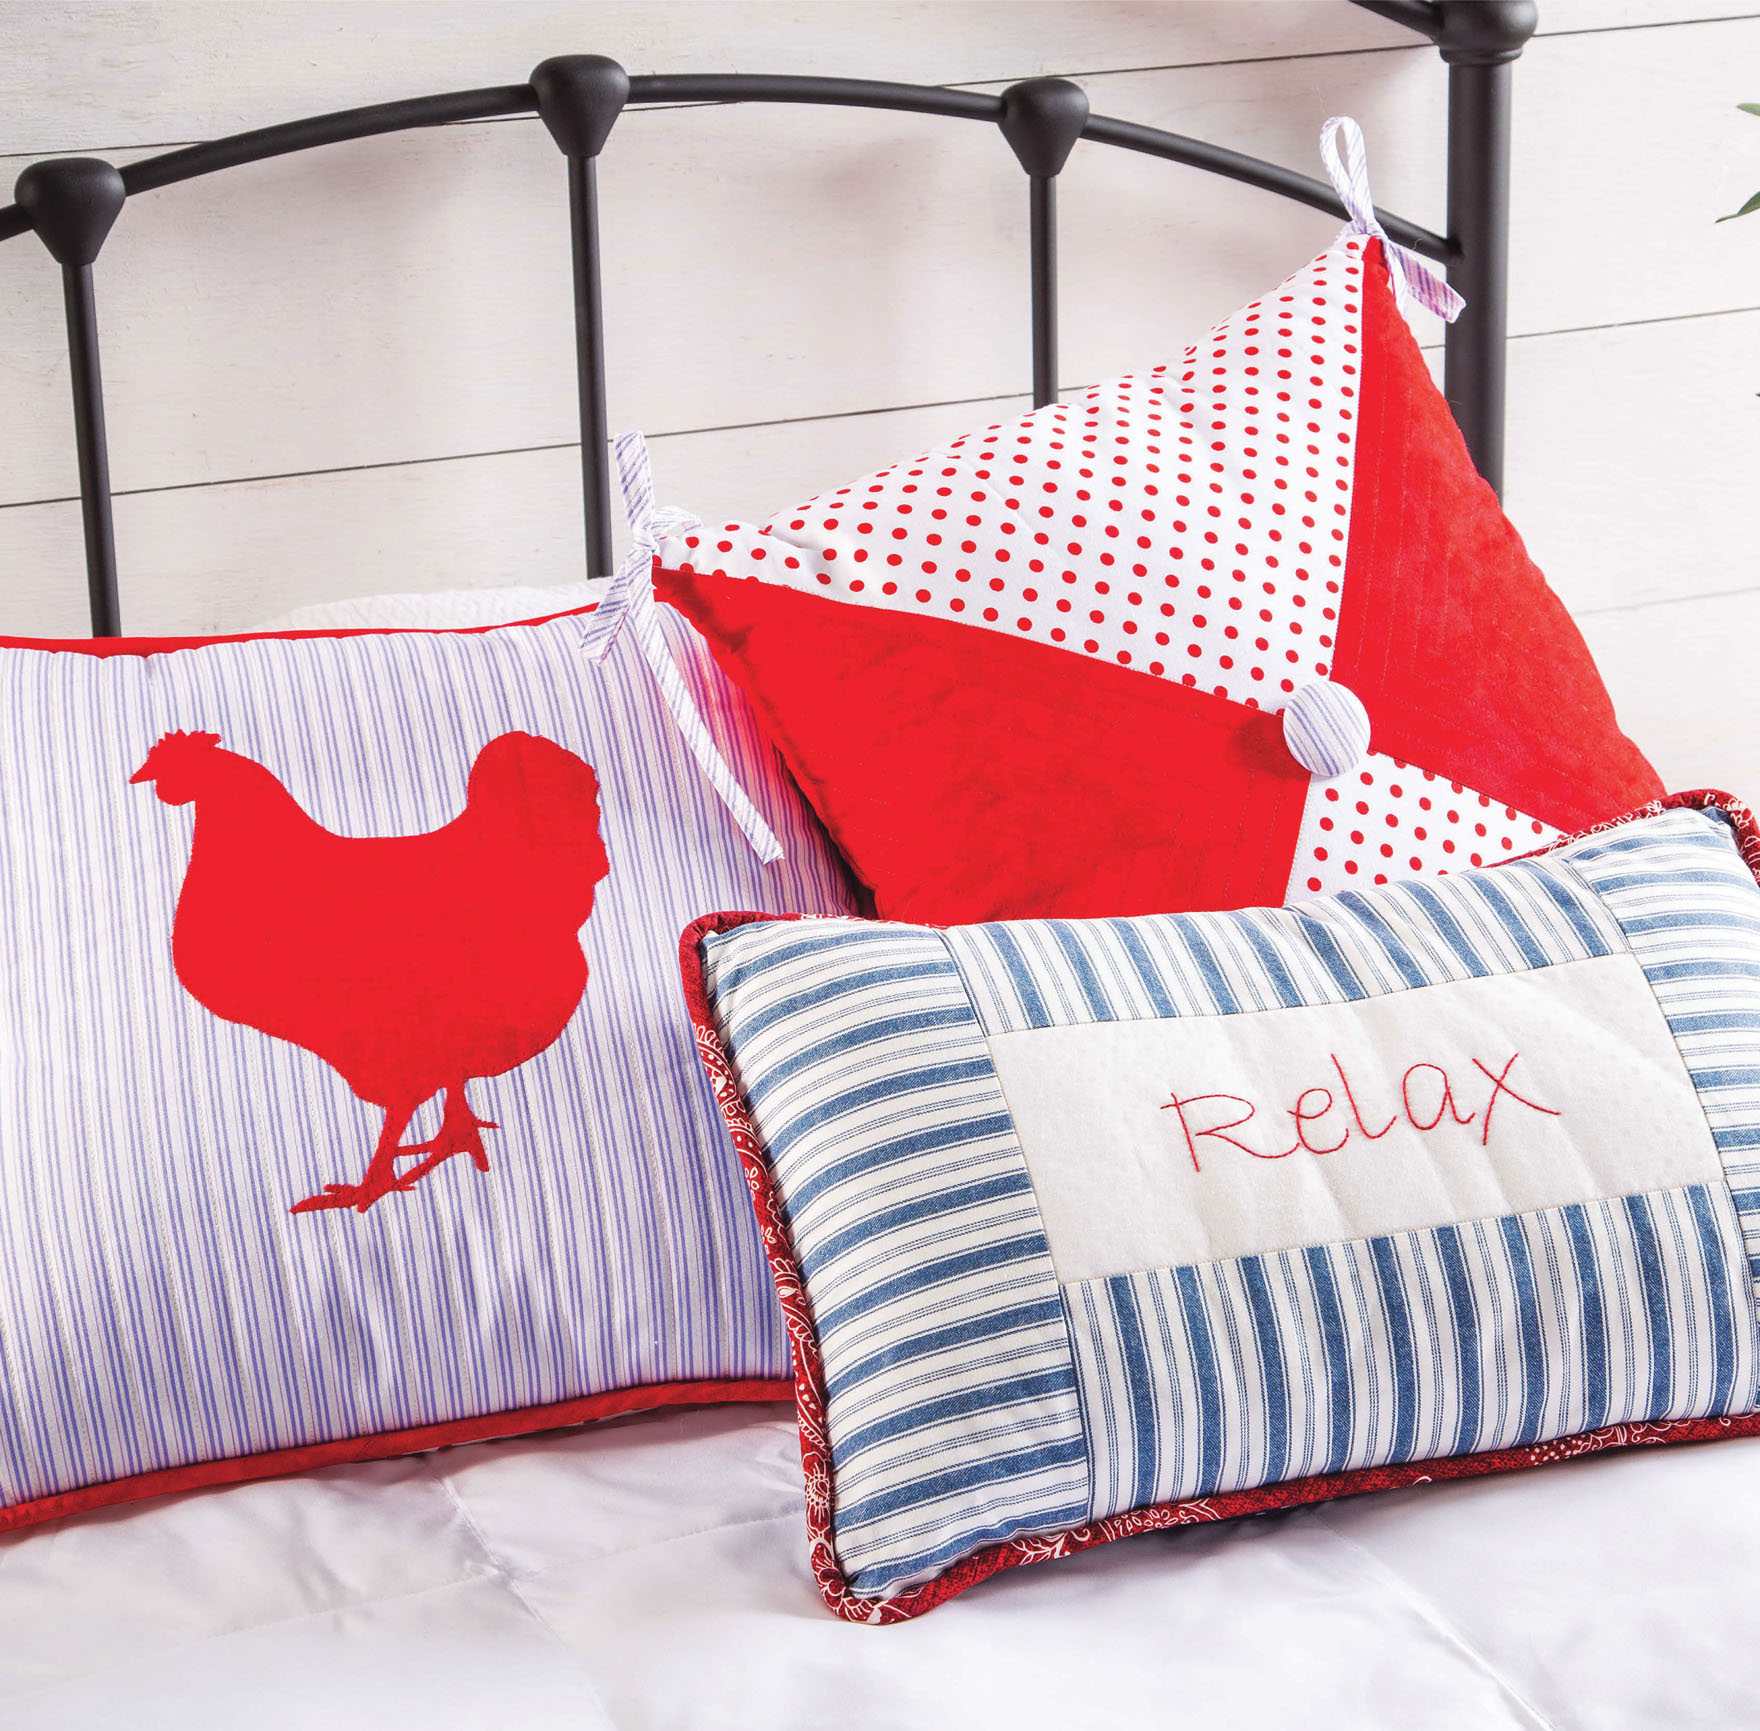 Skill Level Intermediate Project Notes Read all instructions before beginning project(s). Stitch right sides together using a " seam allowance unless otherwise specified. Materials and cutting lists assume 20" of usable fabric width for fat quarters and 40" for yardage. Relax Pillow Finished Size Pillow Size: 18" 12"
Materials 1 fat quarter each white tonal, blue-and-white stripe and red print yard blue tonal 4" 10" rectangle fusible batting 2 yards " cotton cord 12" 18" pillow form Red embroidery floss Thread Basic sewing tools and supplies
Cutting From white tonal: Cut 1 (4" 10") A rectangle.
From blue-and-white stripe: Cut 2 each 4" 10" B and 4" 12" C rectangles. From red print: Cut 1"-wide bias strips to total 72" when seamed. From blue tonal: Cut 1 (12" by fabric width) strip. Subcut strip into 2 (12" 15") backing rectangles. Completing the Relax Pillow Using embroidery diagram provided, transfer Relax onto the center of the A rectangle. Fuse batting rectangle to the wrong side of A.
Using backstitch and red embroidery floss, stitch along transferred letters. 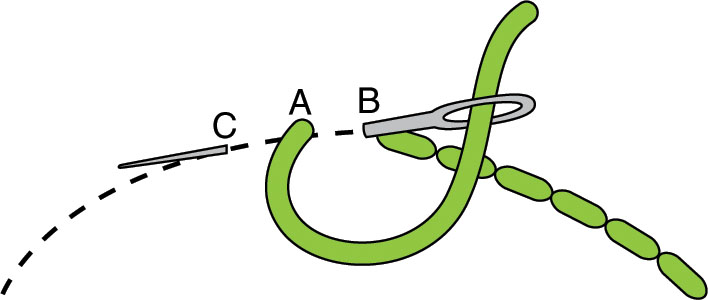 Backstitch Sew B strips to the top and bottom of A and C strips to opposite ends to complete the pillow top; press. Prepare piping by wrapping seamed bias strip around cotton cord, right side out and matching raw edges. Using a zipper foot, stitch bias strip as close to the cord as possible, without stitching into the cord. Trim seam allowance to ". With one end of piping at the bottom center of pillow top and raw edges aligned, starting " from piping end, stitch to the outside edges of the pillow top.
When about 2" from the beginning end, stop stitching and trim ends of cord to meet; trim bias strip to 1" beyond cord, fold under raw edge at end, and then encase the beginning end of piping. Complete stitching along edge of pillow top. Double-fold under " on one short side of a backing rectangle as shown in Figure 1; press. Stitch close to the inner folded edge. 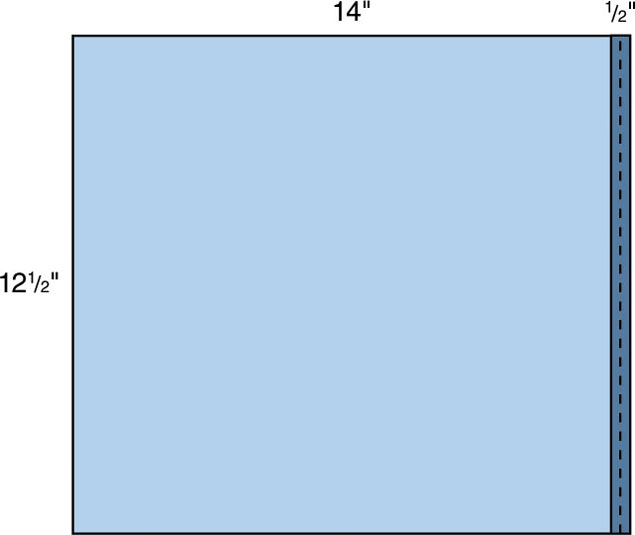 Figure 1 Referring to Figure 2, fold over approximately 2" on the hemmed edge and press so the backing rectangle measures 12" 12".
 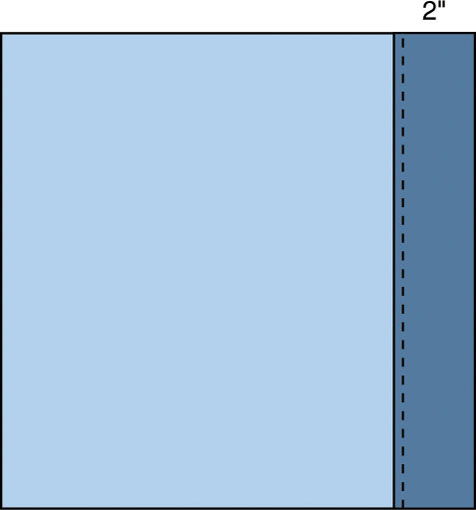 Figure 2 Repeat steps 5 and 6 to make a second backing rectangle.




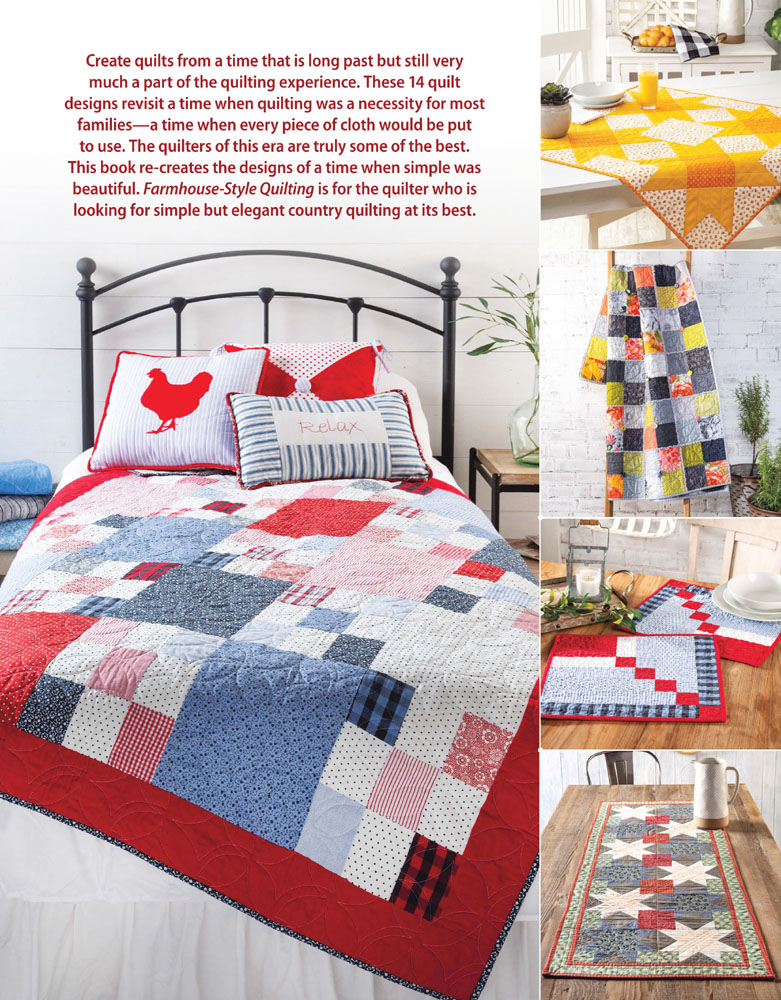
 Figure A Fold 1" of one short end to wrong side and press. Fold the binding strip in half with wrong sides together along length, again referring to Figure A; press. Starting about 3" from the folded short end, sew binding to quilt top edges, matching raw edges and using a " seam.
  Figure B Fold binding up at a 45-degree angle to seam and then down even with quilt edges, forming a pleat at corner, referring to Figure C.
  Figure C Resume stitching from corner edge as shown in Figure C, down quilt side, backstitching " from next corner.
  Figure D Fold binding to quilt back and stitch in place by hand or machine to complete your quilt. Please join us in thanking the talented designers whose work is featured in this collection. Sandi Colwell Farm Fresh Bed Runner Holly Daniels Mamas Scrap Basket Karen DuMont Bits & Pieces Susan Emory Farm Fancy Pillows Bev Getschel Chicken Wire Cathey Laird Country Stars Runner Chris Malone Sunny Side Up Topper Tricia Lynn Maloney Red-Letter Day Place Mats Wash Day Nancy Walhout Recker Starry Paths Runner Nancy Scott Barn Beauty Kristine Smith Country Comfort We would like to thank the following manufacturers who provided materials to our designers to make sample projects for this book. thread from Aurifil. Red-Letter Day Place Mats: Oxford by Sweetwater wovens and prints from Moda. Country Comfort: Chenille-It Blooming Bias from www.fauxchenille.com. Country Stars Runner: Colorworks collection from Northcott, Soft & Bright batting from The Warm Co., and thread from Aurifil. Wash Day: Oxford by Sweetwater wovens and prints from Moda. Mamas Scrap Basket: Warm & White batting from The Warm Co. Barn Beauty: Surfaces fabric by Lynnea Washburn from Robert Kaufman, Warm 80/20 batting from The Warm Co., and digital quilting pattern from TK Quilting & Design. Chicken Wire: Batting from Fairfield. Chicken Wire: Batting from Fairfield.
 Skill Level Intermediate Project Notes Read all instructions before beginning project(s). Stitch right sides together using a " seam allowance unless otherwise specified. Materials and cutting lists assume 20" of usable fabric width for fat quarters and 40" for yardage. Relax Pillow Finished Size Pillow Size: 18" 12"
 Backstitch Sew B strips to the top and bottom of A and C strips to opposite ends to complete the pillow top; press. Prepare piping by wrapping seamed bias strip around cotton cord, right side out and matching raw edges. Using a zipper foot, stitch bias strip as close to the cord as possible, without stitching into the cord. Trim seam allowance to ". With one end of piping at the bottom center of pillow top and raw edges aligned, starting " from piping end, stitch to the outside edges of the pillow top.
 Figure 1 Referring to Figure 2, fold over approximately 2" on the hemmed edge and press so the backing rectangle measures 12" 12".
  Figure 2 Repeat steps 5 and 6 to make a second backing rectangle.