Table of Contents
Guide
Pages
If you are an Annies customer and have a question about the instructions on a pattern you have purchased, please visit: AnniesCatalog.com/pages/customer_care/pattern_services.html Templates To download templates for easy printing, view the download instructions at the end of this book or click the Templates chapter in the Table of Contents. Introduction Halloween has become the second-largest celebrated holiday, and I imagine its because its just downright fun. Memorieswhether youre remembering them or making them for the young or young-at-heartcan be very special. Making a special project to share is just one way to do this. That quilt or wall hanging you make with the orange-and-black theme will invoke those special memories for many years to come. Your children and grandchildren will think of those days with fondness and love, and they will remember how much fun they had.
Within these pages you will find a spooktacular collection of fun quilts and projects youll want to make and share. A quilt for the sofa or one to drape across your bed might be nice. Or maybe a fun table topper that could double for a wall hanging is what youre looking for. Then again, maybe a set of pillowcases for the bed or trick-or-treating is just what will suit you. All in all, there are 10 projects to choose from, so why limit yourself? Enjoy!  Published by Annies, 306 East Parr Road, Berne, IN 46711. Printed in USA.
Copyright 2020 Annies. All rights reserved. This publication may not be reproduced in part or in whole without written permission from the publisher. RETAIL STORES: If you would like to carry this publication or any other Annies publication, visit AnniesWSL.com. Every effort has been made to ensure that the instructions in this publication are complete and accurate. We cannot, however, take responsibility for human error, typographical mistakes or variations in individual work.
Please visit AnniesCustomerService.com to check for pattern updates. ISBN: 978-1-64025-450-3
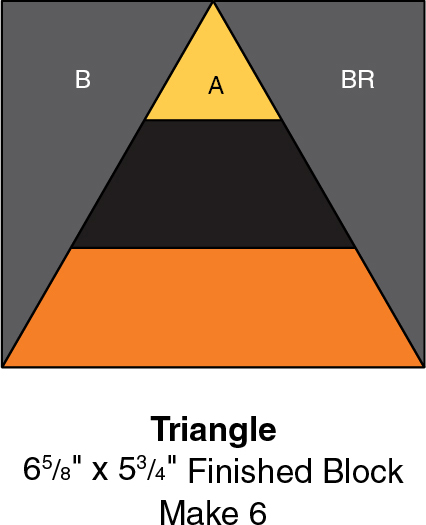
1 2 3 4 5 6 7 8 9 Table of Contents DESIGNED & QUILTED BY GINA GEMPESAW Make this table runner with easy strips and no Y-seams. Its the perfect accent to any table!  SKILL LEVEL Confident Beginner FINISHED SIZES Table Runner Size: 65" 27" Block Size: 6" 5" Number of Blocks: 6
  MATERIALS 1 yards black solid 18 (2" WOF) A strips assorted Halloween-theme prints yard black print Thread Template material 60-degree triangle ruler (optional) Basic sewing tools and supplies Heres a TipUse more A strips for a wider variety of fabric combinations. Cutting each A strip into two strips, each 20" long, is another way to add variety to the striped triangles. PROJECT NOTES Read all instructions before beginning this project. Stitch right sides together using a " seam allowance unless otherwise specified. Materials and cutting lists assume 40" of usable fabric width.
WOF width of fabric HST half-square triangle  QST quarter-square triangle
  Heres a TipApply spray starch or sizing and let dry before cutting triangles to keep bias edges from stretching. CUTTING From black solid cut: 4 (6" 13") C rectangles 4 (6" 7") D rectangles 5 (2" WOF) E/F strips, stitch short ends to short ends, then subcut into: 2 (2" 60") E and 2 (2" 27") F border strips From black print cut: 5 (2" WOF) binding strips COMPLETING THE BLOCKS Using patterns provided, trace the A and B/BR (reversed) triangle shapes onto template material. Label the templates. When cutting fabric, keep labeled side up. Place template labeled side down to cut reverse triangles. Alternately, triangles can be cut using a 60-degree triangle ruler with vertical center lines. Rulers vary; compare yours to the patterns provided to determine how to position ruler on fabric.
Use prepared templates or ruler to cut four A triangles and eight each B and BR triangles from black solid. Randomly choose three A strips and sew together into a strip set as shown in Figure 1. Repeat to make six strip sets. 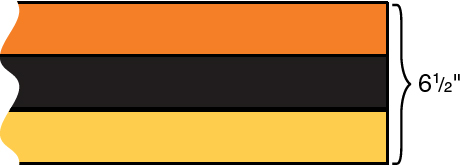 Figure 1 Using template A or ruler, cut 36 striped A triangles from strip sets as shown in Figure 2, rotating template or ruler to cut alternate triangles.
  Figure 2 Referring to Figure 3, sew a B triangle on one side and a BR triangle to the opposite side of a striped A triangle; press.
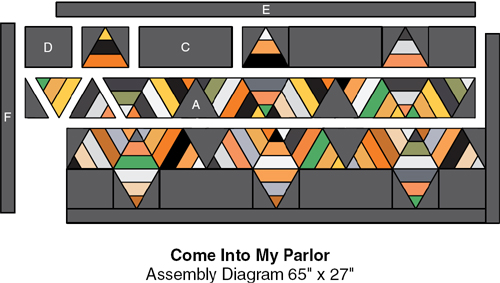
 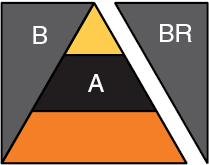 Figure 3 COMPLETING THE RUNNER Referring to the Assembly Diagram, lay out 30 striped A triangles with Triangle blocks, C and D rectangles, black A triangles and remaining B and BR triangles as shown.
  Figure 3 COMPLETING THE RUNNER Referring to the Assembly Diagram, lay out 30 striped A triangles with Triangle blocks, C and D rectangles, black A triangles and remaining B and BR triangles as shown.
Sew blocks, triangles and rectangles together in rows. Sew rows together to complete the runner center. Sew an E border strip to opposite long sides of the runner center. Sew an F border strip to each short end of the runner center. Layer, quilt and bind referring to Quilting Basics. 
 DESIGN BY DENISE RUSSELL OF PIECED BRAIN QUILTED BY MELISSA KELLY This scrap-friendly project is the perfect piece to complete a haunted look for your table or wall.
Quick blocks and easy appliqu make this a great weekend project.  SKILL LEVEL Confident Beginner FINISHED SIZES Table Topper Size: 37" 37" Block Sizes: 6" 6" and 12" 12" Number of Blocks: 12 and 1
 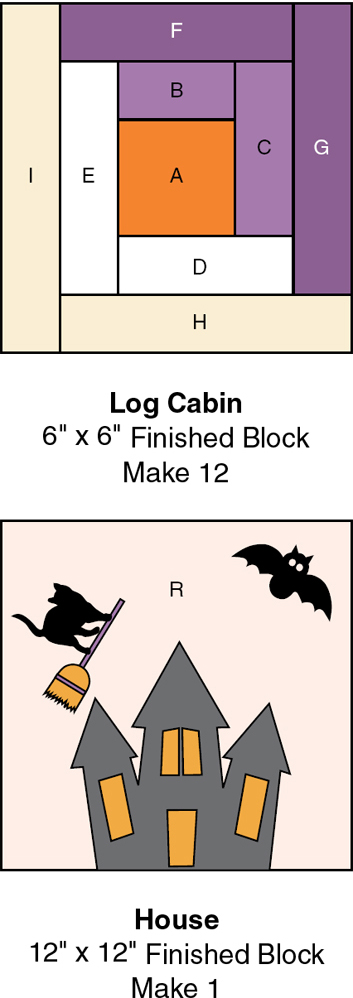 MATERIALS Scrap white yard bright orange word print* yard light orange print* yard black solid* yard white with scattered pumpkins* yard purple bat print* yard white candy print* yard light purple print* yard orange bat print* yard purple pumpkin print* yard orange stripe* yard white with small pumpkins* yard purple multicolored print* yard black print* yard paper-backed fusible web Backing to size Batting to size Thread Template material Basic sewing tools and supplies




 Published by Annies, 306 East Parr Road, Berne, IN 46711. Printed in USA.
 SKILL LEVEL Confident Beginner FINISHED SIZES Table Runner Size: 65" 27" Block Size: 6" 5" Number of Blocks: 6
  MATERIALS 1 yards black solid 18 (2" WOF) A strips assorted Halloween-theme prints yard black print Thread Template material 60-degree triangle ruler (optional) Basic sewing tools and supplies Heres a TipUse more A strips for a wider variety of fabric combinations. Cutting each A strip into two strips, each 20" long, is another way to add variety to the striped triangles. PROJECT NOTES Read all instructions before beginning this project. Stitch right sides together using a " seam allowance unless otherwise specified. Materials and cutting lists assume 40" of usable fabric width.
 QST quarter-square triangle
  Heres a TipApply spray starch or sizing and let dry before cutting triangles to keep bias edges from stretching. CUTTING From black solid cut: 4 (6" 13") C rectangles 4 (6" 7") D rectangles 5 (2" WOF) E/F strips, stitch short ends to short ends, then subcut into: 2 (2" 60") E and 2 (2" 27") F border strips From black print cut: 5 (2" WOF) binding strips COMPLETING THE BLOCKS Using patterns provided, trace the A and B/BR (reversed) triangle shapes onto template material. Label the templates. When cutting fabric, keep labeled side up. Place template labeled side down to cut reverse triangles. Alternately, triangles can be cut using a 60-degree triangle ruler with vertical center lines. Rulers vary; compare yours to the patterns provided to determine how to position ruler on fabric.
 Figure 1 Using template A or ruler, cut 36 striped A triangles from strip sets as shown in Figure 2, rotating template or ruler to cut alternate triangles.
  Figure 2 Referring to Figure 3, sew a B triangle on one side and a BR triangle to the opposite side of a striped A triangle; press.
  Figure 3 COMPLETING THE RUNNER Referring to the Assembly Diagram, lay out 30 striped A triangles with Triangle blocks, C and D rectangles, black A triangles and remaining B and BR triangles as shown.

 DESIGN BY DENISE RUSSELL OF PIECED BRAIN QUILTED BY MELISSA KELLY This scrap-friendly project is the perfect piece to complete a haunted look for your table or wall.
 SKILL LEVEL Confident Beginner FINISHED SIZES Table Topper Size: 37" 37" Block Sizes: 6" 6" and 12" 12" Number of Blocks: 12 and 1
  MATERIALS Scrap white yard bright orange word print* yard light orange print* yard black solid* yard white with scattered pumpkins* yard purple bat print* yard white candy print* yard light purple print* yard orange bat print* yard purple pumpkin print* yard orange stripe* yard white with small pumpkins* yard purple multicolored print* yard black print* yard paper-backed fusible web Backing to size Batting to size Thread Template material Basic sewing tools and supplies