Table of Contents
Guide
Pages
If you are an Annies customer and have a question about the instructions on a pattern you have purchased, please visit:
AnniesCatalog.com/pages/customer_care/pattern_services.html
To download templates for easy printing, view the download instructions at the end of this book or click the Templates chapter in the Table of Contents.
Precut Table Runners & Toppers is just the book you need to turn those precuts into gorgeous usable table coverings for both you and your dearest friends. Its your solution to fast and easy projects that will fit into your busy schedule. By using precuts you not only save time cutting, but you also can enjoy the preselected coordinating fabric collections without worrying if youve made the right decision on color, texture and scale. Let the professionals do that for you.
Thirteen precut quilting projects have been designed for this book and are just waiting for you to plug in your fabrics and stitch them up. If you dont have precuts on hand you always have the option to cut your own or use leftover precuts from other projects. Many of these projects could easily be made from them. Youll find yourself coming back to the fabulous projects in this book time after time. These patterns are timeless and full of real possibilities. All you need is fabric and a bit of time.
Enjoy!
Table of Contents
General Information
Looking for a pattern to use your 2" strips? Well you just found it.
Designed & Quilted by Connie Kauffman

Skill Level
Beginner
Finished Size
Table Runner Size: 34" 18"
Place Mat Size: 18" 12"
Hot Pad Size: 8" 8"
Materials
Fabrics listed are for 1 table runner, 2 place mats and 1 hot pad.
20 assorted 2" precut batik strips
yard tan print batik
Backing to size
Cotton batting to size
Insulated batting to size for hot pad only
Thread
Basic sewing tools and supplies
Project Notes
Read all instructions before beginning this project.
Stitch right sides together using a " seam allowance unless otherwise specified.
Materials and cutting lists assume 40" of usable fabric width.
Cutting
From 2" precut batik strips:
Note: Use a mix of all fabrics when cutting pieces.
Cut 2 (1" 32") F strips.
Cut 2 (1" 18") G strips.
Cut 2 (1" 24") B strips.
Cut 2 (1" 10") C strips.
Cut 60 (2" 3") D rectangles.
Cut 8 (1" 12") I strips.
Cut 9 (2") K squares.
Cut 2 matching 1" 2" L strips and 2 matching 1" 4" M strips.
From tan print batik:
Cut 1 (8" by fabric width) strip.
Subcut strip into 1 (8" 24") A strip, 4 (3") E squares and 4 (2") J squares.
Cut 1 (9" by fabric width) strip.
Subcut strip into 2 (9" 12") H rectangles.
Completing the Table Runner

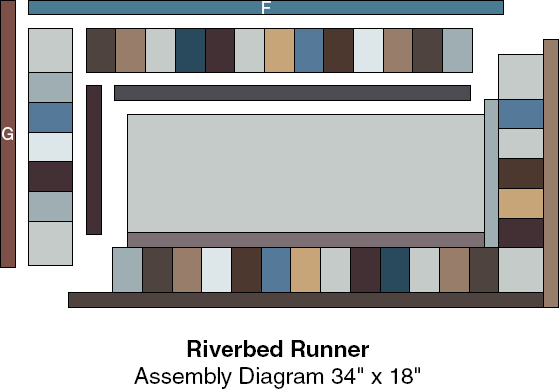
Refer to the Assembly Diagram for positioning of borders.
Stitch B strips to long sides and C strips to short ends of A rectangle as shown in Figure 1; press after each seam.

Referring to Figure 2a, stitch 13 D strips into a side long border; press. Make 2.
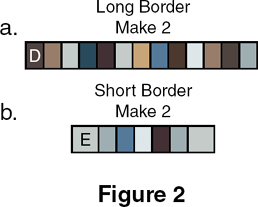
Stitch five D rectangles and two E squares into a short border as shown in Figure 2b; press. Repeat to make a second short border.
Stitch long borders to opposite long sides of the A-B-C unit; press. Stitch short borders to opposite short ends; press.
Stitch F strips to opposite long sides and G strips to opposite ends of pieced center to complete the table runner top; press.
Layer cotton batting, backing right side up and runner top right side down. Stitch " from raw edges, leaving a 4" opening. Trim corners, turn right side out and press. Whipstitch opening closed.
Quilt as desired. Model was stitched-in-the-ditch and quilted with custom leaf motifs.
Completing the Place Mats

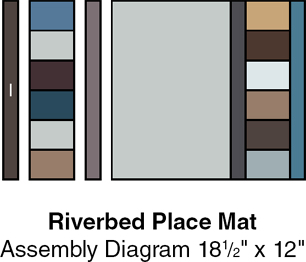
Refer to the Assembly Diagram for positioning of borders.
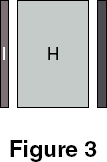
To complete one place mat, stitch I strips to opposite sides of an H rectangle as shown in Figure 3; press.
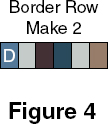
Referring to Figure 4, stitch six D strips into a border row; press. Repeat to make a second border row.
Stitch border rows to opposite long sides of the H-I unit; press.
Stitch I strips to opposite sides of pieced center to complete one place mat top; press.
Repeat steps 14 to make a second place mat top.
Repeat steps 6 and 7 of Completing the Table Runner to complete two place mats.
Completing the Hot Pad
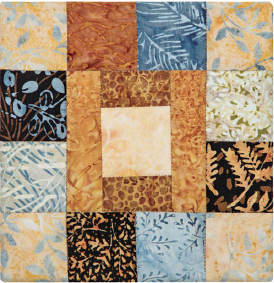
Refer to the Assembly Diagram for positioning of borders.
Stitch L strips to top and bottom, and M strips to opposite sides of K square as shown in Figure 5; press.

Stitch two K squares to form a side border; press. Repeat to make a second side border.
Stitch two each J and K squares together with J squares on opposite ends to make a long border; press. Repeat to make a second long border.
Stitch side borders to opposite sides of K-L-M unit and long borders to top and bottom to complete the hot pad top; press.
Layer cotton batting, insulated batting shiny side down, backing right side up and hot pad top right side down. Stitch " from raw edges, leaving a 4" opening. Trim corners, turn right side out and press. Whipstitch opening closed.
Quilt as desired. Model was stitched in the ditch. 


