FRONT COVER OF BOOKLET: Songbirds
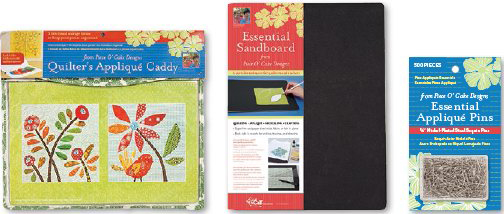
Designed by Becky Goldsmith and Linda Jenkins; made by Linda Jenkins FINISHED BLOCK SIZE: 12 12 FINISHED QUILT SIZE: 52 65 Photography and Artwork copyright 2014 by C&T Publishing, Inc. Publisher: Amy Marson Creative Director: Gailen Runge Art Director: Kristy Zacharias Editor: Lynn Koolish Technical Editors: Ellen Pahl and Gailen Runge Cover Designer: April Mostek Book Designer: Kerry Graham Production Coordinators: Rue Flaherty and Karen Ide Production Editor: Joanna Burgarino Illustrator: Becky Goldsmith Photo Assistant: Mary Peyton Peppo Photography by Diane Pedersen and Nissa Brehmer of C&T Publishing, Inc., unless otherwise noted Published by C&T Publishing, Inc., P.O. Box 1456, Lafayette, CA 94549 Dedication As I sit and stitch on these quilts, it is the coldest winter on record in Grand Junction, Colorado. These birds make me think of spring and they bring a smile to my face. For those of you suffering through a cold winter or difficult times, I hope you will remember that spring always returnsalong with the songbirds. Linda WE ARE SO EXCITED! C&T Publishing has three new products just for us appliqursthe Essential Sandboard; the Quilters Appliqu Caddy, a custom canvas caddy that will keep your projects safely stored at home or on the go; and the Essential Appliqu Pins, our new and improved sequin pins!
  For all printable patterns or digital content, click here.
 MATERIALS Block backgrounds: 12 fat quarters (1 per block) OR 2 yards total* Sashing: yard each of 2 fabrics Inner border: yard Appliqud border background (A and D): 1 yards Accent border (B, E, and F): yard Outer border (C, G, and H): yard Appliqu: A variety of large scraps Binding: yard Backing and sleeve: 3 yards Batting: 60 73 Additional Supplies Self-adhesive laminate sheets for templates (clear, single-sided, heavyweight; 9 12): 2630 sheets Sharpie Ultra Fine Point Permanent MarkerUse 1 of the following products for the overlay:Clear or frosted upholstery vinyl (54 wide): 1 yards ORQuilters Vinyl (16 wide): 5 yards (or 4 packs) sequin pinsPresencia perle cotton, #16(optional)Black and white permanent fabric markers(optional)* If your fabric is 42 wide after prewashing and removing the selvages, you need only 1 yards.FABRIC NOTES:Linda used a wide variety of batiks in this quilt. CUTTING Block backgrounds Cut 12 squares 14 14.
Sashing From each of 2 fabrics, cut 8 strips 1 40. Subcut each group into: 12 strips 1 12 for the sides 12 strips 1 13 for the top and bottom Inner border Cut 5 strips 1 40. Construct: 2 strips 1 52 for the side inner borders 2 strips 1 40 for the top and bottom inner borders Appliqud border backgrounds A and D Cut (from the lengthwise grain) or construct 2 strips 5 55 for the side borders (A). Cut (from the lengthwise grain) or construct 2 strips 5 42 for the top and bottom borders (A). Cut 4 squares 5 5 (D). Accent border B, E, and F Cut 5 strips 1 40 (B).
Construct: 2 strips 1 53 for the sides 2 strips 1 40 for the top and bottom Cut 4 strips 1 4 (E). Cut 4 strips 1 5 (F). Outer border C, G, and H Cut 5 strips 2 40 (C). Construct: 2 strips 2 53 for the sides 2 strips 2 40 for the top and bottom Cut 4 strips 2 5 (G). Cut 4 strips 2 6 (H). Appliqu Cut fabric as needed.
Binding Cut 1 square 30 30 to make a 2-wide continuous bias strip 248 long. See Making Continuous Bias Binding (). 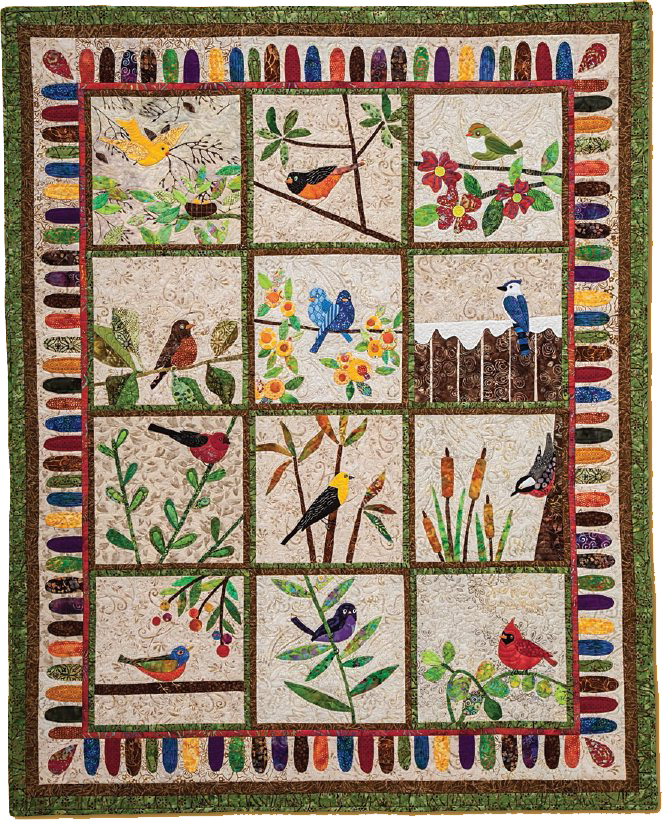 These birds make me think of spring and they bring a smile to my face. Block Assembly Refer to General Instructions () as needed. Appliqu patterns are on the pattern sheets. Make templates and overlays for the blocks. Press the backgrounds in half horizontally and vertically. Place them on your design wall.
Cut out the appliqu pieces with their turn-under allowances. Place the appliqu pieces on the backgrounds on your design wall. Use the overlays to place the appliqu pieces in the proper position or place them by eye. Play with your color and fabric choices until you are happy with the way the blocks look. Audition the Entire Quilt Read ahead in these instructions. Its a good idea to arrange all the sashing strips and borders (with the border appliqu pieces) on your design wall before you begin any stitching.
Appliqu the blocks. As needed, refer to the suggested techniques (). Eyes, Beaks, and Legs The birds eyes can be embroidered or painted. Linda used #16 perle cotton for embroidering the eyes and black and white permanent markers for painting them. The beaks were appliqud and the legs embroidered. When the appliqu is complete, press the blocks on the wrong side and trim them to 12 12.
Sew a side sashing strip to each side of each block. Press toward the sashing. Sew top and bottom sashing strips to each block. Press toward the sashing. Border Assembly Make templates and overlays for the borders. Place border strips A and border corner squares D on the design wall around the blocks.
Cut out the appliqu pieces with their turn-under allowances. Place the appliqu pieces on the border and border corner backgrounds on your design wall. Use the overlay to get the appliqu pieces in the proper position or place them by eye. Place the remaining border strips on your design wall. Play with your color and fabric choices until you are happy with the way the borders look around the blocks. Appliqu the borders and border corners.
When the appliqu is complete, press the border strips A and the border corners D on the wrong side. Trim the side border strips A to 4 53. Trim the top and bottom border strips A to 4 40. Trim the border corners D to 4 4. Sew border strips B and C to the appliqud and trimmed border strips A. Press the seam allowances toward the B strips.
Sew strips E, F, G, and H to the appliqud and trimmed border corner squares D. Press the seam allowances as shown by the arrows. 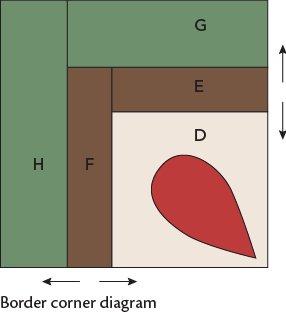
 Quilt Assembly Refer to the quilt assembly diagram at right for quilt construction. Seam allowances are . Sew the sashed blocks together into 4 rows of 3 blocks each. Press the seam allowances in the rows in alternate directions so the seams nest when the rows are sewn together. Sew the 4 rows of blocks together.
Press the seam allowances toward the bottom of the quilt. Sew the side inner borders to the quilt. Press the seam allowances toward the inner borders. Sew the top and bottom inner borders to the quilt. Press the seam allowances toward the inner borders. Sew the side border units to the quilt.
Press the seam allowances toward the border units. Sew a border corner to each end of the top and bottom borders. Press the seam allowances toward the borders. Sew the top and bottom border units to the quilt. Press the seam allowances toward the borders. Layer and baste the quilt.
Quilt by hand or machine. Make and attach the binding (). 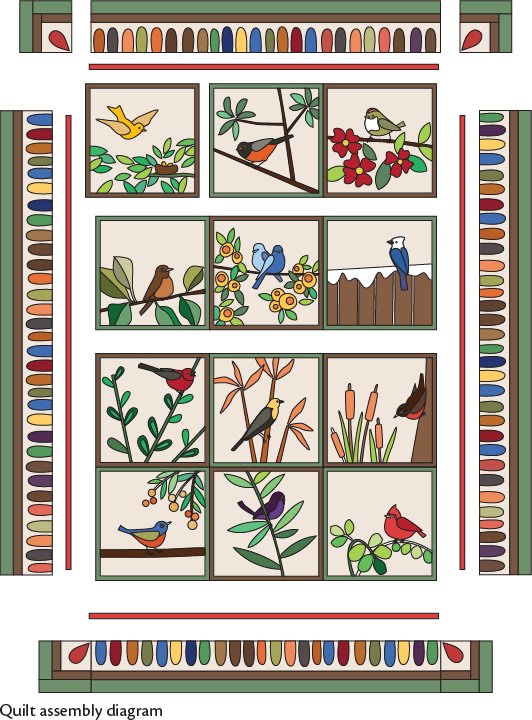
Next page






 WE ARE SO EXCITED! C&T Publishing has three new products just for us appliqursthe Essential Sandboard; the Quilters Appliqu Caddy, a custom canvas caddy that will keep your projects safely stored at home or on the go; and the Essential Appliqu Pins, our new and improved sequin pins!
  For all printable patterns or digital content, click here.
 MATERIALS Block backgrounds: 12 fat quarters (1 per block) OR 2 yards total* Sashing: yard each of 2 fabrics Inner border: yard Appliqud border background (A and D): 1 yards Accent border (B, E, and F): yard Outer border (C, G, and H): yard Appliqu: A variety of large scraps Binding: yard Backing and sleeve: 3 yards Batting: 60 73 Additional Supplies Self-adhesive laminate sheets for templates (clear, single-sided, heavyweight; 9 12): 2630 sheets Sharpie Ultra Fine Point Permanent MarkerUse 1 of the following products for the overlay:Clear or frosted upholstery vinyl (54 wide): 1 yards ORQuilters Vinyl (16 wide): 5 yards (or 4 packs) sequin pinsPresencia perle cotton, #16(optional)Black and white permanent fabric markers(optional)* If your fabric is 42 wide after prewashing and removing the selvages, you need only 1 yards.FABRIC NOTES:Linda used a wide variety of batiks in this quilt. CUTTING Block backgrounds Cut 12 squares 14 14.
 These birds make me think of spring and they bring a smile to my face. Block Assembly Refer to General Instructions () as needed. Appliqu patterns are on the pattern sheets. Make templates and overlays for the blocks. Press the backgrounds in half horizontally and vertically. Place them on your design wall.
 Quilt Assembly Refer to the quilt assembly diagram at right for quilt construction. Seam allowances are . Sew the sashed blocks together into 4 rows of 3 blocks each. Press the seam allowances in the rows in alternate directions so the seams nest when the rows are sewn together. Sew the 4 rows of blocks together.