Carolyn S. Vagts - Quilting with Art Panels 2: Jodys Sentiments
Here you can read online Carolyn S. Vagts - Quilting with Art Panels 2: Jodys Sentiments full text of the book (entire story) in english for free. Download pdf and epub, get meaning, cover and reviews about this ebook. year: 2015, publisher: Annies, genre: Home and family. Description of the work, (preface) as well as reviews are available. Best literature library LitArk.com created for fans of good reading and offers a wide selection of genres:
Romance novel
Science fiction
Adventure
Detective
Science
History
Home and family
Prose
Art
Politics
Computer
Non-fiction
Religion
Business
Children
Humor
Choose a favorite category and find really read worthwhile books. Enjoy immersion in the world of imagination, feel the emotions of the characters or learn something new for yourself, make an fascinating discovery.

- Book:Quilting with Art Panels 2: Jodys Sentiments
- Author:
- Publisher:Annies
- Genre:
- Year:2015
- Rating:4 / 5
- Favourites:Add to favourites
- Your mark:
Quilting with Art Panels 2: Jodys Sentiments: summary, description and annotation
We offer to read an annotation, description, summary or preface (depends on what the author of the book "Quilting with Art Panels 2: Jodys Sentiments" wrote himself). If you haven't found the necessary information about the book — write in the comments, we will try to find it.
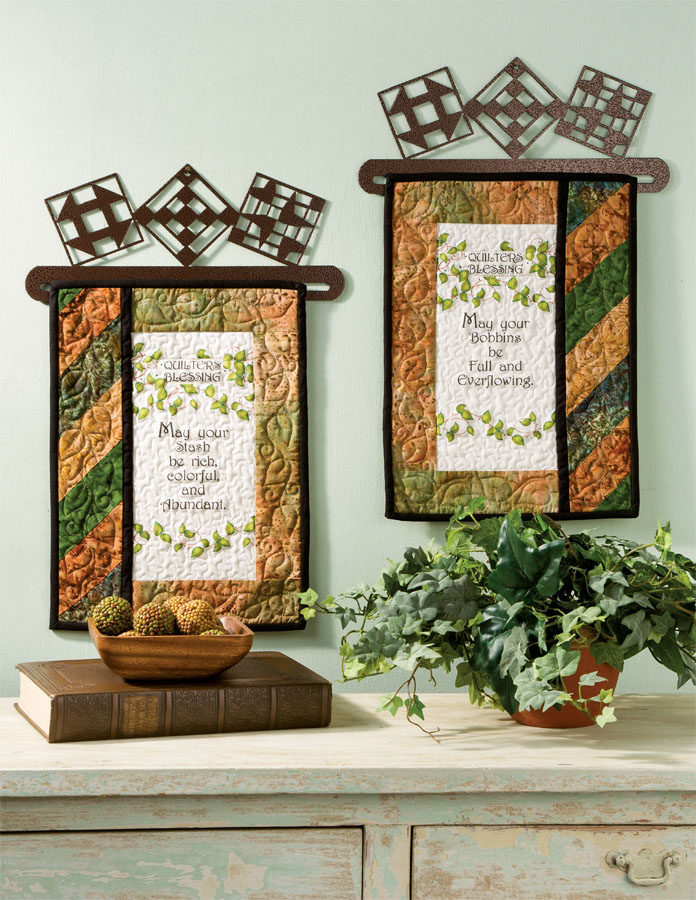
This leaflet is part of a collection of projects made with Jody Houghtons art panels. This second installment contains four fast-and-easy projects that include Jodys sentiment art panels that use words and are inspirational. The patterns are designed so that the different panels can be interchanged and, because they come in standard sizes, there are endless possibilities for using them.
Carolyn S. Vagts: author's other books
Who wrote Quilting with Art Panels 2: Jodys Sentiments? Find out the surname, the name of the author of the book and a list of all author's works by series.


Quilting with Art Panels 2: Jodys Sentiments — read online for free the complete book (whole text) full work
Below is the text of the book, divided by pages. System saving the place of the last page read, allows you to conveniently read the book "Quilting with Art Panels 2: Jodys Sentiments" online for free, without having to search again every time where you left off. Put a bookmark, and you can go to the page where you finished reading at any time.
Font size:
Interval:
Bookmark:
 Skill Level Confident Beginner Finished SizeWall Hanging Size: 18" x 20" Project Notes Read all instructions before beginning this project. Stitch right sides together using a " seam allowance unless otherwise specified. Materials and cutting lists assume 40" of usable fabric width. Refer to your favorite quilting guide for specific techniques. From black solid: Cut 2 (4" by fabric width) strips. From black solid: Cut 2 (4" by fabric width) strips.
 Subcut 2 each 4" x 11" D and 4" x 20" E strips. Cut 3 (2" by fabric width) binding strips. Assembly Refer to the Assembly Diagram for all assembly steps. Trim panel to 9" x 11" A rectangle with panel design centered. Stitch B strips to top and bottom and C strips to sides of panel. Press seams toward borders.
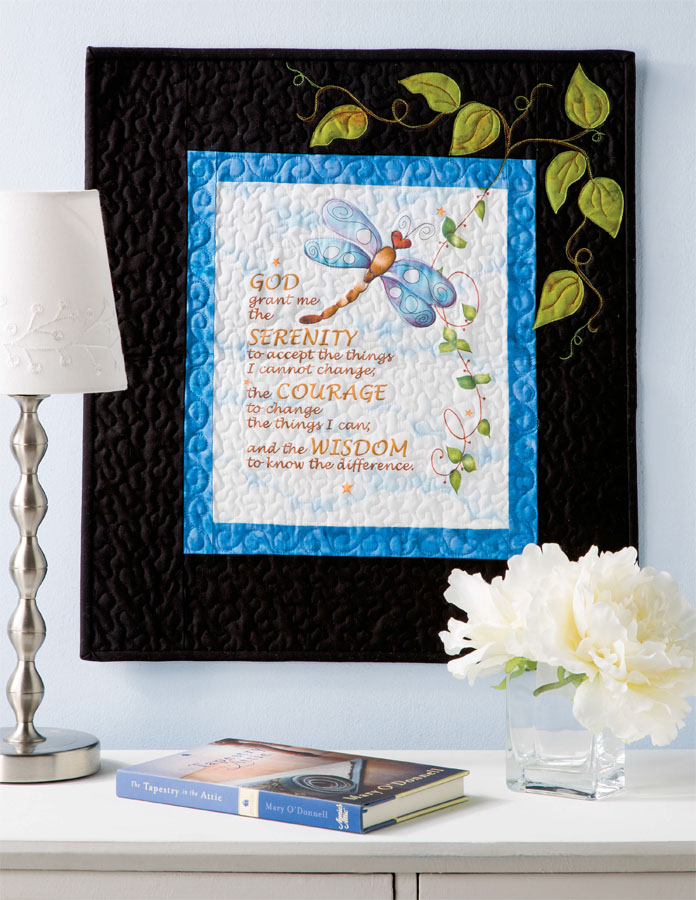
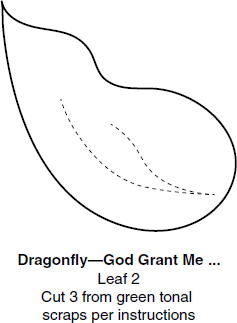
Stitch D strips to top and bottom and E strips to sides of quilt center. Press seams toward borders. For optional appliqu, refer to Raw-Edge Fusible Appliqu on page 11 to prepare four Leaf 1 and three Leaf 2 shapes from green tonal scraps. 
 Mark a vine from the top right-hand corner of the panel design extending into the quilt border referring to sample photo. Position and fuse leaves along drawn vine on quilt border referring to sample photo or as desired. Stitch leaves in place referring to Raw-Edge Fusible Appliqu instructions on page 11.
To complete quilt, sandwich the batting between the pieced top and a prepared backing piece; baste layers together. Quilt as desired. When quilting is complete, remove basting and trim batting and backing fabric even with raw edges of the pieced top. Prepare binding and stitch to quilt front edges, matching raw edges, mitering corners and overlapping ends. Refer to Making a Hanging Sleeve and Alternative Hanging Solutions on page 10 before completing binding to add desired hanging units.  Personalizing With AppliquPersonalize your art panel quilts by adding appliqu that extends part of the panel design into the quilt border as done in our sample.Follow the Raw-Edge Fusible Appliqu instructions on page 11 to apply appliqu shapes before quilting layers together. Personalizing With Appliqu Personalize your art panel quilts by adding appliqu that extends part of the panel design into the quilt border as done in our sample. Follow the Raw-Edge Fusible Appliqu instructions on page 11 to apply appliqu shapes before quilting layers together.
Then stitch connecting elements, like the vine in this quilt, when completing the quilting.Quilt around any freestanding appliqu shapes if your added appliqu does not have a connecting element.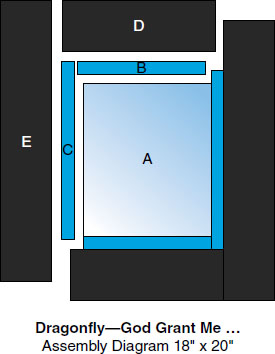
 Skill Level Confident Beginner Finished SizeWall Hanging Size: 11" x 15" Project Notes Materials list, cutting and assembly instructions are for a set of two mirrored quilt hangings. Read all instructions before beginning this project. Stitch right sides together using a " seam allowance unless otherwise specified. Materials and cutting lists assume 40" of usable fabric width. Refer to your favorite quilting guide for specific techniques. From black solid: Cut 2 (1" x 15") D strips. From black solid: Cut 2 (1" x 15") D strips.
Cut 4 (2" by fabric width) binding strips. Assembly Trim panels to 5" x 11" A rectangles with designs centered. Set aside. Stitch four different 2"-wide precut strips together along length creating a strip set. Press seams in one direction. Trim one end of strip set off at 45-degree angle (Figure 1a).
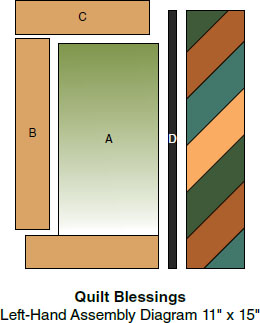
Cut four 3"-wide strips from strip set referring to Figure 1b. 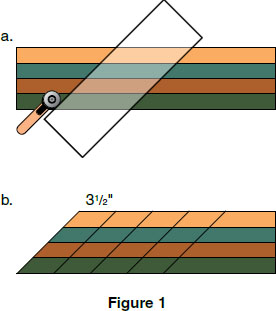 Join two pieced strips together making a stripe unit (Figure 2a); press. Trim stripe unit to 3" x 15" referring to Figure 2b. Repeat to make two stripe units. Set one unit aside. Note:Refer to Left-Hand Assembly Diagram for steps 58. Press seams toward B. Note:Refer to Left-Hand Assembly Diagram for steps 58. Press seams toward B.
Stitch C strips to top and bottom of A-B unit; press seams toward C. Stitch D to stripe unit; press seam toward D. Join stripe unit to left-hand side of quilt; press seam toward D. To complete quilt, sandwich the batting between the pieced top and a prepared backing piece; baste layers together. Quilt as desired. When quilting is complete, remove basting and trim batting and backing fabric even with raw edges of the pieced top.
Prepare binding and stitch to quilt front edges, matching raw edges, mitering corners and overlapping ends. Refer to Making a Hanging Sleeve and Alternative Hanging Solutions on page 10 before completing binding to add desired hanging units. Fold binding to back side and hand-stitch in place to finish. To complete mirrored second quilt, repeat steps 513 except stitch B to the right-hand side of the trimmed panel. Continue construction referring to the Right-Hand Assembly Diagram. 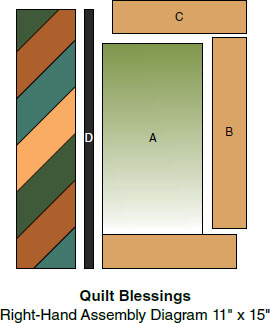
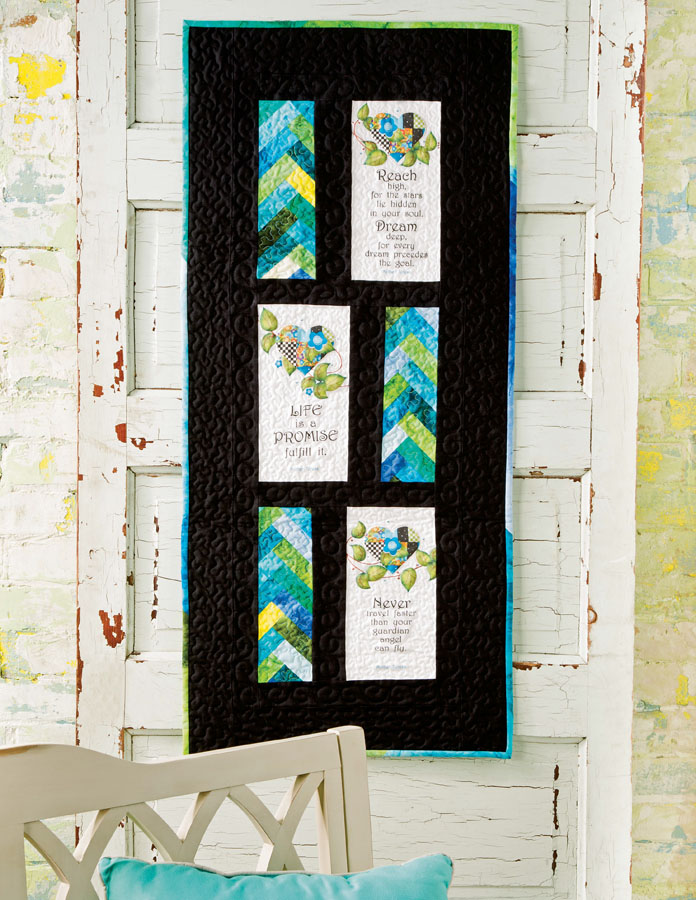 Skill Level Confident Beginner Finished SizeWall Hanging Size: 19" x 42" Project Notes Read all instructions before beginning this project.
Stitch right sides together using a " seam allowance unless otherwise specified. Materials and cutting lists assume 40" of usable fabric width. Refer to your favorite quilting guide for specific techniques. Materials 3 (6" x 12") Mother Teresa panels* Scraps assorted blue and green batiks or fat quarters* yard black solid* Thread Batting to size* Backing to size* Basic sewing supplies *Sample made with Jody Houghton Designs Mother Teresa panels, Anthology Gradations fat quarter collection, yardage cuts of background fabrics and Quilter's Dream batting available from AnniesCraftStore.com.
Font size:
Interval:
Bookmark:
Similar books «Quilting with Art Panels 2: Jodys Sentiments»
Look at similar books to Quilting with Art Panels 2: Jodys Sentiments. We have selected literature similar in name and meaning in the hope of providing readers with more options to find new, interesting, not yet read works.
Discussion, reviews of the book Quilting with Art Panels 2: Jodys Sentiments and just readers' own opinions. Leave your comments, write what you think about the work, its meaning or the main characters. Specify what exactly you liked and what you didn't like, and why you think so.