Sock
Patterns
for the
Traveling
Knitter
Nancy Bush

Contents
PATTERNS
This book was inspired by journeys, by crowded airports and hotel rooms in faraway cities. I have always recommended that traveling knitters take along a small project, one worked on small needles with fine yarn. Theres a lot of knitting, yet the materials dont fill a suitcase! Socks are great travelers projects.
These socks were designed for knitting on the gomany of the patterns are pretty easy. A few are more challenging, but the designs flow so that after a couple of repeats, you should be able to sail along with few glances at the text or graph. Some of the socks will be quick to knit, others will take more time; your knitting may fill that two-week vacation or only a six-hour layover.
The world offers lots of yarns for socks, and Ive included an extensive list on . I knitted the socks with yarns I love or wanted to try and hope you will use this list to discover yarns you love as well.
While working on the patterns, I realized that even though I did most of the work at home, the process was a journey. I was transported to the places that inspired the designs; I could knit and dream of special events and memories, of scenes I saw, food I ate, and people I met. I remembered other knitting, done in other places, and discovered that knitting itself is a journey, a craft that will take you anywhere you want to go, as far as imagination will allow. Knitting is a connection to history, other cultures, and even make-believe. And so, included with these patterns comes a wish: May you always have wonderful knitting journeyswherever they take you!
GAUGE
Gauges in the sock patterns are based on knitting worked circularly, and you wont get an accurate gauge if you work back and forth. Always check gauge in the method called for in the pattern. Since socks dont (usually) take a lot of stitches to make a round (not like a sweater), I will start knitting the sock to get my gauge. If I am way off, well, ripping is part of the process. If I am right on or very close, I am ahead of the game, with some of the sock already knitted.
Here is a conversion chart that may help in choosing a substitue yarn. See also list of sock yarns on pages 1113, which lists many sock yarns by length per weight.
ounces | = | grams 0.035 |
grams | = | ounces 28.57 |
yards | = | meters 1.0936 |
meters | = | yards 0.9144 |
50 g | = | 1.75 ounces |
100 g | = | 3.50 ounces |
1 ounce | = | 28.57 grams |
4 ounces | = | 114.28 grams |
10 yards | = | 9.14 meters |
10 meters | = | 10.93 yards |
CASTING ON
When knitting socks, I like to cast on over two needles held together as one in my right hand. This makes the cast-on stitches loose (but not sloppy) on the needle, which in turn makes the first round easier to work, and gives the cast-on edge a bit of stretch.
I have also become a passionate five-needle sock knitter and have written most of the patterns in this book for five needlesfour to hold the stitches and the fifth to knit them. However, sometimes its easier to work a pattern on four needles, especially when there is a pattern that runs down the front of a sock and continues down the instep. Those patterns have been written for four needlesthree to hold the stitches and the fourth to knit them. If you want to knit one of my five-needle patterns on four needles, simply place the stitches I have on needles #2 and #3 (the instep stitches) together onto one needle. Place a marker between each group so you will know which stitches belong where. This is especially important when shaping heels and toes.
Continental Long-tail Cast-on
This method of casting on gives a firm yet elastic edge. Make a slip knot and place it on the right needle, leaving a long tail (the length of this tail will depend on how many stitches you need to cast on). Place the thumb and index finger of your left hand between the two threads. Secure the long ends by closing your other three fingers on them. Twist your wrist so that your palm faces upward and spread your thumb and index finger apart to make a V of the yarn around them.
Insert a needle into the loop of yarn around your thumb from front to back. Place the needle over the top of the yarn around your index finger and bring the needle down through the loop around your thumb. Drop the loop off your thumb and, placing your thumb back in the V configuration, tighten up the resulting stitch on the needle. Repeat this process until all stitches are cast on.
Continental Long-tail Cast-on
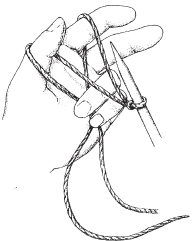
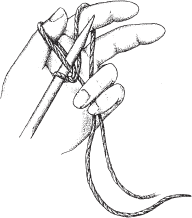
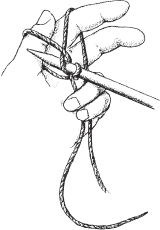
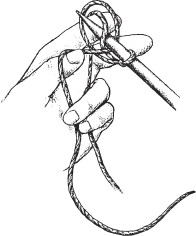
Long-tail Thumb Cast-on
This method of casting on gives a firm, yet elastic edgethe results are the same as for the Continental Long-tail Cast-on. This cast-on is knitted, using your left thumb as the left needle.
Place a slipknot on the right needle, leaving a long tail (the length of this tail will depend on how many stitches you need to cast on). Wrap the tail end around your left thumb, clockwise. Hold the needle with the slipknot in your right hand and wrap the yarn from the ball over your right index finger. Insert the needle through the loop around your thumb from front to back. With your right index finger, wrap the yarn from the ball around the needle as if to knit (this is a counterclockwise wrap). Pull this yarn through the loop around your thumb to make a stitch. Tighten the resulting loop on the needle. Continue in this manner until you have the desired number of stitches cast on.
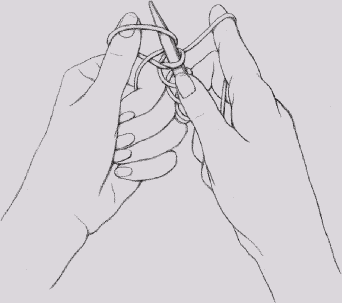
English Cast-on
This cast-on is worked in much the same way as the Continental Long-tail Cast-on, but there is an extra twist in the yarn. This twist secures the stitch, making the cast-on a bit stronger and also more decorative.
Make a slipknot and place it on the right needle, leaving a long tail (the length of this tail will depend on how many stitches you need to cast on). Place the thumb and index finger of your left hand between the two threads. Secure the long ends by closing your other three fingers on them. Twist your wrist so that your palm faces upward and spread your thumb and index finger apart to make a V of the yarn around them. Place the needle in front of the yarn around your thumb and bring it underneath both threads around your thumb. Insert the needle down through the center of the loop around your thumb and bring the needle forward toward you. The loop around your thumb will have a twist in it, close to the needle. Place the needle over the top of the yarn around your index finger, catch this yarn, and insert the needle back down into the loop around your thumb. As you do this, turn your thumb slightly away from you to remove the twist in the loop and allow the needle to pass through the untwisted loop. Drop the loop off your thumb and, placing your thumb back in the


