Lucia Frthmann lives with her husband and three children in the suburbs of Hamburg, Germany. She discovered her passion for crocheting during her first pregnancy and has been creating her own crochet patterns with great enthusiasm ever since. The results of this labor of love are presented on Instagram @LuciaFoerthmann.
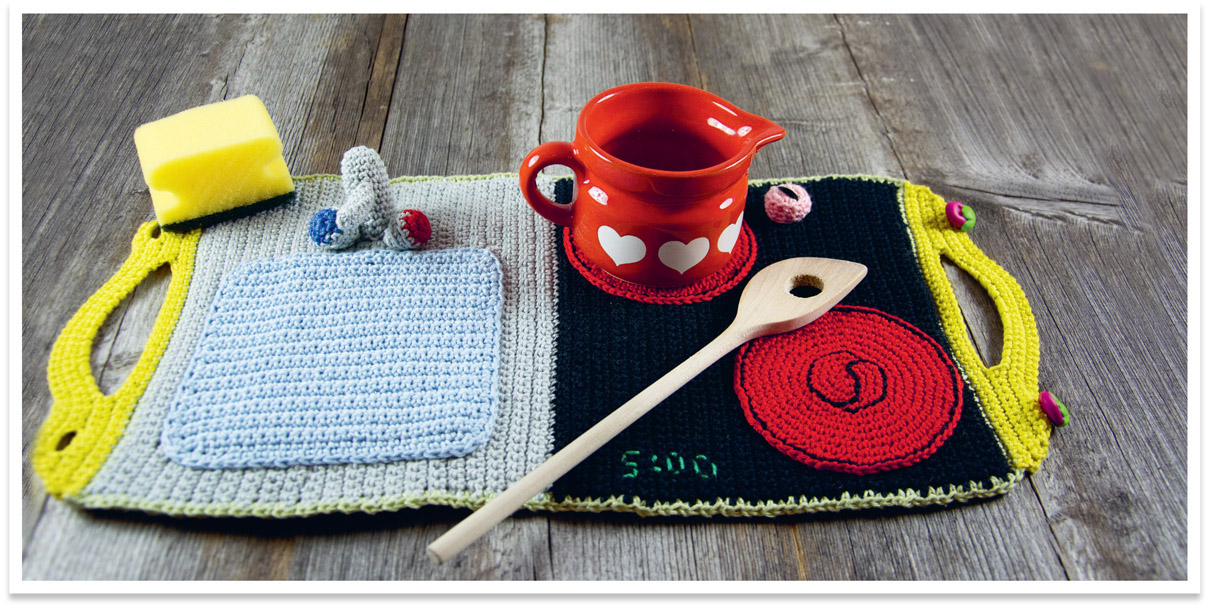
Up-and-coming masters need proper toolswith these, the tasty dishes from our play kitchen will turn out just perfectly! Equip your little chef with apron, chefs hat, pots, dishes, and flatware, and let the fun begin!
MATERIALS
crochet hook, 2.5 mm (US B-1 or C-2)
tapestry needle
sewing needle and thread
Schachenmayr Catania (100% cotton): 2 skeins (3.5 oz/100 g) in Kiwi; 1 skein (1.75 oz/50 g) each in Black (Schwarz), Silver (Silber), Signal Red (Signalrot), Anise (Anis), Pastel Blue (Hellblau), and Orange; 0.5 oz (15 g) each in Apple (Apfel), Pink (Rosa), Regatta (or any other shade of Blue), May Green (Maigrn), White (Wei), Coffee (Kaffee), and Mimosa (Mimose)
polyester fiberfill
white craft felt and glue
2 buttons
INSTRUCTIONS
KITCHEN SURFACE MAT
Work in rows. At the end of every row, chain 1, and turn work.
Using Black yarn, crochet a chain of 46.
Row 1 (RS): Work 1 sc into the 2nd stitch from the hook, 1 sc each in every following ch. (45 sts)
Rows 244: 1 sc each in every st of the prev row. (45 sts)
Change color to Silver.
Rows 4588: 1 sc each in every st of the prev row. (45 sts)
Break the working yarn, and secure the end.
OUTSIDE POCKET
Work as before for Kitchen Surface Mat, but this time, use only Kiwi.
Now place the 2 crocheted pieces together, wrong sides facing each other, and crochet them together evenly by working sc through both layers at a rate of 1 sc into every st and 1 sc into every end of the row. At the corners, work 2 sc each into each one of the 4 corner sts.
Break the working yarn, and secure the end.
FIRST HANDLE
Hold the crocheted-together kichen surface mat with the kiwi-colored side facing you (with the Silver part of the mat located in the back), and join new working yarn in Anise to the first stitch of the narrow edge. Work in rows. At the end of every row, chain 1, and turn work.
Row 1: 1 sc each in every st of the prev row. (45 sts)
Row 2: Dec 1 st, 41 sc, dec 1 st. (43 sts)
Row 3: Dec 1 st, 10 sc, ch19, skip 19 sts, 10 sc, dec 1 st. (41 sts)
Row 4: Dec 1 st, 9 sc, 19 sc in chsp, 9 sc, dec 1 st. (39 sts)
Row 5: Dec 1 st, 1 sc, ch3, skip 3 sts (1st buttonhole), 27 sc, ch3, skip 3 sts (2nd buttonhole), 1 sc, dec 1 st. (37 sts)
Row 6: Dec 1 st, 3 sc in ch-sp, 27 sc, 3 sc in ch-sp, dec 1 st. (35 sts)
Row 7: Dec 1 st, 31 sc, dec 1 st. (33 sts)
Break the working yarn, and secure the end.
SECOND HANDLE
Now work the second handle at the opposite narrow edge of the kitchen mat, kiwi-colored side facing you. Work Rows 17 as for the 1st handle, except for the buttonholes: Instead of 3 chains, work 3 sc, skipping no sts.
OUTSIDE POCKET
Work in rows. At the end of every row, chain 1, and turn work.
In Orange, crochet a chain of 34.
Row 1 (RS): Work 1 sc into the 2nd stitch from the hook, 1 sc each in every following ch. (33 sts)
Rows 221: 1 sc each in every st of the prev row. (33 sts)
Change color to Apple.
Row 22: Ch3, 1 sl-st into the 1st st of the row, * 1 sl-st into the next st, ch3, 1 sl-st into the same st as the last sl-st had been worked *, rep between * and * to end of row.
Break the working yarn, and secure the end.
KITCHEN SINK
Work in rows. At the end of every row, chain 1, and turn work.
In Pastel Blue, crochet a chain of 25.
Row 1 (RS): Work 1 sc into the 2nd stitch from the hook, 1 sc each in every following ch. (24 sts)
Row 2: Inc 1 st, 22 sc, inc 1 st. (26 sts)
Rows 327: 1 sc each in every st of the prev row. (26 sts)
Row 28: Dec 1 st, 22 sc, dec 1 st. (24 sts)
Row 29: 1 sc each in every st of the prev row. (24 sts)
Do not turn at the end of the row. Work sc edging evenly around the rectangle to the 1st st of the last row. Work 1 sl-st into this 1st st.
Break the working yarn, and secure the end.
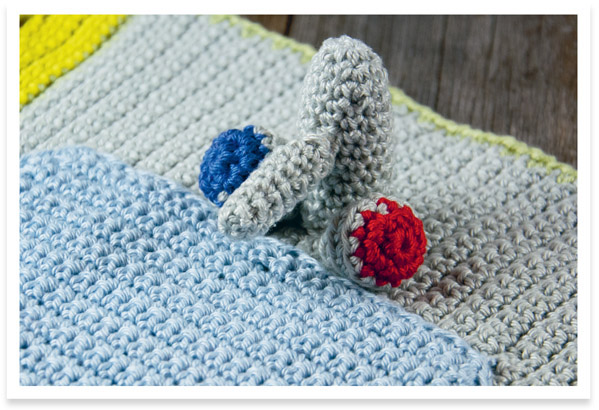
FAUCET
PART 1
Work in rounds. Begin every round with 1 chain, and end every round with 1 sl-st into the first stitch of the round. Do not turn work.
Rnd 1: In Silver, work 6 sc into an adjustable magic ring. (6 sts)
Rnd 2: Inc 1 st each, 6 times in all. (12 sts)
Rnds 313: 1 sc each in every st of the prev rnd. (12 sts)
Break the working yarn, and secure the end.
Now stuff the faucet with polyester fiberfill.
PART 2
Work in rounds. Begin every round with 1 chain, and end every round with 1 sl-st into the first stitch of the round. Do not turn work.
Rnd 1: Work 6 sc into an adjustable magic ring. (6 sts)
Rnds 28: 1 sc each in every st of the prev rnd. (6 sts)
Break the working yarn, and secure the end.
Lightly stuff the part with polyester fiberfill.
Sew on Part 2 in mattress stitch at the level of Rnds 68 of Part 1.
DIAL
Work in rounds. Begin every rnd with ch1, and end every rnd with 1 sl-st into the 1st st of the rnd. Do not turn work.
Rnd 1: In Signal Red, work 6 sc into an adjustable magic ring. (6 sts)
Rnd 2: Inc 1 st each, 6 times in all. (12 sts)
Change color to Silver.
Rnd 3: 1 sc each in every st of the prev rnd. (12 sts)
Rnds 4 and 5: Working through the back loop of the st only: 1 sc each in every st of the prev rnd. (12 sts)
Stuff the dial with polyester fiberfill.
Rnd 6: Working through the back loop of the st only: dec 1 st each, 6 times in all. (6 sts)
Rnd 7: * Skip 1 st, 1 sl-st *, rep from * to * 2 times more. (3 sts)
Break the working yarn, and secure the end.
Make a second dial the same way, but working the first two rnds in Regatta instead of Signal Red.
BURNER (MAKE 2)
Using Signal Red, crochet a circle from Basic pattern (Rnds 111, see page 23).
Break the working yarn, and secure the end.
TEMPERATURE DIAL
Work in rounds. Begin every round with 1 chain and end every round with 1 sl-st into the first stitch of the round. Do not turn work.
Rnd 1: In Pink, work 6 sc into an adjustable magic ring. (6 sts)
Rnd 2: Inc 1 st each, 6 times in all. (12 sts)
Rnd 3: Working through the back loop of the st only, 1 sc each in every st of the prev rnd. (12 sts)
Rnds 4 and 5: 1 sc each in every st of the prev rnd. (12 sts)
Break the working yarn, and secure the end.


