Pattern Services and Revisions
If you are an Annies customer and have a question about the instructions on a pattern you have purchased, please visit: http://www.anniescatalog.com/pages/customer_care/pattern_services.html
Contents
Skill Level
Confident Beginner
Finished Size
Quilt Size: 40" 48"
Block Size: 8" 12" finished
Number of blocks: 18 and 4
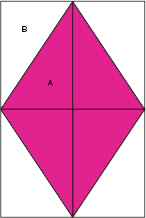 Diamond
 8" 12" Finished Block Make 18
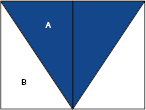 Half-Diamond
 8" 6" Finished Block Make 4
Materials
1 fat eighth each 20 assorted bright-color tonals and dots 1 yards white with multicolored dots Backing to size Batting to size Thread Basic sewing tools and supplies
Project Notes
Read all instructions before beginning this project. Stitch right sides together using a " seam allowance unless otherwise specified. Materials and cutting lists assume 40" of usable fabric width. Refer to your favorite quilting guide for specific techniques.
Cutting
From each fat eighth:
Cut 1 (5" 21") strip. Subcut strip into 2 (5" 7") A rectangles.
Cut a total of 11 (2" 21") binding strips.
From white with multicolored dots:
Cut 6 (7" by fabric width) strips. Subcut strips into 40 (5" 7") B rectangles.
Completing the Blocks
Make a dot on the upper left corner on the wrong side of an A rectangle " in from the top and side edges. Repeat on the lower right corner as shown in Figure 1.
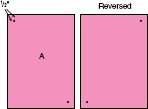 Figure 1
 Repeat to mark one A rectangle of each fabric in this manner (20 A rectangles total).
Repeat step 1, marking the upper right and lower left corners of the remaining 20 A triangles for reversed pieces, again referring to Figure 1. Repeat steps 1 and 2 with the B rectangles. Draw a diagonal line connecting the dots on all pieces as shown in Figure 2.  Figure 2 Select one each marked A and B rectangle. Place the A and B rectangles right sides together with the B rectangle on top.
 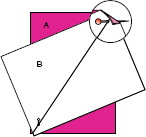 Figure 3 Pin pieces together to secure and to keep from moving; stitch a scant " on each side of the marked line as shown in Figure 4.
  Figure 4 Repeat steps 6 and 7 with a matching reversed A and B pair as shown in Figure 5.
  Figure 5 Cut each stitched pair apart on the marked line.
  Figure 5 Cut each stitched pair apart on the marked line.
Open the units and press the seams open to complete two A-B units and two reversed A-B units as shown in Figure 6. 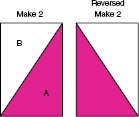 Figure 6 Repeat steps 59 with the remaining A and B, and reversed A and B rectangles to make a total of 40 each A-B and reversed A-B units. Trim each A-B unit to 4" 6", centering the seam line as shown in Figure 7. Note: See Trimming Units sidebar.
 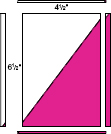 Figure 7 Select two each matching A-B and reversed A-B units. Press. Press.
Join the two rows to complete one Diamond block as shown in Figure 8; press.  Figure 8 Repeat step 12 to complete a total of 18 Diamond blocks. Repeat step 12, except do not join the rows, to make a set of two matching Half-Diamond blocks as shown in Figure 9. Repeat to make a second set of Half-Diamond blocks.
  Figure 9
Completing the Quilt Top
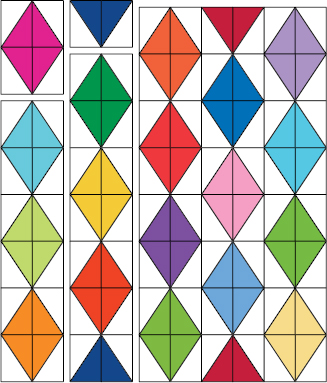
Refer to the Assembly Diagram for positioning of blocks and half-blocks. Arrange and join four Diamond blocks to make row 1; press.
Repeat to make rows 3 and 5. Arrange and join three Diamond blocks with two matching Half-Diamond blocks to make row 2; press. Repeat to make row 4. Arrange and join the rows in numerical order to complete the quilt top; press.
Completing the Quilt
Sandwich the batting between the pieced top and a prepared backing piece; baste layers together. Quilt as desired.
When quilting is complete, remove basting; trim batting and backing fabric even with raw edges of the pieced top. Prepare binding and stitch to quilt front edges, matching raw edges, mitering corners and overlapping ends. Fold binding to back side and stitch in place to finish. 
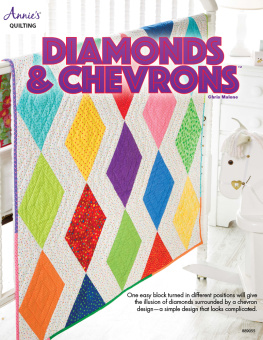
 Diamonds & Chevrons
Assembly Diagram 40" 48"
Mark a dot at the " mark at the top right corner of your ruler and the 4" 6" mark at the lower left on the ruler (Figure A).
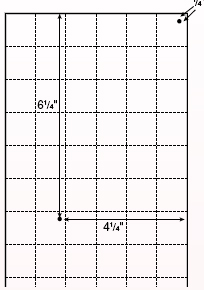 Figure A
 Align the marked dots on ruler with the diagonal seam on one of the stitched A-B units, making sure that there is at least 4" 6" of the block covered by the ruler (Figure B).
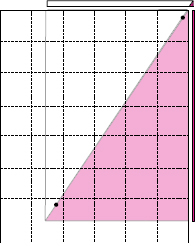 Figure C
 Rotate the unit and use the 4" 6" lines to complete the trim.
 Figure C
 Rotate the unit and use the 4" 6" lines to complete the trim.
Another method is to mark a 4" 6" rectangle on the ruler and draw a diagonal line from corner to corner to use as a centering guide. Place the marked rectangle on the A-B unit with the diagonal line matching the seam line of the unit. Trim all edges.
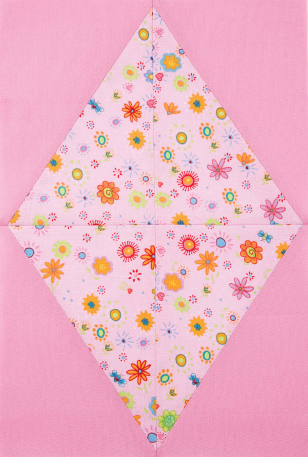
 | If bright colors arent what you are looking for, try a color scheme for a boy or a girl. Use two fabrics instead of a scrappy palette for a totally different effect. |





 Diamond 8" 12" Finished Block Make 18
  Half-Diamond 8" 6" Finished Block Make 4
  Figure 1 Repeat to mark one A rectangle of each fabric in this manner (20 A rectangles total).
  Figure 2 Select one each marked A and B rectangle. Place the A and B rectangles right sides together with the B rectangle on top.
  Figure 3 Pin pieces together to secure and to keep from moving; stitch a scant " on each side of the marked line as shown in Figure 4.
  Figure 4 Repeat steps 6 and 7 with a matching reversed A and B pair as shown in Figure 5.
  Figure 5 Cut each stitched pair apart on the marked line.
  Figure 6 Repeat steps 59 with the remaining A and B, and reversed A and B rectangles to make a total of 40 each A-B and reversed A-B units. Trim each A-B unit to 4" 6", centering the seam line as shown in Figure 7. Note: See Trimming Units sidebar.
  Figure 7 Select two each matching A-B and reversed A-B units. Press. Press.
 Figure 8 Repeat step 12 to complete a total of 18 Diamond blocks. Repeat step 12, except do not join the rows, to make a set of two matching Half-Diamond blocks as shown in Figure 9. Repeat to make a second set of Half-Diamond blocks.
  Figure 9
 Diamonds & Chevrons
 Figure A Align the marked dots on ruler with the diagonal seam on one of the stitched A-B units, making sure that there is at least 4" 6" of the block covered by the ruler (Figure B).
  Figure C Rotate the unit and use the 4" 6" lines to complete the trim.
