contents
hooded capelet
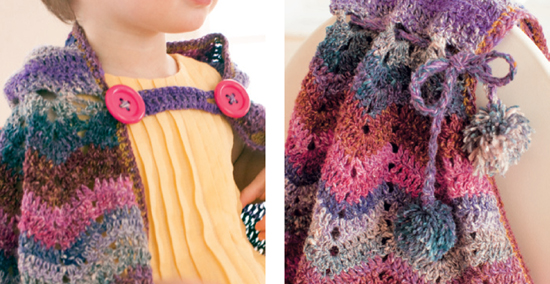
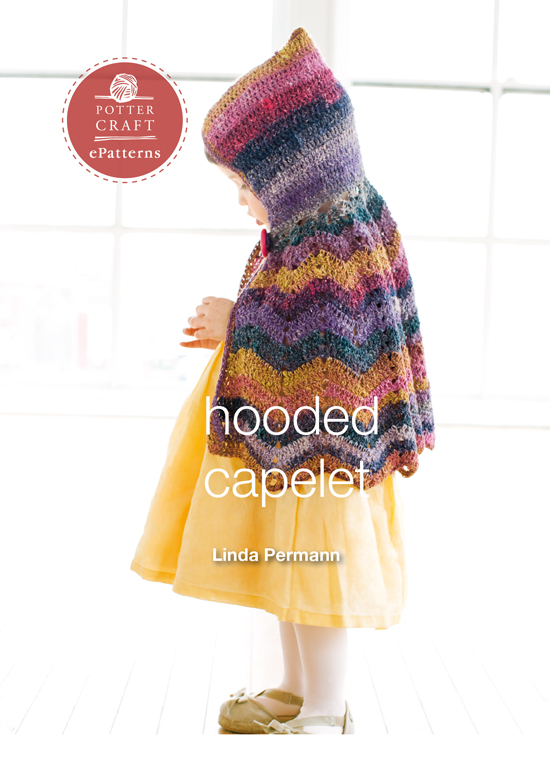
Self-striping sock yarn and a classic ripple stitch pattern turn this simple capelet into something special. Its great for playing dress-up or for warmth when an extra layer of clothing is needed. The cape closes with a button tab for smaller children, or pom-pom neck ties for older ones. For safety reasons, please be sure to supervise your child while he or she is wearing the cape.
SKILL LEVEL Intermediate
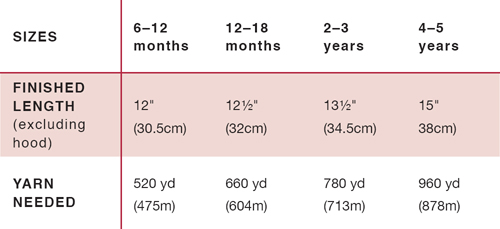
YARN 520 (660, 780, 960) yds (475 [604, 713, 878]m) of sportweight yarn
Samples Knit with Noro Silk Garden Sock Yarn (40% lambs wool, 25% silk, 25% nylon, 10% kid mohair; 3 oz/100g, 275 yds/300m): 2 (3, 3, 4) skeins in color #S292 (pink/purple/gray)
CROCHET HOOK Size F-5 (3.75mm) crochet hook, or size needed to obtain gauge
GAUGE 18 stitches and 9 rows = 4" (10cm) over double crochet
OTHER MATERIALS Yarn needle Stitch markers Two 1" (3cm) diameter buttons or 1" (3.8cm) diameter pom-pom maker (optional)
NOTE The capelet is worked in one piece. The hood is worked in rows of double crochet down to the neck. The ripple stitch pattern is then established around the neck, and the capelet is worked from the neck down.
HOOD
Ch 62 (72, 82, 92).
Row 1 (RS): Dc in fourth ch from hook (beginning ch counts as first dc) and in each ch across60 (70, 80, 90) dc.
Rows 215 (17, 19, 22): Ch 3 (counts as dc here and throughout), turn, dc in each dc across.
Row 16 (18, 20, 23): Ch 1, turn, sc in each dc across.
SHAPE NECK
Row 1 (eyelet row): Ch 1, turn, *sc in next sc, ch 4, sk next 3 sc, sc in next sc; repeat from * across12 (14, 16, 18) ch-4 sps.
Row 2: Ch 3 (counts as dc here and throughout), turn, dc in first stitch, 2 dc in next ch-4 sp, (3 dc, ch 2, 3 dc) in each ch-4 sp across to last ch-4 sp, 2 dc in last ch-4 sp, 2 dc in last sc10 (12, 14, 16) ch-2 sps and 68 (80, 92, 104) dc.
Row 3: Ch 3, turn, dc in first stitch, dc in next 2 dc, sk next 2 dc, place a marker between last dc made and next dc, *dc in next 2 dc, (2 dc, ch 2, 2 dc) in next ch-2 sp, dc in next 2 dc, sk next 2 dc, place a marker between last dc made and next dc; repeat from * across to last 3 dc, dc in next 2 dc, 2 dc in last dc88 (104, 120, 136) dc.
Move markers up as work progresses.
Row 4: Ch 3, turn, dc in first stitch, 2 dc in next dc, dc in each dc to one stitch before marker, sk next 2 dc, *dc in each dc to next ch-2 sp, (2 dc, ch 2, 2 dc) in next ch-2 sp, dc in each dc to 1 stitch before marker, sk next 2 dc; repeat from * across to 1 stitch before last marker, sk next 2 dc, dc in each dc to last 2 dc, 2 dc in last 2 dc110 (130, 150, 170) dc.
Row 5: Ch 3, turn, dc in first stitch, dc in each dc to 1 stitch before marker, *sk next 2 dc, dc in each dc to next ch-2 sp, (dc, ch 2, dc) in next ch-2 sp, dc in each dc to 1 stitch before next marker; repeat from * across to 1 stitch before last marker, sk next 2 dc, dc in each dc to last dc, 2 dc in last dc.
Row 6: Repeat Row 4132 (156, 180, 204) dc.
Rows 7 and 8: Repeat Rows 5 and 6154 (182, 210, 238) dc.
Rows 911: Repeat Row 5 three times.
Row 12: Repeat Row 4176 (208, 240, 272) dc.
Rows 1320: Repeat Rows 912 twice220 (260, 300, 340) dc.
Rows 2123 (24, 26, 28): Repeat Row 5, 3 (4, 5, 6) times, or to desired length.
Fasten off.
FINISHING
Fold the top edge of the hood in half and sew the edges together to form the top of the hood.
Edging
Round 1: With right side facing, join yarn in lower front corner, ch 1, 2 sc in corner, work 2 sc in end of each row up front edge, around hood edges, and down opposite front edge to opposite lower front corner; work 3 sc in opposite corner, sc in next 9 dc, sc2tog, *sc in next 9 dc, 4 sc in next ch-4 sp, sc in next 9 dc, sc2tog; repeat from * across to last 9 stitches, sc in next 9 dc, 2 sc in last dc; join with sl st in first sc.
Row 2: Ch 1, sc in each sc up front edge, around hood edges, and down opposite front edge. Fasten off.
Neck Closure
Note: Both neck ties and buttons can be hazardous for small children. At your discretion, use the Button Tab closure for children under age three, and the Neck Tie closure for older children.
Button Tab (Optional)
Ch 24.
Row 1: Dc in tenth ch from hook (skipped 10 ch forms buttonhole), dc in next 13 ch14 dc.
Round 2: Ch 1, turn, evenly sc around entire outside edge of tab, working 14 sc into ch-10 sp.
Fasten off. Pin the non-loop edge of the tab to the Right Front of the cape just below the hood. Place one button over the tab, and sew both the button and tab to the cardigan. Sew the remaining button to the Left Front, directly across from button loop.
Neck Tie (for Kids Ages 3 and Up, Optional)
With 2 strands of yarn held together, work a chain that is 32" (81.5cm) in length. Fasten off. Weave the chain through the eyelet row at the neck of cape. Following the manufacturers instructions, make two 1" (3.8cm) diameter pom-poms. Sew one pom-pom to each end of the tie.
Weave in all ends.
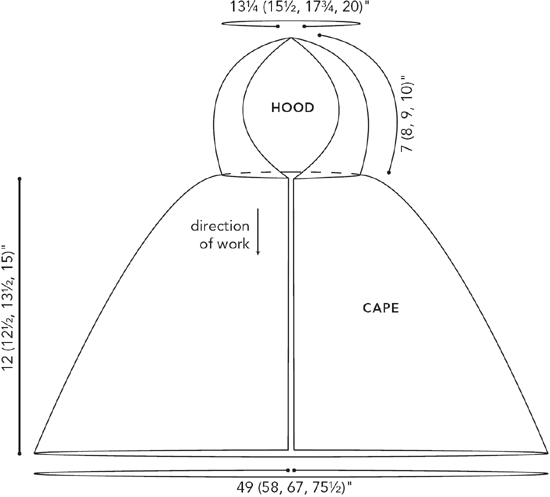
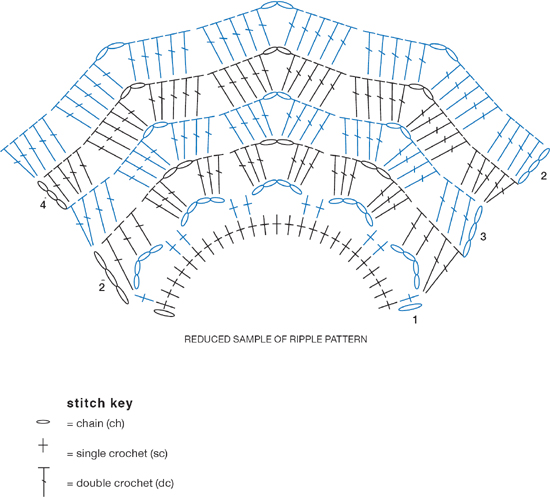
To download a printable copy of this chart, go to http://rhlink.com/mcp006
This ePattern is excerpted from
Copyright 2011 by Linda Permann
Photographs copyright 2011 by Potter Craft
All rights reserved.
Published in the United States by Potter Craft,
an imprint of the Crown Publishing Group, a division of Random House, Inc., New York.
POTTER CRAFT and colophon is a registered trademark of Random House, Inc.
eISBN: 978-0-307-98556-9
Photographs by Heather Weston
Schematics by Kj Hay
Crochet Diagrams by Karen Manthey
Originally published as part of Little Crochet by Potter Craft, an imprint of the Crown Publishing Group, a division of Random House, Inc.
v3.1
Look for more Potter Craft knitting and crochet ePatterns




 (40% lambs wool, 25% silk, 25% nylon, 10% kid mohair; 3 oz/100g, 275 yds/300m): 2 (3, 3, 4) skeins in color #S292 (pink/purple/gray)


