HOW TO MAKE
DOLLS HOUSES
First published 1957

a Bell Handbook
Contents
Photographs
The photographs appear between
Introduction

ABOVE ALL THINGS I am interested in houses and particularly in their furnishing. Three years ago, I completed the furnishing of my own, for the time at least, and I found myself faced with the prospect of spending all my long winter evenings either knitting or reading. I must confess that I soon get bored with knitting and even with reading, for I enjoy making things with my hands. Like so many of my sex, I am fascinated by tiny, fragile things, however useless, and I saw my opportunity for indulging myself thoroughly when the idea of making a dolls house cropped up.
I made no replicas of real houses, preferring always to build, just for the fun of it, some version of a past style that caught my imagination; or to furnish and decorate a few rooms that Id rather like to live in, however impractical. I have had great pleasure from admiring such magnificent dolls houses as those in the London Museum, Queen Marys dolls house and of course such of those that I have seen that figure in Vivian Greenes book about dolls houses. The one that gave me the greatest delight was the Longleat Baby House, loaned by the Marquess of Bath to an Exhibition of Dolls Houses at Messrs Bewleys.
The professional skill that went into the making of these housesmansions ratheris obviously far out of reach of most of us today and I have, in this book, tried to write only of what I could do myself. I believe that the modest buildings described in this book could be made by anyone reasonably good with their hands.
In the first part, I have described a dolls house that could be made by schoolchildren from cheap and handy materials and without too many tools or any great fuss. I know how much pleasure and worth-while knowledge children can get from making and playing with these houses, for my own little boy has played with every single item in every house described in this book, made many that are not described and overwhelmed me with suggestions; and, though he is a rough sort of boy, he has broken very few things and then only when completely absorbed in putting them to use.
The next section is concerned with a modern house and shop that could be made by an older child or adultperhaps as a present for a younger child who would be able to manage the decorating and furnishing easily enough.
For the third and most ambitious scheme, I chose a nineteenth-century drapers shop, with a flat above it. As I made each part, I wrote about it so that I completed both house and book at the same time, and by doing it that way I hope to have dealt with most of those wretched little snags that are so easily forgotten when one tries to think back.
The last section contains a variety of dolls houses that I either made some time ago, or intend to make, or that may provide the reader with an idea for one of his own.
All the ambitious schemes for decoration that so many of us have and either dare not carry out or cannot afford, are but half an hours job in a dolls house. Perhaps, like model railways to Fathers, they mean as much and more to grown-ups as they do to children? In any case, it is far better to make them than to buy them, for in the making lies the real pleasure.
SECTION A:
A School
See

1. THE IDEA
When you want to make something, it is always a great help if you can start by trying to draw it, however simply. Plans, elevations and perspective drawings are a necessary beginning for all but the most barbaric buildings. Once you have decided what type of dolls house you want, make a little sketch of it. As an example, I chose a school, just a one-room building, but there are many shapes to choose fromsuch as these:

Fig. 1
Having decided, not necessarily on the easiest, but I hope more wisely on the one that appeals to your imagination, the one that you think you can really make something of, different from everyone elses, then try more elaborate drawings from different angleslike those on the next page.

Fig. 2
2. CONSTRUCTION
How big is it to be? It should be small enough to fit easily into a real household, or, if it is to be made in school, on a desk, yet large enough to furnish and decorate without a magnifying glass or special tools.
First, decide on the measurements of the base, then estimate the height (which should be of taller proportions than a real room, so that you can see into it). I would suggest that it be about 14 long by 8 wide, with walls 10 high. If you have 1/4 softwood available (grocery boxes perhaps?), you will need two pieces each 14 8 (A and B) and two pieces each 8 10 (C and D)see .
These can be glued and/or nailed together to form a box open at both ends. For the more elaborate front, you can use a material that is easier to cut windows out of, such as Balsa wood, stiff cardboard or plywood, depending on what materials and tools you have. The hardest, plywood, needs a fretsaw; Balsa wood and cardboard can be cut with a sharp knife or scissors. Lay the box, one of the open ends down, ). Cut them out carefully and save the odd pieces for use later on.
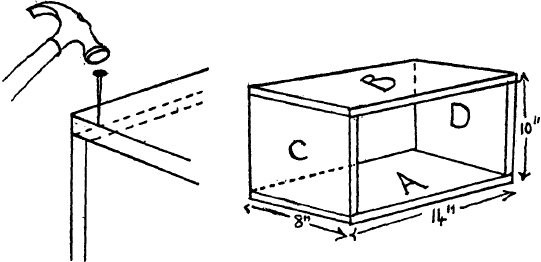
Fig. 3

Fig. 4A

Fig. 4B
Tack and/or glue this faade on to one end of the box.

Fig. 5
If you like, you can elaborate this by adding a hinged door to the back, a roof of stiff card and a flag-pole.
). The roof can be made of stiff cardboard, overlapping the walls slightly. To bend it, make a careful incision with a knife along the centre, cutting only halfway through the card; after bending along this line, strengthen the roof top with sticky tape. Then cut out a triangular piece of wood or card (A) to support the roof at the back and glue and/or tack it into place.
A flag-pole made from a paintbrush handle or a meat skewer can be stuck with gum strip or tape or tacks to the faade before the roof is put on and a little hole cut in the roof to let it through.

Fig. 6A
Next page

