2006 C&T Publishing
Publisher: Amy Marson
Editorial Director: Gailen Runge
Acquisitions Editor: Jan Grigsby
Editor: Liz Aneloski
Technical Editors: Teresa Stroin and Ellen Pahl
Copyeditor/Proofreader: Wordfirm, Inc.
Cover Designer: Kristen Yenche
Design Director/Book Designer: Kristen Yenche
Illustrator: Tim Manibusan
Production Assistant: Matt Allen
Photography: Luke Mulks, unless otherwise noted
Published by C&T Publishing, Inc., P.O. Box 1456, Lafayette, CA 94549
Background of pages: Images of fabric from Kimono Art II from In the Beginning by MLiss Rae Hawley.
All rights reserved. No part of this work covered by the copyright hereon may be used in any form or reproduced by any meansgraphic, electronic, or mechanical, including photocopying, recording, taping, or information storage and retrieval systemswithout the written permission of the publisher.
Attention Teachers: C&T Publishing, Inc., encourages you to use this book as a text for teaching. Contact us at 800-284-1114 or www.ctpub.com for more information about the C&T Teachers Program.
We take great care to ensure that the information included in our books is accurate and presented in good faith, but no warranty is provided nor results guaranteed. Having no control over the choices of materials or procedures used, neither the authors nor C&T Publishing, Inc., shall have any liability to any person or entity with respect to any loss or damage caused directly or indirectly by the information contained in this book. For your convenience, we post an up-to-date listing of corrections on our website ( or at P.O. Box 1456, Lafayette, CA 94549.
Trademark () and registered trademark () names are used throughout this book. Rather than use the symbols with every occurrence of a trademark or registered trademark name, we are using the names only in the editorial fashion and to the benefit of the owner, with no intention of infringement.
Library of Congress Cataloging-in-Publication Data
Piecing tips & tricks tool : piece like the experts : easy-to-use color-coded sections, everything you need to know / Alex Anderson ... [et al.].
p. cm.
ISBN-13: 978-1-57120-983-2 (paper trade : alk. paper)
ISBN-10: 1-57120-983-2 (paper trade : alk. paper)
1. Quilting. 2. Patchwork. I. Anderson, Alex, II. Title.
TT835.P552 2006
746.46--dc22
2006007141
10 9 8 7 6 5 4 3 2 1
For more detailed information
For further reading and more detailed information on many of the topics included in this book, please refer to these books:

Author websites:
www.nancyjohnsonsrebro.com
www.ruthbmcdowell.com
www.alexandersonquilts.com
www.sharyncraig.com
www.caroldoak.com

For more detailed information, see Stars by Magic by Nancy Johnson-Srebro.
Workspace
Lighting
Use four types of lighting: natural, fluorescent overhead, sewing machine, and swing-arm lamp attached to your sewing table.
Position your sewing machine near a window, if possible.
Adjust the swing-arm lamp so it shines on the throat plate and needle.
Sewing Area Set-Up
Position your sewing machine so the bed of the machine sits flush with the tabletop. Cut out a section of a wooden table and attach two iron supports beneath the tabletop to hold the machine in position.
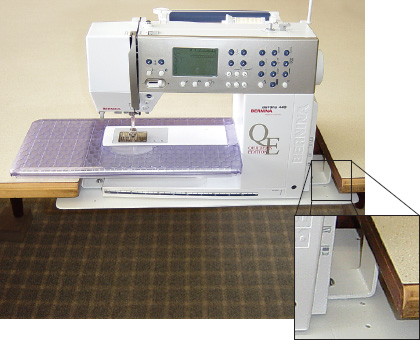
Position your ironing board at your left side, perpendicular to your sewing table. Adjust the height of the ironing board so you can rest your left elbow on it. This arrangement makes it easy to press as you sew and helps keep your left arm from getting tired.
Chair
Use a five-wheel secretarial swivel chair with an adjustable back and height.
Match the height of your chair to the height of your sewing machine, not your table.
Design Wall
Hang as large a piece of Warm and Natural or Hobbs cotton batting as you can fit on the wall using pushpins on the edges.
If you dont have room for a design wall, tape white flannel to a door.

Ironing Board and Iron
I use the Big Board on top of my ironing board (). It gives me more than twice as much room for pressing and laying out pieces and blocks. This big pressing surface works well for pressing lattice strips and borders.
Use a foam pad (no more than thick) under the cover of your ironing board for pressing pieced units and a thicker pad for pressing appliqu blocks.
Choose an ironing board with four separate legs for more stability and a solid top (no holes) for an even pressing surface.
Use a light, solid-color ironing board cover so you can see small pieces of fabric easily.
Place muslin or flannel on top of the area of the ironing board where you press the most. Replace it when it gets dirty.
Use a lightweight iron to prevent stress on your hands and wrists.
It is very handy to have an iron with an extra-long power cord.
Always unplug the iron when its not in use.
Another safety trick is to plug the iron, sewing machine and swing-arm light into a power strip. When the light is off you know the sewing machine and iron are also off.
To make a portable ironing/cutting mat, use a 10 12 piece of paneling. For the ironing surface, place one or two layers of cotton batting on one side of the paneling. Cover it with a piece of flannel a few inches larger than the paneling, wrap the excess to the other side, and glue the edges down. For the cutting surface, glue an 8 10 cutting mat to the other side, covering the glued flannel edges.

Rotary Cutting
Equipment
Rotary Cutters

The bigger the diameter of the handle, the more comfortable it will be for your hand, especially if you suffer from carpal tunnel syndrome or arthritis. The comfort comes from the diameter of the handle, not the size of the blade.
Increase the size of a smaller-diameter handle by wrapping and taping a layer of soft foam around it.
Use a cutter with a small blade (28mm) for cutting around templates.
When you put in a new blade, mark the date on the blade with a permanent marker, so you know when you last changed it.
Try as many rotary cutters as possible before purchasing one. Cup your hand. The bottom of the cutter should fit in the center crease of your palm. Wrap your hand and fingers around the handle. Your fingers should not overlap your thumb.
Always close the cutter after each cut.
Next page
