Publisher: Amy Marson Creative Director: Gailen Runge Editors: Joanna Burgarino and Alice Mace Nakanishi Cover/Book Designer: April Mostek Production Coordinator: Zinnia Heinzmann Photography by Diane Pedersen, Christina Carty-Francis, and Nissa Brehmer, of C&T Publishing, unless otherwise noted For further information and similar projects, see the book listed after each artists bio. Published by C&T Publishing, Inc., P.O. Box 1456, Lafayette, CA 94549 Log Cabin Pincushion Alexia Marcelle Abegg 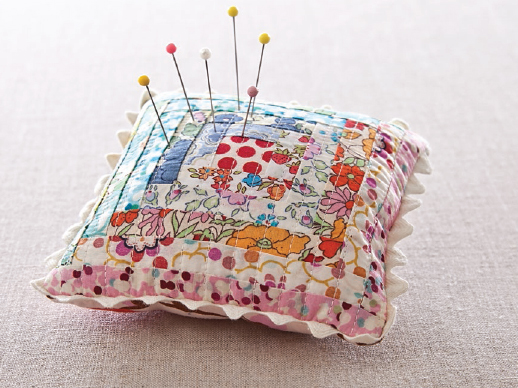 FINISHED SIZE: 6 6 approximately 1 thick This little pincushion is a twist on the Log Cabin block that is embellished with rickrack. ALEXIA MARCELLE ABEGG is an award-winning artist and designer who studied fashion and fine arts. Her experience in photography and costuming has helped her find her home in designing quilt and sewing patterns. Alexia lives in Tennessee.
  Available as an eBook only Materials and Supplies RED PRINT: 1 1 for center VARIETY OF PRINTS: 10 strips 1 wide (from 1 to 6 length) for logs VARIETY OF PINK AND RED PRINTS: 10 strips 1 wide (from 1 to 6 length) BACKING: yard or scrap 7 7 BATTING: 7 7 RICKRACK: yard, wide STUFFING Cutting RED PRINT: Cut 1 square 1 1.
  Available as an eBook only Materials and Supplies RED PRINT: 1 1 for center VARIETY OF PRINTS: 10 strips 1 wide (from 1 to 6 length) for logs VARIETY OF PINK AND RED PRINTS: 10 strips 1 wide (from 1 to 6 length) BACKING: yard or scrap 7 7 BATTING: 7 7 RICKRACK: yard, wide STUFFING Cutting RED PRINT: Cut 1 square 1 1.
COTTON PRINT 1 STRIPS: Arrange and cut the 1-wide fabric strips according to the length shown in the block diagram. BACKING FABRIC: Cut 1 square 6 6. 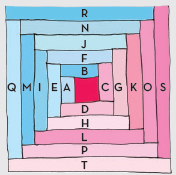 Log Cabin block A: 1 B: 2 C: 2 D: 2 E: 2 F: 3 G: 3 H: 3 I: 3 J: 4 K: 4 L: 4 M: 4 N: 5 O: 5 P: 5 Q: 5 R: 6 S: 6 T: 6 Construction Use a seam allowance, and sew all seams with the right sides together.TOP Sew strip A to the left of the 1 1 center square. Press the seam away from the center square. Sew strip B to the top of the unit.
  Continue sewing strips in alphabetical order until you have completed the block.
  Continue sewing strips in alphabetical order until you have completed the block.
Layer the Log Cabin block onto the batting with the wrong side touching the batting. Press. Using a straight stitch, quilt rows of stitching every across the block. Trim away any excess batting. Beginning at the center of a side of the top, sew the rickrack trim in place, centering it on the seamline. Overlap the rickrack ends and let each veer over the cut edge of the pincushion top.
Backstitch over the rickrack. Trim excess. 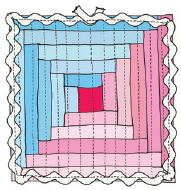 PINCUSHION On the wrong side of the backing, make 2 marks on the seam allowance about 2 apart and centered on a side for turning right side out after sewing. Pin the top and backing of the pincushion, right sides together. With the bottom facing up, sew around the perimeterbegin at an opening mark, pivot at each corner, and stop when you reach the other opening mark. Clip the excess seam allowance at each corner.
Turn the pincushion right side out. Stuff until the pincushion is fairly firm. Using a ladder stitch, stitch the opening of the pincushion closed. Kaleidoscope Pincushion Jeni Baker 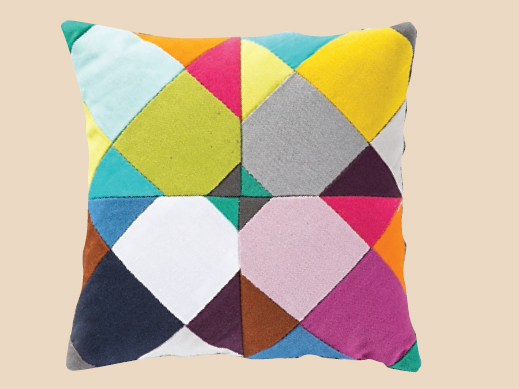 FINISHED SIZE: 5 5 Most sewists can never have enough pincushions, even with five or six at the ready. For Kaleidoscope Pincushion, a Nine-Patch block was altered to become something fresh and different.JENI BAKER loves to find ways to be creative every day, whether through photography, sewing, or quilting. Recently she entered the world of fabric design as a licensed designer for Art Gallery Fabrics.
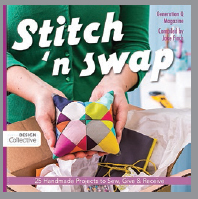
She also writes and publishes sewing and quilting patterns.  WEBSITE: incolororder.com This project originally appeared in Stitch n Swap (from Stash Books), which was compiled by Jake Finch.
  Materials and Supplies SOLID FABRIC SCRAPS: 18 squares 2 2 BACKING FABRIC: 6 6 STUFFING Construction All seam allowances are . Arrange and sew the squares into 2 Nine-Patch blocks. Press the seams open. Sew the Nine-Patch blocks, right sides together, on all 4 sides.
 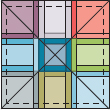 Open the pieces and press the seams open.
 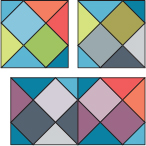 Arrange and sew 2 rows of 2 pieced squares each.
  Arrange and sew 2 rows of 2 pieced squares each.
Join the rows. Press the seams open. Layer the pieced pincushion top with the 6 6 backing, right sides together. Trim any excess backing. Sew around all 4 sides, leaving a 1 opening along a side. Turn right side out, clipping the corners and poking them out with a dull pencil.
Stuff the pincushion as desired, and hand stitch the opening closed. tip You dont have to use fiberfill to stuff your pincushions. Try sand, ground walnut shells, or emery powder to help keep your pins sharp and ready for your next project! 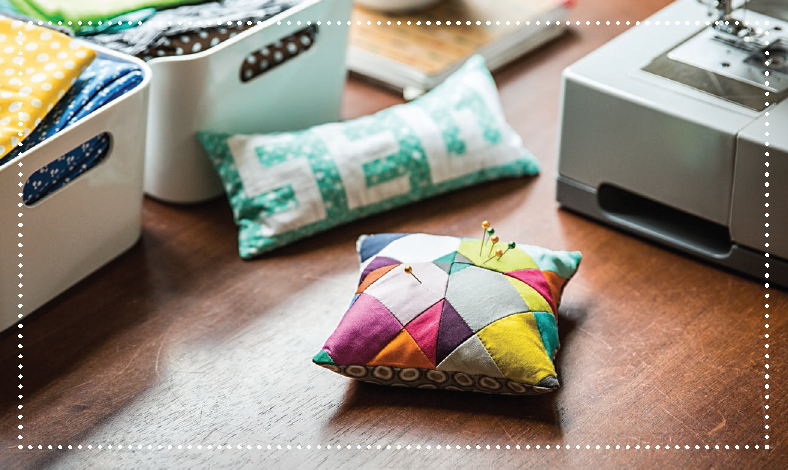 Boxy Pincushion Virginia Lindsay
 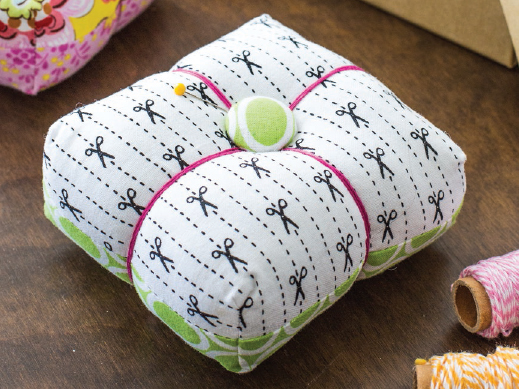 FINISHED SIZE: 4 wide 4 high 1 deep Fabric: This pincushion features Dear Stellas fabric Do It Yourself Scissors in White and Ann Kelles Ovals in LimeThe shape of this pincushion is practical but pretty too. It holds lots of pins and fits nicely right next to your machine. VIRGINIA LINDSAY is a self-taught sewist and lover of all things fabric. She is the author of a popular sewing blog and the designer behind Gingercake Patterns. Several of her patterns are published by Simplicity.
Virginia lives in Freeport, Pennsylvania. 
Next page

 FINISHED SIZE: 6 6 approximately 1 thick This little pincushion is a twist on the Log Cabin block that is embellished with rickrack. ALEXIA MARCELLE ABEGG is an award-winning artist and designer who studied fashion and fine arts. Her experience in photography and costuming has helped her find her home in designing quilt and sewing patterns. Alexia lives in Tennessee.
  Available as an eBook only Materials and Supplies RED PRINT: 1 1 for center VARIETY OF PRINTS: 10 strips 1 wide (from 1 to 6 length) for logs VARIETY OF PINK AND RED PRINTS: 10 strips 1 wide (from 1 to 6 length) BACKING: yard or scrap 7 7 BATTING: 7 7 RICKRACK: yard, wide STUFFING Cutting RED PRINT: Cut 1 square 1 1.
  Log Cabin block A: 1 B: 2 C: 2 D: 2 E: 2 F: 3 G: 3 H: 3 I: 3 J: 4 K: 4 L: 4 M: 4 N: 5 O: 5 P: 5 Q: 5 R: 6 S: 6 T: 6 Construction Use a seam allowance, and sew all seams with the right sides together.TOP Sew strip A to the left of the 1 1 center square. Press the seam away from the center square. Sew strip B to the top of the unit.
  Continue sewing strips in alphabetical order until you have completed the block.
  PINCUSHION On the wrong side of the backing, make 2 marks on the seam allowance about 2 apart and centered on a side for turning right side out after sewing. Pin the top and backing of the pincushion, right sides together. With the bottom facing up, sew around the perimeterbegin at an opening mark, pivot at each corner, and stop when you reach the other opening mark. Clip the excess seam allowance at each corner.
 FINISHED SIZE: 5 5 Most sewists can never have enough pincushions, even with five or six at the ready. For Kaleidoscope Pincushion, a Nine-Patch block was altered to become something fresh and different.JENI BAKER loves to find ways to be creative every day, whether through photography, sewing, or quilting. Recently she entered the world of fabric design as a licensed designer for Art Gallery Fabrics.
 WEBSITE: incolororder.com This project originally appeared in Stitch n Swap (from Stash Books), which was compiled by Jake Finch.
  Materials and Supplies SOLID FABRIC SCRAPS: 18 squares 2 2 BACKING FABRIC: 6 6 STUFFING Construction All seam allowances are . Arrange and sew the squares into 2 Nine-Patch blocks. Press the seams open. Sew the Nine-Patch blocks, right sides together, on all 4 sides.
  Open the pieces and press the seams open.
  Arrange and sew 2 rows of 2 pieced squares each.
  Boxy Pincushion Virginia Lindsay
  FINISHED SIZE: 4 wide 4 high 1 deep Fabric: This pincushion features Dear Stellas fabric Do It Yourself Scissors in White and Ann Kelles Ovals in LimeThe shape of this pincushion is practical but pretty too. It holds lots of pins and fits nicely right next to your machine. VIRGINIA LINDSAY is a self-taught sewist and lover of all things fabric. She is the author of a popular sewing blog and the designer behind Gingercake Patterns. Several of her patterns are published by Simplicity.