Contents
Guide


Contents

Introduction
I really enjoyed writing this title with its fun mix of gorgeous and gruesome inspired designs for children. The gorgeous designs were easy to imagine, a little pink perhaps, a magical castle, a pretty fairy, some sparkle or a cute face and theres your appealing gorgeous cake that draws looks of admiration on the special day from all those little faces looking up at you.
When making some of the more gruesome designs, a colleagues words kept ringing in my ears, You couldnt make anything look ugly! Every piece of sugar you touch turns out cute! I suppose its rather true as most of the designs herein really arent too gruesome at all. They are gruesome without being too much so even the Ugly Bug has a funny facial expression that couldnt offend and the Monster instead of being angry just looks endearing!
I couldve added some ghouls, a little blood and guts, perhaps an ugly worm or some disgusting looking rotting brains oozing out of the Pirate Skulls eye, or a pretty little butterfly sitting on the Baby Dinosaurs tongue about to be his tea, but decided to keep the designs slightly tamer, to stop those widened eyes of horror from little childrens faces. I know they love the really gruesome ideas for cakes, but when it comes to the serving, the wrinkling of noses is common and they never really want to consume the really unsavoury looking ones, and its such a waste of a nice celebration cake and all the time youve spent perfecting it.
I hope you find something to inspire you within these pages and the designs give you and the lucky recipients much pleasure. Ive been writing and designing for many years and all of these cakes are achievable within a sensible timeframe although I recommend you leave plenty of time to decorate to alleviate any stress as the special day nears. Ive found as long as the cake is sealed tightly with a good covering of sugarpaste no later than a day after baking then it can, depending on the climate you are working in, last anything up to a week before consumption, allowing you time to perfect your masterpiece. Just have fun and be happy to have found this wonderful and rewarding pastime.
Debbie
Basic recipes
Butter sponge cake
This recipe is rich and moist but with the addition of a little extra flour makes it slightly denser so perfect for sculpting. I would recommend using this recipe in preference to shop bought sponge mixes as these are often too soft and crumbly to withstand being sculpted into different shapes.

If you have a fan assisted oven, it may be advisable to reduce the suggested oven temperature slightly. I also recommend placing a metal baking (cookie) sheet onto the top of the bakeware so the cake is protected from the hot air during baking.
Preheat the oven to 150C/300F/Gas Mark 2-3. Grease and line the bakeware. Sift the flour into a bowl.
Soften the butter and place into the food processor or a large mixing bowl. Sift and add the caster (superfine) sugar. Beat until the mixture becomes lighter in colour with a fluffy texture.
Add the eggs along with two thirds of the flour and beat well.
Add the Vanilla essence/flavouring and then fold in the remaining flour.
Spoon the mixture into the bakeware and level the top.
Bake in the centre of the oven until a skewer inserted into the centre comes out clean.
When baked, remove from the oven and leave to cool for five minutes before turning out onto a wire rack to cool completely. When cold, store in an airtight container or double wrap in clingfilm (plastic wrap) for at least eight hours, allowing the texture to settle before use.


Pretty pink raspberry cake
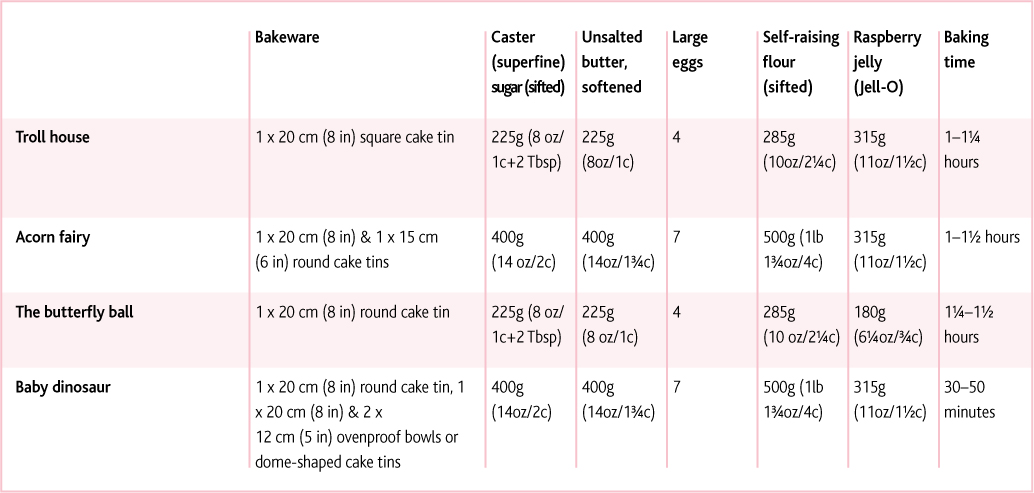
This recipe is gorgeously pretty pink in colour and tastes great with the addition of the raspberry jelly (Jell-O). The jelly also helps to slightly firm the texture of the cake, making it perfect for sculptures.
If you have a fan-assisted oven, it may be advisable to reduce the suggested oven temperature slightly. I also recommend placing a metal baking (cookie) sheet onto the top of the bakeware so the cake is protected from the hot air during baking.
Preheat the oven to 150C/300F/Gas Mark 2-3. Grease and line the bakeware. Sift the flour into a bowl.
Melt the jelly (Jell-O) for one minute in a microwave and then stir until dissolved.
Soften the butter and place into the food processor or a large mixing bowl. Sift and add the caster (superfine) sugar. Beat until the mixture becomes lighter in colour with a fluffy texture.
Add the eggs along with two thirds of the flour and beat well.
Add the melted jelly (Jell-O) and then fold in the remaining flour.
Spoon the mixture into the bakeware and level the top.
Bake in the centre of the oven until a skewer inserted into the centre comes out clean.
When baked, remove from the oven and leave to cool for five minutes before turning out onto a wire rack to cool completely. When cold, store in an airtight container or double wrap in clingfilm (plastic wrap) for at least eight hours, allowing the texture to settle before use.


Slime lime cake
This recipe is gorgeously gruesome green in colour but tastes great with the flavour of the lime jelly (Jell-O). As the raw green jelly (Jell-O) is quite pale, I added a few small drops of liquid green food colouring into the cake mixture as this helps to intensify the colour, but of course you could leave this out if you wish.
If you have a fan assisted oven, it may be advisable to reduce the suggested oven temperature slightly. I also recommend placing a metal baking (cookie) sheet onto the top of the bakeware so the cake is protected from the hot air during baking.
Preheat the oven to 150C/300F/Gas Mark 2-3. Grease and line the bakeware. Sift the flour into a bowl.
Melt the jelly in a pan over a low heat or heat for one minute in a microwave and then stir until dissolved. Set aside to cool slightly.

