Flora Klickmann - Victorian Fancy Stitchery: Techniques and Designs
Here you can read online Flora Klickmann - Victorian Fancy Stitchery: Techniques and Designs full text of the book (entire story) in english for free. Download pdf and epub, get meaning, cover and reviews about this ebook. year: 2013, publisher: Dover Publications, genre: Home and family. Description of the work, (preface) as well as reviews are available. Best literature library LitArk.com created for fans of good reading and offers a wide selection of genres:
Romance novel
Science fiction
Adventure
Detective
Science
History
Home and family
Prose
Art
Politics
Computer
Non-fiction
Religion
Business
Children
Humor
Choose a favorite category and find really read worthwhile books. Enjoy immersion in the world of imagination, feel the emotions of the characters or learn something new for yourself, make an fascinating discovery.

- Book:Victorian Fancy Stitchery: Techniques and Designs
- Author:
- Publisher:Dover Publications
- Genre:
- Year:2013
- Rating:5 / 5
- Favourites:Add to favourites
- Your mark:
Victorian Fancy Stitchery: Techniques and Designs: summary, description and annotation
We offer to read an annotation, description, summary or preface (depends on what the author of the book "Victorian Fancy Stitchery: Techniques and Designs" wrote himself). If you haven't found the necessary information about the book — write in the comments, we will try to find it.
This exceptionally fine needlecraft guide from the turn of the twentieth century includes instructions for projects that range from drawn-thread work one of the oldest and simplest forms of art needlework to the attractive novelty of bead embroidery on netting.
Abundantly illustrated directions for fancy stitchery also provide tips for such exquisite creations as reticella lace and Venetian crochet, elegant hardanger and hedebo work, macram, cross-stitch, ancient cut-work, and embroidery on flannel.
A useful manual for anyone who enjoys re-creating needlecraft projects from an earlier era and a valuable reference for collectors of antique laces and dress trimmings, this volume also provides a captivating glimpse of needlework from a bygone era.
Flora Klickmann: author's other books
Who wrote Victorian Fancy Stitchery: Techniques and Designs? Find out the surname, the name of the author of the book and a list of all author's works by series.


Victorian Fancy Stitchery: Techniques and Designs — read online for free the complete book (whole text) full work
Below is the text of the book, divided by pages. System saving the place of the last page read, allows you to conveniently read the book "Victorian Fancy Stitchery: Techniques and Designs" online for free, without having to search again every time where you left off. Put a bookmark, and you can go to the page where you finished reading at any time.
Font size:
Interval:
Bookmark:
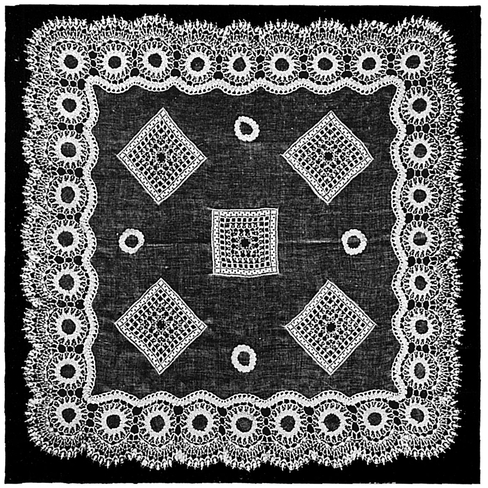
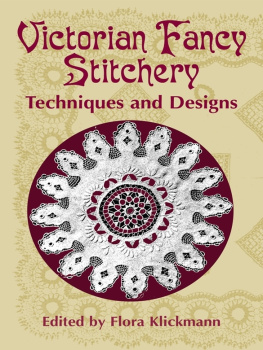
THE CLOTH COMPLETE.
We illustrate here a Five oclock Cloth of unusually handsome design. It is made of the most transparent lawn and very fine crochet, and is an illustration of what needlework wonders can be accomplished if patience, care and evenness of stitch be brought to bear on the work. The actual crochet-patterns are composed of really simple stitches. We are not giving exhaustive instructions in this case, but merely supplying a few details that will be sufficient to enable any girl who has had practice in crochet to copy the cloth from the pictures.
As will be seen, five square insets are let into the lawn, and four rings or medallions are applied to the lawn ; in the latter case the lawn is not cut away at the back. The edge is composed of these same rings laid on lawn backgrounds, and the same pattern edges the slightly scalloped edge of the cloth itself.
1 st Row. Ch 18, I tr into the 9th ch from needle, * ch 3, 1 tr into 3rd ch from last tr. Repeat twice from *. You should now have a row of 4 sp.
2 nd Row . Turn with 6 ch, 1 tr into top of tr in previous row, 2 tr into sp, 1 tr into top of next tr, 3 tr into sp, 1 tr into next tr, 3 ch, 1 tr into 3rd chain so as to end the row with a square sp.
3 rd Row .6 ch, 1 tr into each of the 8 tr in previous row, 3 ch, 1 tr.
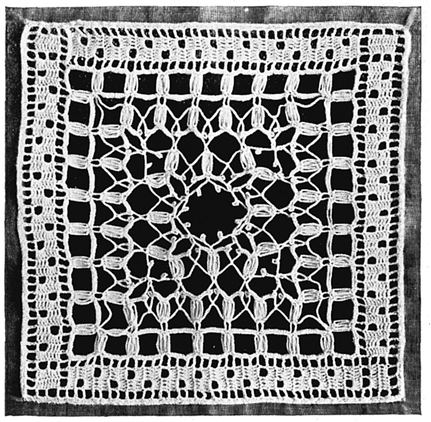
THE SQUARE INSET.
If the small detail of this part of the design is studied carefully, it will be seen that d cs are worked round the edge of the narrow insertion, 3 d c into each sp, while at every 4th sp occur 3 loops of 18 ch each. These loops are in turn held together by strands of 12 ch each, with 12 d c worked over each at the next round. These sets will lessen as the work proceeds, simply by omitting the connecting strand of 12ch at each corner. The looser strands, which are caught together between the groups of loops, consist of 18 ch each.
4 th Row .6 ch, 1 tr (this forms one sp), then make 3 more sp as in 1st row.
5 th Row .1 sp, 8 tr, 1 sp (like 2nd row).
6 th Row .6 ch, 4 tr, then 2 sp.
7 th Row .Like 5th row.
8 th Row. 2 sp, 4 tr, 1 sp.
Repeat from 5th row.
Notice that each side of the square must start with the four open  sp, then the solid block:formed by the 8 tr in rows 2 and 3, so as to make a good corner. The four sides are worked without breaking the thread, the final edges being sewn together.
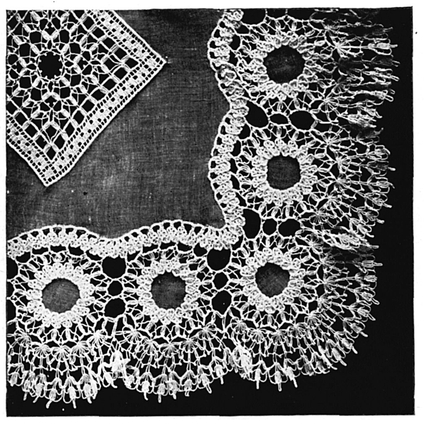
A CORNER OF THE CLOTH.
Ch 7, then back into the very first ch, work 2 tr, 3 ch, 2 tr, 3 ch, 2 tr, 3 ch, 2 tr.
* Turn with 6 ch, and into the first little sp in previous row work 2 tr, 3 ch, 2 tr, 3 ch, 2 tr, 3 ch, 2 tr. Repeat from * till you have 14 scallops on one side and 13 scallops on the other. Then join in a ring, having the 14 scallops on the outside and the 13 on the inside of the ring.
Now work 5 d c into the first large sp on the outside edge (made by the 6 ch you turned with), then 5 d c into the next sp, 5 d c into the 3rd sp, and 1 d c down into the root of trs.
Next ch 7, and carry it down to the large sp on the inner side of the circle (this sp will be just a trifle in advance of the one above that you have just filled in with d cs). Fill in this first sp with 5 dc, and (going backwards along the work) make 5 d c into the next 2 sp, and 1 dc again into the root of the trs.
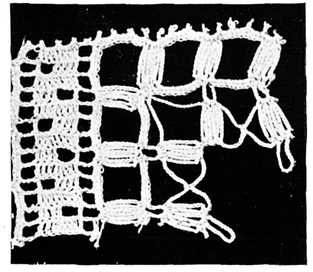
Showing how the work is started in the squares.
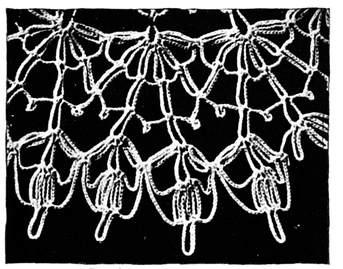
A Detail of the Outside Border.
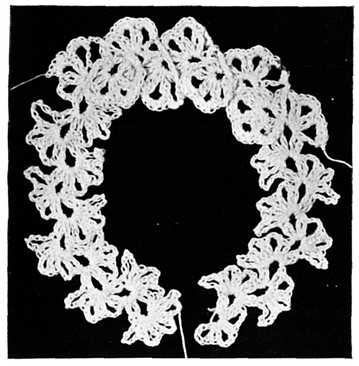
The Design used in the Medallions and in the Borders.
You have now put dc into what may be called both sides of one scallop.
Now ch 7, and cross with this right over to the outer edge of the circle, and proceed to fill in with d c the top of the next scallop.
In this way workallround the ring. If you study the illustration showing this ring in detail, you will see that part of it is without this extra cross-bar working, while the centre portion has the d c started, and the 7 ch crossing over the work can be seen.
It is more convenient if the extra d c and cross ch are worked before the strip is actually joined in a ring.
This ring forms the round medallion on the cloth ; it is also used in the border. This design also edges the lawn and serves to unite it to the border.
To make the open-work ring round medallions already described in the border, * make two loops of 18 ch each into the centre-point of one of the scallops. Ch 9, catch back into the fifth loop, making a picot loop. Then ch 5 which carries you to the next scallop. Repeat from *.
2nd Row .Make a d c into the bottom of each of the 2 loops already made. Ch 4, catch into picot loop above, ch 18, catch back into picot loop, ch 4, then make a d c into each loop above and repeat all round. Catch into the table-cloth edge and to the next medallion where shown in the illustration.
You will see by looking at the corner illustrated that each medallion is surrounded with this open-work circle.
For the outside edge of the border, work as follows :
1 st Row .Into the long loop of 18 ch already made, make 6 loops of 18 ch, then ch 18 to carry you to the next loop of 18, where you make 6 more loops. In this way proceed round the cloth.
2 nd Row .The outside loop of every group of six is caught to the 18 ch, which connects the sets together. (See small detail of outside border). Ch 7 from this point and catch into the next loop, Into this make another loop of 18 ch, 5 ch between the next loop, and another loop of 18 ch. Complete the row in this way with 4 loops of 18 ch to each little scallop.
Font size:
Interval:
Bookmark:
Similar books «Victorian Fancy Stitchery: Techniques and Designs»
Look at similar books to Victorian Fancy Stitchery: Techniques and Designs. We have selected literature similar in name and meaning in the hope of providing readers with more options to find new, interesting, not yet read works.
Discussion, reviews of the book Victorian Fancy Stitchery: Techniques and Designs and just readers' own opinions. Leave your comments, write what you think about the work, its meaning or the main characters. Specify what exactly you liked and what you didn't like, and why you think so.