Rubber
Band BRACELETS
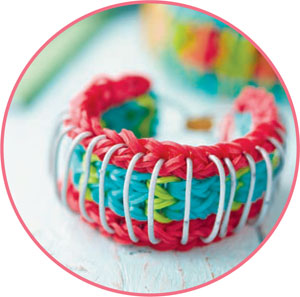

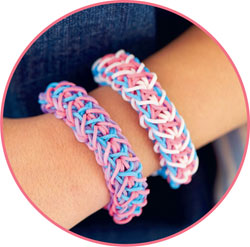
Rubber
Band BRACELETS colorful projects youll love to make
Lucy Hopping CICO kidz
Published in 2014 by CICO Kidz
An imprint of Ryland Peters & Small
519 Broadway, 5th Floor, New York NY 10012
2021 Jockeys Fields, London WC1R 4BW
www.rylandpeters.com 10 9 8 7 6 5 4 3 2 1 Text copyright Lucy Hopping 2014
Design, photography, and illustration
copyright CICO Kidz 2014 The authors moral rights have been asserted. All rights reserved. No part of this publication may be reproduced, stored in a retrieval system, or transmitted in any form or by any means, electronic, mechanical, photocopying, or otherwise, without the prior permission of the publisher. A CIP catalog record for this book is available from the Library of Congress and the British Library. eISBN: 978-1-78249-276-4 ISBN: 978-1-78249-159-0 Printed in China Editor: Sarah Hoggett
Designer: Louise Turpin and Alison Fenton
Illustrator: Louise Turpin
Photographer: Terry Benson
Stylist: Rob Merrett Rubber-band bracelets are the newest crafting craze aroundeverywhere you turn, people are adorned with bright and funky jewelry creations! This book includes 35 fantastic projects with detailed step-by-step instructions and illustrations, plus loads of extra ideas to inspire you to create your own designs. Begin with the techniques section and learn how to make your own loom, what materials you will need, and the basics of rubber-band jewelry.
Then start off with the Easy-Peasy Braceletssimple bracelets that look great, but are quick and easy to make. Graduate to the Craftier Bracelets, which are a bit trickier and often require a larger loom. Finally, move on to Awesome Accessoriesquirky little projects such as clip-on earrings, key fobs, and charms. The rubber-band movement began in the US, when an enterprising Dad named Cheong Choon Ng saw his daughters making bracelets from rubber bands. He fashioned a loom for them so that they could make more intricate bracelets rather than just simple threaded single designs. Eventually he started manufacturing these and this became known as the Rainbow Loom.
Since then, many other brands have come into the marketand the rubber-band bracelet craze has exploded! Rubber-band bracelets are an ideal summer camp or sleepover activity. Its such fun for you and your friends to help each other master a new design and then experiment with different-colored bands to create a unique piece of jewelry or a special gift. Why not make a stash, set up a stall at your school fair, and sell your wares to raise money for the school or a charity organization? So sit back, open up the techniques section, and get ready for a new and exciting craft to take over your life. Youll soon find that mini rubber bands are finding their way into every nook and cranny of your home. Rubber-band bracelets are here to stay!  Although you can make the simplest of bracelets with only your hands, a few bands, and a clip, most of the projects in this book require a loom and a few extras. In this section we guide you through all the tools you need, where to get them from, and how to use them.
There is even an explanation of how to make your own loom. Looms The rubber-band projects in this book are mostly made using a loom. However, you can make the most simple bracelet (the Single Bracelet on is also made just using a crochet hook. At the beginning of each project, we have told you what size loom you will need, whether the pegs should be set up in a square or diagonal format, and what direction the arrows on your loom should be facing. Making your own loom You can also make your own loom using a piece of wood, a ruler, some nails or screws, a hammer or drill/screwdriver, and an adult! To make all the projects in this book, you will need to make two loomsone in the diagonal format and one in the square format. I suggest you make your loom in the bigger size shown here, so that you can make all the projects with just these loomsbut you may prefer to start with a smaller 3 x 13 peg loom first. (52 cm) long x 4 in. (12 cm) wide and 2 in. (5 cm) thick Ruler and pencil156 x 2-in. (5-cm) nails and a hammer (or 156 x 2-in./5-cm screws, a drill, and a screwdriver)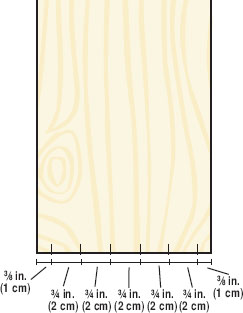 Starting on the short end and using a ruler and pencil, make a mark in. (1 cm) in from the edge on both sides. (1 cm) in from the edge on both sides.
Then mark every in. (2 cm) between those two points so there are six dots, each in. (2 cm) apart.  Repeat on the other short end of the loom, then join the marks together so that you have six lines running lengthwise along your piece of wood.
  Now working along the long sides of the wood, make a mark in. (2 cm) again. (2 cm) again.
Repeat on the other side, and then join your marks with lines again so you have 26 horizontal lines. The points where the lines meet are where your nails or screws will go. 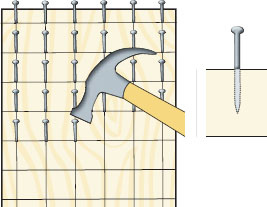 Ask an adult to help you with this bit. If you are using nails, hammer in one nail at each point, so that half of the nail (approx. 1 in./2.5 cm) goes into the wood and half is still above the surface of the loom.
 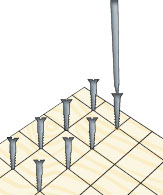 If you are using screws, ask an adult to drill a hole slightly smaller than the diameter of your screw at each point, and then twist the screws into the holes using a screwdriver.
  If you are using screws, ask an adult to drill a hole slightly smaller than the diameter of your screw at each point, and then twist the screws into the holes using a screwdriver.
Repeat on the whole loom. MAKING A SMALL, SQUARE-FORMAT LOOM TO MAKE A SMALLER 13 X 3-PEG LOOM, TAKE A PIECE OF WOOD MEASURING 9 X 3 IN. (26 X 6 CM) AND REPEAT THE STEPS ABOVE, MAKING THREE MARKS ALONG EACH SHORT SIDE AND 13 ALONG EACH LONG SIDE. Making a diagonal-format loom You Will Need (to make a large 26 x 6-peg loom)A piece of wood 20 in. (52 cm) long x 4 in. (5 cm) thickRuler and pencil156 x 2-in. (5-cm) nails and a hammer (or 156 x 2-in./5-cm screws, a drill, and a screwdriver)








 Rubber
 Published in 2014 by CICO Kidz
 Although you can make the simplest of bracelets with only your hands, a few bands, and a clip, most of the projects in this book require a loom and a few extras. In this section we guide you through all the tools you need, where to get them from, and how to use them.
 Starting on the short end and using a ruler and pencil, make a mark in. (1 cm) in from the edge on both sides. (1 cm) in from the edge on both sides.
 Repeat on the other short end of the loom, then join the marks together so that you have six lines running lengthwise along your piece of wood.
  Now working along the long sides of the wood, make a mark in. (2 cm) again. (2 cm) again.
 Ask an adult to help you with this bit. If you are using nails, hammer in one nail at each point, so that half of the nail (approx. 1 in./2.5 cm) goes into the wood and half is still above the surface of the loom.
  If you are using screws, ask an adult to drill a hole slightly smaller than the diameter of your screw at each point, and then twist the screws into the holes using a screwdriver.