Publisher: Amy Marson
Creative Director: Gailen Runge
Editor: Karla Menaugh
Technical Editor: Alison M. Schmidt
Cover/Book Design and Style Photography: Page + Pixel
Production Coordinator: Freesia Pearson Blizard
Production Editor: Alice Mace Nakanishi
Illustrator: Patty Prann Young
Photo Assistant: Sarah Frost
Instructional photography by Diane Pedersen, unless otherwise noted
Published by Stash Books, an imprint of C&T Publishing, Inc., P.O. Box 1456, Lafayette, CA 94549
Acknowledgments
I owe my immediate familynamely, my dear husband, Jon, and my two sweet daughters, Sophie and Sydneya huge thank-you (with an added heartfelt apology) for putting up with my absence these past few months while I worked on this book. Your love, encouragement, and understanding fueled me through those long work days and sleepless nights. I love you with all my heart!
The sample projects you see in the pages of this book were sewn by my two interns extraordinaire, Megan Dowling and Kait Lorenz, and for that I will be eternally grateful. These two girls came in eager to tackle a new project each day with a smile on their faces and a positive attitude. You cant put a price on that.
The textiles, notions, and trims we used in all the projects in this book were graciously contributed by Riley Blake Designs, Jo-Ann Fabric and Craft Stores, and Shannon Fabrics. Thank you, from the bottom of my heart, to these three companies for being just as excited about this book as I am, and sending me boxes upon boxes of gorgeous materials to use in these projects.
Last, but certainly not least, I would like to thank a couple of very special women from C&T Publishing. This book would not have been possible without the support, encouragement, and friendship of my acquisitions editor and dearest friend, Roxane Cerda. Thank you for always believing in me! Also, words cannot express my gratitude to my developmental editor, Karla Menaugh, for her patience, kind words, and expertise in getting this book to where it is today. Lastly, to the graphic designers, photographers, and models, thank you from the bottom of my heart for making me look good.
Introduction
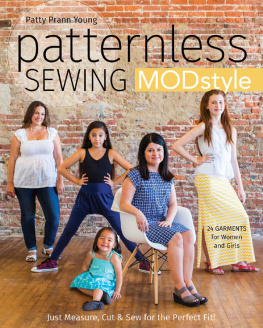
It may seem odd for a sewing pattern designer to write a book about patternless sewing. For the past eight years I have designed patterns for everything from girls dresses to womens tops to purses and even quilts. Some are extremely complicated, using unusually shaped sleeves or bodice pieces. But others just use straight cuts of fabric, which are then gathered, pleated, or folded into new shapes. The new shapes are often sewn onto other straight cuts of fabric to form a finished garment. These simpler designs are the types of projects that this book is all about.
You can start with simple dresses that are sewn from a single cut of fabric, but by the end of this book you will be sewing runway-worthy garments that are not only stylish but also a perfect fit because they are made based on your own body measurements.
People come in all shapes and sizes. Maybe youre extra petite, or maybe you have a full bustline; maybe you have a long torso but short legs or vice versa. Not all of us are shaped like supermodels. Its challenging to find not only ready-to-wear garments but also sewing patterns that fit us perfectly. Often, we buy a sewing pattern hoping that the end result will make us look like the cover model, but in the end weve made so many alterations that we might as well have drafted our own pattern.
This is where Patternless Sewing Mod Style comes in. I have designed 24 easy-to-sew projects that span all seasons and are made based on your own body measurements for a perfect fit every time. Embellish and add flair to all your base garments with eight predesigned add-on piecesvarious pocket styles, belts, hem ruffles, and bandsand you can easily create a large wardrobe of custom-fitted pieces for yourself or your child. So lets get started!
I dedicate this book to my sweet mom, Maria Prann (a.k.a. Mami), from whom I inherited my desire to create something new every day.
Taking Your Measurements
The most important goal, when sewing for yourself or others, is to have a perfect fit. You will achieve this by jotting down a set of body measurementsfor yourself, your kids, or your friendsthat you can easily refer to while working on these projects.
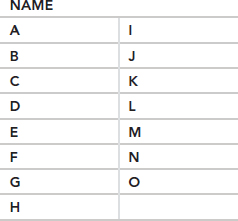
Use a flexible tape measure and refer to the descriptions. Use the fill-in chart to jot down your measurements in pencil, so you can easily update them later.
If you need your own measurements, it is easier to have someone else do the measuring for you.
WOMAN/TEEN
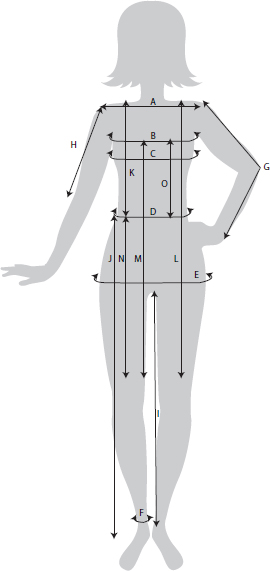
Keep your body upright as you are measured. Wear the undergarments, and perhaps the shoes, you will be wearing with the garments, because they affect your posture and shape.
A = Shoulder Width Using a favorite shirt that fits you perfectly, measure from shoulder seam to shoulder seam across the back.
B = Upper Bust All the way around your body just under your armpit, where a strapless dress would start.
C = Full Bust All the way around your body at the fullest part of your bust and the widest part of your back. Dont let the tape measure sag in the back.
D = Waist All the way around your body at your natural waistline (the narrowest part).
E = Hips All the way around your body at the widest part of your hip. This is usually about 79 below your natural waist. Keep the tape measure level all the way around.
F = Ankle All the way around your ankle.
G = Arm Length From your shoulder seam (A) all the way down to 1 past your wrist. Bend your elbow slightly when you measure.
H = Elbow Length From your shoulder seam (A) down to your elbow.
I = Inseam From your crotch down to your ankle. Be sure to keep your leg fully extended and straight, or measure a favorite pair of pants.
J = Outseam This is essentially your finished pant length. Measure from your natural waist to 1 below your ankle down your side, or measure a favorite pair of pants along the outer side seam.
K = Bodice Length From the top of your shoulder down to your natural waistline (or below if you like longer shirts).
L = Dress Length From the top of your shoulder down to where you would like your dresses to fall. You can always adjust this length for a longer or shorter style.
M = Strapless Dress Length (or any dress with shoulder straps and a bodice that goes straight across the bust) From your Upper Bust (B) down to where you would like your dresses to fall.
N = Skirt Length From your natural waist down to where you would like your skirts to fall. You can always adjust this length later for a longer or shorter style.
O = Strapless Blouse Length From your Upper Bust (B) down to where you would like your tops to fall.
MY MEASUREMENTS
(WOMAN/TEEN)
Taking Your Childs Measurements
Because kids bodies are shaped differently than womens, use a different chart to record their numbers. If your girl has already started developing, use the Woman/Teen chart.
Use a flexible tape measure and refer to the descriptions for how to take each body measurement.
Use the fill-in chart to jot down her measurements in pencil, so you can easily update them as she grows.
Next page
