One-of-a-Kind  Wedding
INVITATIONS and PAPER DETAILS LAURA MAFFEO and
COLLEEN MULLANEY


Copyright 2008 Laura Maffeo and Colleen Mullaney
All rights reserved. No part of this work covered by the copyrights hereon may be reproduced or used in any form or by any meansgraphic, electronic, or mechanical, including photocopying, recording, taping of information on storage and retrieval systemswithout the written permission of the publisher.
Due to differing conditions, materials, and skill levels, the publisher and various manufacturers disclaim any liability for unsatisfactory results or injury due to improper use of tools, materials, or information in this publication.
First published in the United States of America by Creative Publishing international, Inc., a member of
Quayside Publishing Group
400 First Avenue North
Suite 300
Minneapolis, MN 55401
1-800-328-3895
www.creativepub.com
ISBN-13: 978-1-58923-393-5
ISBN-10: 1-58923-393-X
Digital edition: 978-1-61673-287-5
Softcover edition: 978-1-58923-393-5
10 9 8 7 6 5 4 3 2 1
Library of Congress Cataloging-in-Publication Data
Maffeo, Laura.
One-of-a-kind weddings. Invitations and paper details /
Laura Maffeo, Colleen Mullaney.
p. cm. -- (One-of-a-kind weddings)
ISBN 978-1-58923-393-5
1. Paper work. 2. Weddings--Equipment and supplies. I.
Mullaney, Colleen, 1966- II. Title. III. Series.
TT870.M22 2009
745.54--dc22
2008022239
Cover and Book Design: Sandra Salamony
Page Layout: Sandra Salamony
Photographs: Jack Deutsch Photography
Copy Editor: Carol Polakowski
Proofreader: Julia Maranan
Printed in Singapore

Every bride wants her wedding to be a one-of-a-kind event. She looks for details and personal touches that reflect her style and the style of her groom. Paper plays such an important role in a weddingfrom the invitations to the program and written vowsthat its the perfect material to work with to customize your day.
Whether youre planning the place cards or the cocktail napkins, the guestbook or the dcor, the unique personality of the happy couple will shine through in each of the details. Paper embellishments can be showcased in decorations on walls and tables, favors, and save-the-date cardsand everything in between. No small element should be overlooked.
Paper is versatile and easy to work with and can be cost-efficient, too. A few, well-chosen extra details can change a wedding from an ordinary affair to a truly inspired eventwithout breaking even the most thrifty brides budget. Here are some ideas for working with paper to help you showcase your own personal flair, to make your wedding a one-of-a-kind day that no one will ever forget.
CONTENTS


SAVE-THE-DATES AND ANNOUNCEMENTS
Save-the-date cards and announcements are the first steps you take when planning your wedding. These important pieces of paper tell the world who you are, whom you love, and what you hope your future holds. They also set the theme and tone for the rest of your wedding events, so why not add a bit of your own individuality and style? Whether you prefer a sparkly shadowbox announcement or a sweet and simple bookmark, these projects will help you find your own special way to express your joy and excitement as you spread the word about the amazing day ahead!

SHADOWBOX ANNOUNCEMENT
Wedding announcements should be fun and original. They announce to the world the joining of two people in love! With this unique shadowbox, you can spread the good news to your loved ones in style. The materials are easy to find, and the technique is simple and quick. Mix up your design by choosing bright silver stars or colorful confetti. Choose colors and papers that reflect your wedding theme, coordinated with your other paper details. These announcements are as much fun to make as they are to receive.

Here are the materials you will need to make one shadowbox announcement:
one 5 7 (12.5 18 cm) paper photo card with 2  4 (6.5 10 cm) window opening
one plastic sheet protector
paper in color of your choice, for announcement
one large, decorative rubber stamp
one rubber-stamp ink pad
clear double-sided tape
foam double-sided tape
small plastic confetti
scissors


STEP 1. Cut apart the photo card. Discard the middle piece of paper (youll use only the front and back of the card).
STEP 2. Cut the sheet protector in half. Cut it in half again to make a total of eight small plastic sheets, measuring 4 5  (10 13.5 cm).
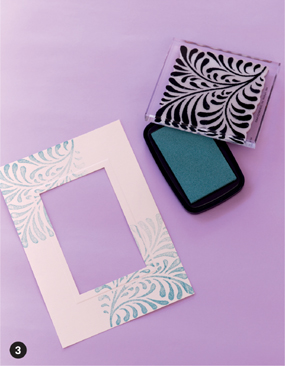
STEP 3. Working with the decorative rubber stamp and ink pad, stamp two opposite corners on the front of the top photo card. Try to place each design motif in the same position on each cornerbut you dont have to be exact.
STEP 4. Adhere the plastic sheet onto the inside of the top photo card with the clear double-sided tape.

STEP 5. Print your announcement on the colored paperby hand or with a computer and color printer (we used a 14-point font in our word processing program). Position the announcement so you can cut the paper to a size of 4 6 (10 15 cm).
STEP 6. Attach the announcement to the center front of the bottom photo card with clear double-sided tape. Make sure the announcement is centered in the window of the card before securing it.
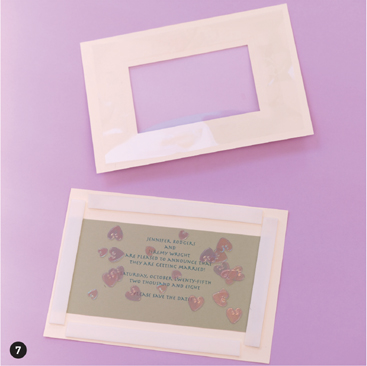
STEP 7. Frame the front outside edge of the bottom photo card with foam double-sided tape. Sprinkle a small amount of plastic confetti inside the foam-tape frame. Place the top window frame onto the bottom card, making sure it sits evenly on all sides.


 Wedding


 4 (6.5 10 cm) window opening

 (10 13.5 cm).