SELL YOUR ARTWORK & CRAFTS ONLINE
An Insider's Guide to the Worldwide Arts Market
by Heidi Rand
Dedicated to my husband George McRae. He's the onewith the big hat and a chicken under each arm.
All content and original photographs copyright 2012Heidi Rand
Garden Delights Arts & Crafts
Smashwords Edition
All graphics included with the artist profiles arecopyrighted by the artists. In the order they appear: KaylaGarelick, Carolyn Hess, Toni Wynn, Rich Fowler, Tamara Holland, andLaurie Stern. Thank you all so much for your wonderful artwork andinspiring stories.
Smashwords Edition, Standard License Note
This ebook is licensed for your use only. It may notbe re-sold or given away to other people. If you would like toshare this book, please purchase an additional copy. If yourereading this book and you did not purchase it, or it was notpurchased for your use only, then please return it toSmashwords.com and purchase your own copy. Thank you for respectingthe hard work of the author.
TABLE OF CONTENTS
How long have you been thinking about sellingyour artwork or crafts on the internet? What's holding you back?Are you confused by too many options? Do you worry that having yourown website will be too expensive, and you're not sure what othervenues would be right for your work? Are you unsure how to getphotos that best show off your art? Do you dread all of the tasksinvolved in packing and shipping your art? Are you concerned thatyour artwork or ideas will be stolen?
In this practical guide I help you discoverwhere your artwork and crafts fit in online, teach you about theskills and tools you need to show and sell your work, let you knowwhere to turn for assistance when you need it, delve into a widevariety of ways to market and advertise your work, and zero in onwhat's holding you back and how to get motivated.
Just not ready to start selling online yet? Igive you plenty of insider ideas and leads to use the internet topromote your art sales offline, whether in brick and mortar stores,art fairs, galleries, through an open studio, or any othervenue.
The internet is constantly changing andevolving, but by using the information and tools in this bookyou'll be set up to spot new opportunities and figure out how theyfit into your business plan.
To help guide and inspire you, I've invitedalong six of my favorite artists who are at different points on thecontinuum of selling and marketing their work online. You'll findtheir profiles at the ends of Parts 2, 3, 4, 5, 6, and 8:photographer, painter, writer, printmaker, collage artist, andnatural perfumer. Just as you and I have, they decided thatignoring the potential of the online arts market wasn't an option.And their choices about how to present their work, show it forsale, and market it, are as varied as their artwork.
The wonder of the internet is that you can reach such a largepotential audience and market with a relatively small investment ofmoney. The equipment, at least to get basic results, is not tooexpensive, and I'll mention free options when they're available. Itdoes take time and hard work to succeed, but the skills you needare things that you can master with practice. The critical skillsyou'll need to sell visual art online: (1) photography, (2) imageor photo processing, (3) writing, (4) word processing, and (5)marketing.
PHOTOGRAPHY: The internet isprimarily a visual media; having good photos of your visual artworkis the most important aspect of selling it online.
Equipment you'll need:
*For 2-D art: scanner or camera
*For 3-D work: camera, lights or locationwith good natural light, tripod
What's a good product photograph? At least,show truthfully and realistically what your art or craft lookslike. Your primary goal is to provide potential buyers withwell-lit, clear pictures of all aspects of the piece.

Lighting: If you have abundantsunlight whenever you need to take photos, I want to live where youdo. For the rest of us, the best option is a setup with artificiallights that you can use day or night, or when the weather doesn'tcooperate. Depending on your budget, a setup can range fromoverhead lights to bulbs in stands with a neutral backdrop. Usingflash is not a substitute for good lighting, although it may beuseful to fill in shadows.
Focus: Without getting too technical,sharpness in photos is mostly a function of the amount of availablelight. In most lighting situations you won't get a good resulthand-holding the camera, so make sure you have a tripod. Basic onesare good for most purposes and well worth the expense. Does yourcamera have a self-timer? Use it to reduce any vibration caused bypushing the button to take the shot.
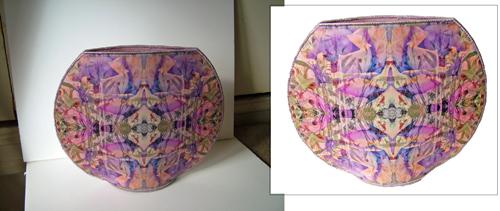
Background: For many shots you can usea plain, light background. Taking the time to set one up will saveyou much time in editing out intrusive lines or details.Professionals use expensive continuous lengths of paper or fabricas backdrops. If you're shooting small items, you can buy or make abox to place the object inside and take a photo through theopening. Search the internet for "a photography light box" or"photo light tent" or similar words. For larger items, drape orhang a piece of cloth.
Taking the photo against a plain lightbackground (as in the picture at the left side) makes it easy tocut out the product in image processing software, leaving a cleanshot (as in the picture at the right side).

Close-ups: To shoot small objects orzero in on details in a piece, check whether your camera has aclose-up or macro setting. Most basic point-and-shoot cameras havesettings (often indicated by a flower symbol) that let you focuscloser than the normal setting. With a more advanced camera you canbuy relatively inexpensive close-up filters which you screw ontothe front of your lens.
With image processing software, start with abasic shot of your piece and crop that to really show off thedetails. When you crop an image you're deleting pixels. Thatdegrades the quality of the image, depending on how much you crop.For the best result, start with a photo that's zoomed in as tightlyas possible on the object, given your camera and lens, and makesure to use a tripod so the image is in sharp focus.
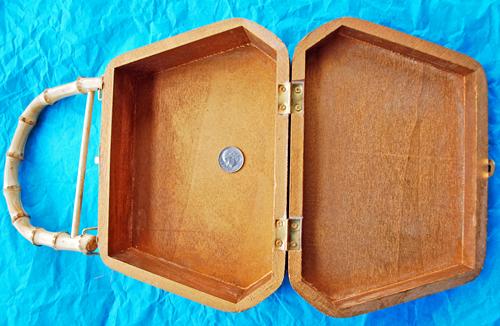
Subject: To start, get a shot of thefront of the entire piece. Then, take shots of the inside (say, ofa box, purse, or vase), and shots of the back or bottom. Sizealways matters to a purchaser, so even though you're going to givethem dimensions in your written description, include a ruler (or acoin) in at least one of your shots.

Show close-ups of smaller sections of thework. How is your painting hung? Is it wired? Does it have asawtooth hanger?
Have you signed the work? Let the customersee. If possible, get all shots at one session to avoid problemswith varying color or light.
Beyond the basics: After you get goodat the fundamentals, be adventurous. Compose creative shots todistinguish your gallery or shop from other online stores. Reflectyour brand and your artistic sense in the photographs. Instead of aplain background, put your work in a scene that shows it toadvantage. Place flowers in your handmade vase, show how your printlooks framed and hanging. Make sure to specify exactly what theitem that they're buying is (without the flowers or frame, forexample). Similarly, if you take photos of people wearing yourjewelry, especially earrings, consider mentioning that the itemsthat customers will receive have not been previously worn.
Next page


