Aji ( ah-gee ) p. 27
Atari ( ah-tar-ee ) p. 9
Fuseki ( foo-se-key ) p. 17
Gote ( go-tay ) p. 205
Hane ( han-nay ) p. 14
Jigo ( gee-go ) p. 254
Joseki ( joe-se-key ) p. 11
Ko ( koh ) p. 10
Miai ( me-eye ) p. 255
Ponnuki ( pon-new-key ) p. 10
Sabaki ( sa-bak-kee ) p. 14
Seki ( se-key ) p. 70
Sente ( sen-tay ) p. 205
CHAPTER ONE
KatachiMaking Good Shape
Unlike chess, the underlying basis of go is the mysterious necessity for making good shapes and avoiding bad ones. As this book will demonstrate, in all phases of the game, good shapes are resilient to attack because they are working efficiently, while poor ones are vulnerable and subject to harassment. Spotting the differences and knowing what to do about them is the primary key for rapid improvement in playing ability.
Short Summary of the Fundamentals of Good and Bad Shapes
Efficient Expansions
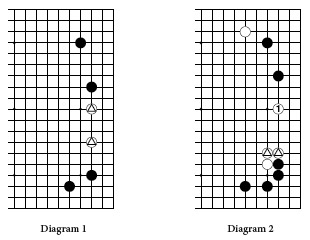
The two marked white stones on the second line in Diagram 1 are separated by two spaces. This is an efficient extension because these stones cannot be split and have sufficient resiliency to live.
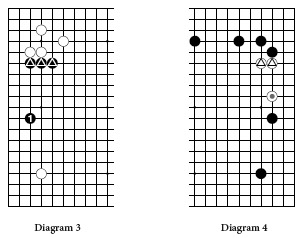
From a wall of two stones (the marked ones in Diagram 2), extending three spaces with 1 is also a good extension. It makes efficient use of the two-stone wall.
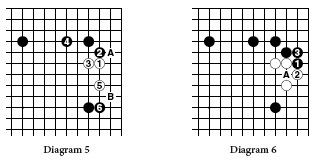
From a wall such as the three marked stones in Diagram 3, a four-space extension would also be a good move.
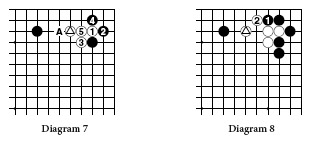
There are times when only a two-space extension can be made from a two stone wall. The extension in Diagram 4 is a bit narrow, but what it lacks in efficiency, it makes up for in strength.
Moreover, in high-handicap games, there are times when only a one-space extension is possible from a two-stone wall. Whites position is quite cramped, but at least there is potential to make eye shape with a move such as 5. If Black A , White can expand with B ; if Black B , White A .
After White 5 in Diagram 5, Black might secure the corner with 1 and 3 in Diagram 6, but White makes good shape with 2. This is good shape because White has almost made an eye around the point A and has room to move into the center.
Making Good Shape
White 1 and 3 in Diagram 7 are standard moves. However, when Black puts White into atari (ah-tar-ee) and threatens to capture, White 5 forms the classic bad shape commonly known as an empty triangle. However, if the marked stone was at A , this would be a reasonable result for White. For example, in Diagram 8, if the marked stone was in place and Black pushed in with 1, a good shape like the one in Diagram 6 on the other side of the board would result.
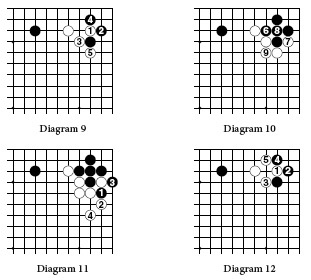
White should answer Black 4 in Diagram 7 with the atari of 5 in Diagram 9 . Black will capture with 6 in Diagram 10, White ataries again with 7 and Black has to connect with 8. White can then connect on the outside with 9. Later, Black will have to capture a stone with 1 and 3 in Diagram 11, but White can make good shape with 2 and 4.
Instead of 5 in Diagram 9, White could answer Black 4 by falling back to 5 in Diagram 12. But this is a special technique when Blacks stones are too strong in this area and White is prepared to fight a ko (koh) to make a living group. This is explained on the next page.
Ponnuki and Ko
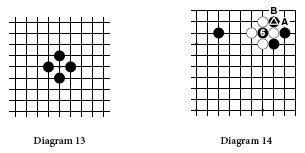
After a capture, a ponnuki (pon-new-key) shape can radiate influence all over the board. Since the shape of the white stones in Diagram 12 was almost a ponnuki, White 5 made good shape.
If Black takes with 6, since no position can be repeated in go, White can make a move elsewhere that threatens Black with a bigger loss. If Black responds, it is the beginning of a two-step ko and White can take back. This back-and-forth can continue for many moves with the size of the ko threats diminishing, but if White has calculated correctly, conceding two smaller loses and capturing the marked stone with A and B results in a living, impregnable position in the corner.
The Mouth Shape
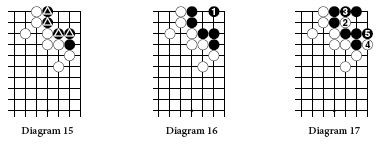
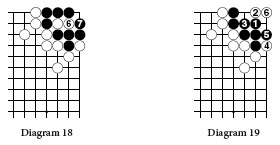
The marked stones in Diagram 15 are called the mouth shape. However, in this case, the shape is incomplete and Black needs another move to secure life. Black can do this by putting a tooth on the vital point of this shape with 1 in Diagram 16. Blacks stones are now absolutely secure. If White tried to kill the black group with an atari at 2 in Diagram 17, Black could defend with 3 and Whites subsequent moves in Diagram 18 would be futile.
Any other reinforcing move will fail. For example, Black cannot live with 1 in Diagram 19 because White would attack with the placement of 2. If Black connects with 3 to prevent the two stones on the left from being captured, White can play 4 and 6, leaving the black group with only one eye.
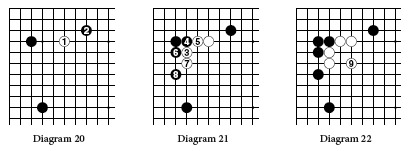
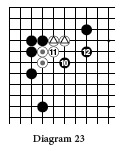
Here is an example of how the mouth shape can occur in a game. Th e exchange of White 1 for Black 2 in Diagram 20 is the start of a local skirmish called a joseki (joe-se-key) in which both sides are satisfied in terms of profit and/or influence. The moves from White 3 to Black 8 in Diagram 21 unfold naturally, and White has made the mouth shape with 7. It is now urgent that White secures this shape by playing on the vital point with 9 in Diagram 22. Getting a second eye at the top or even in the center will be easy.

