Publisher: Amy Marson Creative Director: Gailen Runge Project Editor: Alice Mace Nakanishi Compiler: Lindsay Conner Developmental Editors: Liz Aneloski, Cynthia Bix, Phyllis Elving, Lynn Koolish, Deb Rowden Technical Editors: Carolyn Aune, Mary E. Flynn, Helen Frost, Doreen Hazel, Susan Nelsen, Sandy Peterson, Priscilla Read, Gailen Runge, Teresa Stroin, Janice Wray, Sadhana Wray, Nanette S. Zeller Cover/Book Designer: April Mostek Production Coordinators: Tim Manibusan and Zinnia Heinzmann Illustrators: Mary E. Flynn, Jessica Jenkins, Tim Manibusan, Wendy Mathson, Amanda Murphy, Kirstie L. Pettersen, Aliza Shalit, Rose Sheifer, Amy Walsh, Janice Wray Photography by Diane Pedersen, Christina Carty-Francis, and Nissa Brehmer, of C&T Publishing, Inc., unless otherwise noted Published by C&T Publishing, Inc., P.O. Box 1456, Lafayette, CA 94549 Basket CaseFINISHED QUILT: 65 81
Designer: Angela Walters Pieced by Mary Workman and Jessica Harrison; machine quilted by Angela Walters

When I set out to design a project that would showcase texture, all I could think about was a quilt that incorporated a weave element.
After many tries, I finally came up with Basket Case, not your typical woven-looking quilt. With plenty of background area to showcase your favorite quilting design, this quilt will have people wanting to run their hands over it! Materials Cream solid: 5 yards with at least 42 usable width for background Blue solids: 2 shades totaling 2 yards for blocks and binding Batting: 74 90 Backing: 5 yards  Cutting Cream solid Cut 14 strips 1 width of fabric. Cut 13 strips 3 width of fabric; subcut as follows: For 8 columns: 30 segments 1 3 32 segments 2 3 26 segments 3 3 For 11 columns: 20 segments 1 3 20 segments 3 3 20 segments 3 3 16 segments 4 3 TIP Cutting multiple strips at once will make the process go much more quickly. Cut 2 strips 8 length of fabric (after you have cut the above strips); subcut into: 8 5 (Column 1a) 8 34 (Column 1b) 8 59 (Column 2) 8 15 (Column 5a) 8 11 (Column 5b) 8 5 (Column 8a) 8 31 (Column 8b) Cut 1 strip 4 81 (Column 6; cut lengthwise). Cut 2 strips 11 length of fabric; subcut into: 11 13 (Row 3a) 11 39 (Row 3b) 11 34 (Row 7a) 11 18 (Row 7b) Blue solids Cut 14 strips 3 width of fabric. Cut 8 strips 2 width of fabric for binding. Making the Quilt Sew a cream strip 1 width of fabric to a blue strip.
Press carefully. Repeat with the remaining 1 cream strips and the remaining blue strips to make a total of 14 strip units. Subcut the strips as follows: For the 8 column: 7 strips, 8 long 15 strips, 5 long 16 strips, 4 long 13 strips, 2 long For the 11 column: 5 strips, 11 long 10 strips, 8 long 10 strips, 6 long 10 strips, 4 long 8 strips, 3 long Sew each size of blue-and-cream strip to the appropriate cream side pieces as shown in the diagrams below. 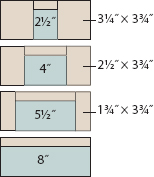 8 block assembly
 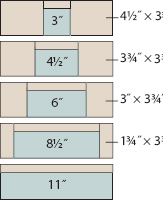 11 block assembly Piece the columns as shown in the quilt assembly diagram. Then sew the columns together in the indicated order to finish the quilt top.
  Quilt assembly The Quilting Layer the top, batting, and backing.
Bind the quilt. The choice of solid fabric for this quilt was not an accident! I wanted to be sure that the texture that quilting adds could be seen. 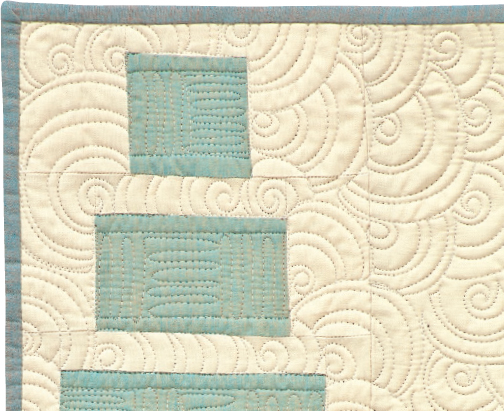 Crossroads FINISHED QUILT: 65 90
  FINISHED BLOCK: 8 8
Designer: Amanda Murphy Pieced by Amanda Murphy; quilted by Deborah Norris
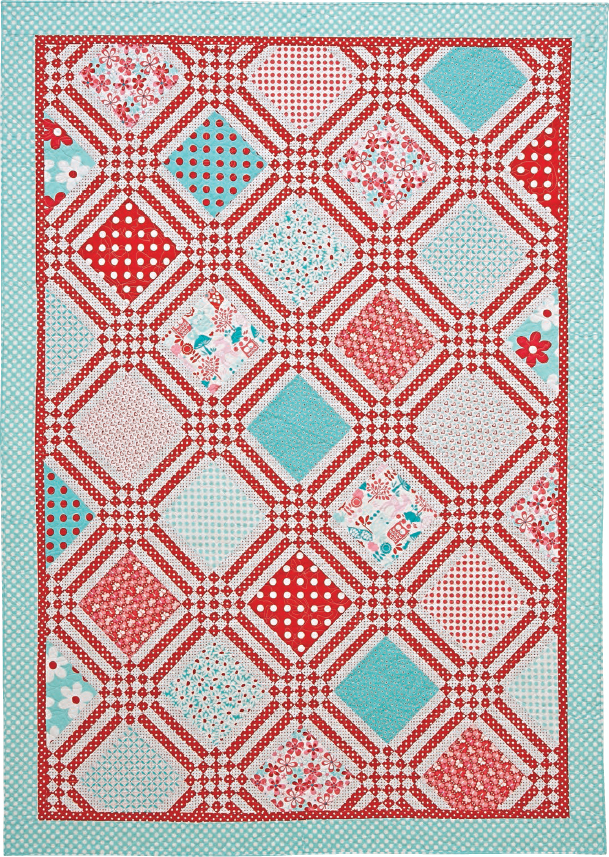

Dynamic sashing strips and Checkerboard blocks enhance your favorite feature fabrics in this modern design. Choose sashing fabrics that read as solids to really make the blocks pop! Materials Light sashing and checkerboard fabric: 2 yards Dark sashing, checkerboard, and inner border fabric: 2 yards Feature fabrics: 31 squares 8 8 Inner border fabric: yard Outer border and binding fabric: 2 yards Lightweight fusible interfacing: yard Backing: 5 yards Batting: 73 98 (such as Warm & Natural by The Warm Company) Cutting
WOF = width of fabric Light sashing and checkerboard fabric Cut 56 strips 1 WOF. Dark sashing and checkerboard fabric Cut 52 strips 1 WOF. Set 8 of these strips aside for inner border.
Outer border and binding fabric Cut 9 strips 4 WOF for outer border. Cut 9 strips 2 WOF for binding. Lightweight fusible interfacing Cut 14 strips 1 WOF. Block Assembly Join 3 light sashing strips to 2 dark sashing strips, pressing seams toward the dark strips. Repeat to make 16 strip sets.  Join 3 dark sashing strips 1 WOF to 2 light sashing strips, pressing seams toward the dark strips.
  Join 3 dark sashing strips 1 WOF to 2 light sashing strips, pressing seams toward the dark strips.
Repeat to make 4 strip sets. Subcut strip sets into 96 units 1 wide.  Join 2 units 1 wide from Step 1 and 3 units 1 wide from Step 2 together to make a checkerboard square. Repeat to make 32 checkerboard blocks. Press seams toward rows 1, 3, and 5.
 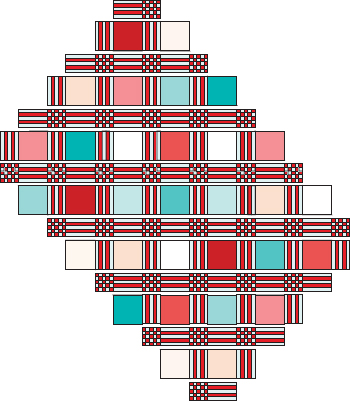 Quilt assembly 1 Join blocks into rows, pressing seams toward square units.
  Quilt assembly 1 Join blocks into rows, pressing seams toward square units.
Make sure that the raw edge of the short row extends beyond the seam of the longer row. Press all seams toward square units. Join rows. Trim the quilt center down to size by cutting out from the corner points of the blocks, as shown. The dotted line indicates the seamlinenot the cutting line! Cut out from dotted line. 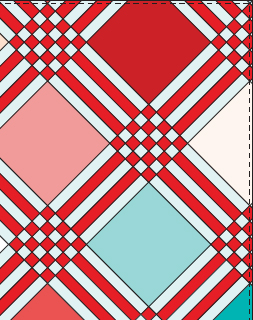 Turn the quilt top over.
Being careful not to stretch the edges of the quilt, apply interfacing along the perimeter, flush with the quilt tops edge. This will stabilize the bias edges that are exposed before adding borders. The center of my quilt top after trimming was 55 80. Measure yours and adjust the following border measurements accordingly. Piece 2 inner border strips 1 80 and sew onto each side of the quilt top. Piece 2 inner border strips 1 57 and sew onto the top and bottom of the quilt top.

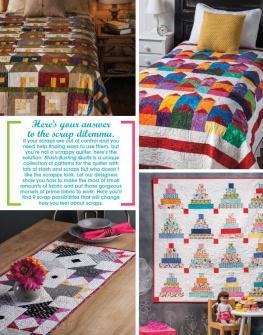

 When I set out to design a project that would showcase texture, all I could think about was a quilt that incorporated a weave element.
  Cutting Cream solid Cut 14 strips 1 width of fabric. Cut 13 strips 3 width of fabric; subcut as follows: For 8 columns: 30 segments 1 3 32 segments 2 3 26 segments 3 3 For 11 columns: 20 segments 1 3 20 segments 3 3 20 segments 3 3 16 segments 4 3 TIP Cutting multiple strips at once will make the process go much more quickly. Cut 2 strips 8 length of fabric (after you have cut the above strips); subcut into: 8 5 (Column 1a) 8 34 (Column 1b) 8 59 (Column 2) 8 15 (Column 5a) 8 11 (Column 5b) 8 5 (Column 8a) 8 31 (Column 8b) Cut 1 strip 4 81 (Column 6; cut lengthwise). Cut 2 strips 11 length of fabric; subcut into: 11 13 (Row 3a) 11 39 (Row 3b) 11 34 (Row 7a) 11 18 (Row 7b) Blue solids Cut 14 strips 3 width of fabric. Cut 8 strips 2 width of fabric for binding. Making the Quilt Sew a cream strip 1 width of fabric to a blue strip.
 8 block assembly
  11 block assembly Piece the columns as shown in the quilt assembly diagram. Then sew the columns together in the indicated order to finish the quilt top.
  Quilt assembly The Quilting Layer the top, batting, and backing.
 Crossroads FINISHED QUILT: 65 90
  FINISHED BLOCK: 8 8
 Dynamic sashing strips and Checkerboard blocks enhance your favorite feature fabrics in this modern design. Choose sashing fabrics that read as solids to really make the blocks pop! Materials Light sashing and checkerboard fabric: 2 yards Dark sashing, checkerboard, and inner border fabric: 2 yards Feature fabrics: 31 squares 8 8 Inner border fabric: yard Outer border and binding fabric: 2 yards Lightweight fusible interfacing: yard Backing: 5 yards Batting: 73 98 (such as Warm & Natural by The Warm Company) Cutting WOF = width of fabric Light sashing and checkerboard fabric Cut 56 strips 1 WOF. Dark sashing and checkerboard fabric Cut 52 strips 1 WOF. Set 8 of these strips aside for inner border.
  Join 3 dark sashing strips 1 WOF to 2 light sashing strips, pressing seams toward the dark strips.
  Join 2 units 1 wide from Step 1 and 3 units 1 wide from Step 2 together to make a checkerboard square. Repeat to make 32 checkerboard blocks. Press seams toward rows 1, 3, and 5.
  Quilt assembly 1 Join blocks into rows, pressing seams toward square units.
  Turn the quilt top over.