Mary Twitchell - Restoring Hardwood Floors
Here you can read online Mary Twitchell - Restoring Hardwood Floors full text of the book (entire story) in english for free. Download pdf and epub, get meaning, cover and reviews about this ebook. year: 1995, publisher: Storey Publishing, LLC, genre: Home and family. Description of the work, (preface) as well as reviews are available. Best literature library LitArk.com created for fans of good reading and offers a wide selection of genres:
Romance novel
Science fiction
Adventure
Detective
Science
History
Home and family
Prose
Art
Politics
Computer
Non-fiction
Religion
Business
Children
Humor
Choose a favorite category and find really read worthwhile books. Enjoy immersion in the world of imagination, feel the emotions of the characters or learn something new for yourself, make an fascinating discovery.

- Book:Restoring Hardwood Floors
- Author:
- Publisher:Storey Publishing, LLC
- Genre:
- Year:1995
- Rating:3 / 5
- Favourites:Add to favourites
- Your mark:
Restoring Hardwood Floors: summary, description and annotation
We offer to read an annotation, description, summary or preface (depends on what the author of the book "Restoring Hardwood Floors" wrote himself). If you haven't found the necessary information about the book — write in the comments, we will try to find it.
Mary Twitchell: author's other books
Who wrote Restoring Hardwood Floors? Find out the surname, the name of the author of the book and a list of all author's works by series.
Restoring Hardwood Floors — read online for free the complete book (whole text) full work
Below is the text of the book, divided by pages. System saving the place of the last page read, allows you to conveniently read the book "Restoring Hardwood Floors" online for free, without having to search again every time where you left off. Put a bookmark, and you can go to the page where you finished reading at any time.
Font size:
Interval:
Bookmark:
by Mary Twitchell
For years, people took wooden floors for granted. Then, not so long ago, homeowners became infatuated with resilient flooring such as linoleum; it was cheap, impervious to spills, colorful, and easy to clean. Next, everyone wanted wall-to-wall carpeting; it was comfortable under foot, sound absorbent, easy to maintain, safe, and versatile. Now people are again choosing the natural look of hardwood floors the subtle grain of oak; the mellowness of maple; the lightness of birch or beech; the dark, somber quality of cherry.
Today it is not unusual to find prospective homeowners hunched over in the corner of a room carefully lifting an edge of the floor covering. And many times they find to their delight a hardwood floor beneath.
Sometimes floor coverings were installed to hide defects; frequently they only attest to the fact that tastes change. Wood floors still remain the most versatile covering; they are strong, durable, attractive, and traditional. Even after years of neglect, many hardwood floors can be restored to their original natural beauty although some are easier to reclaim than others.
First, remove all furniture from the room. Because the refinishing may take from three days to a couple of weeks, store the furniture out of the way.
Removing old floor coverings and refinishing floors create a lot of dirt and sawdust. Take precautions to protect your furnishings as well as the rest of the house. Dirt and sawdust particles are extremely fine and have an amazing ability to travel.
If you cannot remove the curtains, slip them onto coat hangers hung from the curtain rods and enclose them in plastic bags. Remove heat registers. Shut doors to adjoining rooms; open all windows; and tape plastic over hallways, heat register openings, and built-in shelving.
Wall-to-wall carpeting is stretched between tackless strips nailed along the perimeter of the room. The strip, made of plywood, is full of pins which stretch the carpet and hold it tight to the baseboard.
Once you have loosened a corner of the carpet, pull up the carpet along one wall. Then with a helper, walk along parallel walls to release the carpet on three sides. Continue until all carpet is free of the tackless strip.
Because carpeting is heavy and awkward to carry, fold it over in the center of the room and, with a matt knife, cut it in half through the backing fabric. This will allow you to roll up and remove the carpet in two (or more) sections.
Next, remove the felt, sponge rubber, or foam padding. If it is stapled to the floor, remove all the staples. (Any staples left protruding from the floor will rip the sandpaper off the floor sander.) Remove the staples with pliers or slip the flat side of a slotted screwdriver under the staple head and gently lift the staple free.
The tackless strip will be nailed to the floor. Carefully work a prybar under one end of the strip where it has been nailed into the floor. Once the nail loosens, work your way along the strip, gradually prying it up until it can be removed.
Remove the metal threshold strips used to secure the carpeting in doorways in the same manner.
Vacuum the floor thoroughly.
If you bend old linoleum over on itself, it will usually snap, making it easy to remove in pieces. Scrape any old adhesive off the floor with a putty knife. Very small bits of stubborn adhesive may be sanded off when the floor is sanded.
Linoleum installed before 1985 that has a white backing could contain asbestos. Dampen the remaining adhesive with water and scrape. Put the linoleum and the adhesive scrapings in plastic bags and seal. Always wear a face mask and protective eyewear when scraping or sanding.
Flooring adhesives are flammable. Using a propane torch or heat gun to loosen linoleum or its adhesive is dangerous. Chemical adhesive solvents are available but not recommended. If you choose to try them, test in an inconspicuous area first.
Vacuum the floor thoroughly.
With the wood exposed, assess the condition of the floor and the amount of work involved. Some floors may require more work than you are willing to undertake. For badly damaged floors, you may want the advice of a professional.
Large cracks between boards can be filled, but when the floor is refinished, the filler may show. In addition, large patches of filler may come loose with time. Deep and multiple grooves, deep burns, or large stains may be impossible to sand away.
If there is extensive patching, if walls have been relocated, if there is evidence of rot, or if replacement boards were added to fill in the holes left when woodstove stacks were removed, refinishing your floors may not be worth the effort. It is important to know that you will have a floor worth showcasing for your time and money.
It may be more practical to paint your floors if they are in poor condition or badly discolored. Porch and deck enamels come in all colors. Apply two or three coats to a floor free of dirt, grease and wax.
Some tongue-and-groove floors may have been sanded before, in which case there may be too little wood left above the grooves. If there is less than inch between the top surface of the floor and the groove, further sanding will so weaken the wood that it will splinter along the edges.
Refinishing floors is a dirty, noisy, unpleasant, back-breaking task. You may want to get an estimate from a professional. He/she will quote you a figure based on the number of square feet to be refinished.
To prepare the floor for refinishing, remove the shoe molding around the perimeter of the room. Run the blade of a matt knife between the shoe molding and the baseboard. This will separate the paint and make the shoe molding easier to dislodge. If you intend to reuse the molding, pry it off carefully with two prybars or a prybar and a slotted screwdriver. Slowly loosen the molding by working along the edge, applying pressure at each nail location. Once the molding is removed, countersink any exposed nails.
On the unpainted surface, number each piece of molding so that it can be renailed in the same location. With a pair of vise grips, remove the finish nails still attached to the shoe molding. Grasp the nail shank where the nail entered the floor or baseboard with the vise grips and slowly bend the nail to a 45-degree angle. This will pull the nail head through the wood and prevent the molding from splintering. (Splintering invariably occurs when the nails are hammered out rather than pulled through the wood.) The nail holes can later be filled with wood putty.
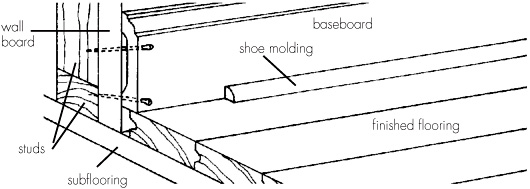
Cross-section shows flooring with baseboard and shoe molding. Baseboard is nailed into studs behind wallboard.
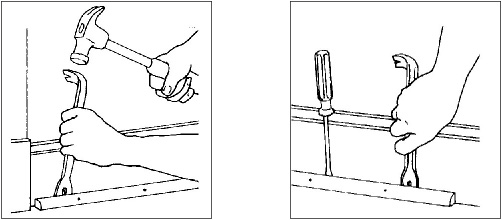
Use a prybar to remove shoe molding. A screwdriver holds the loosened piece away from the baseboard.
If there is no shoe molding, remove the baseboard. Pry it off carefully, number the boards, and remove the nails.
Next go over the entire floor with a broad spackling knife. Remove grit and debris, and staples or tacks which protrude above the flooring. With a nail set, sink any nail heads to inch below the floor surface, and fill the holes with wood putty. Nail heads, staples, and tacks will rip the sandpaper when you sand the floor. Working your way around the floor will give you ample opportunity to assess any problems.
Font size:
Interval:
Bookmark:
Similar books «Restoring Hardwood Floors»
Look at similar books to Restoring Hardwood Floors. We have selected literature similar in name and meaning in the hope of providing readers with more options to find new, interesting, not yet read works.
Discussion, reviews of the book Restoring Hardwood Floors and just readers' own opinions. Leave your comments, write what you think about the work, its meaning or the main characters. Specify what exactly you liked and what you didn't like, and why you think so.